background image

      - Away from the microwave oven. Certain microwave ovens do not have wave interference 
shield. When placed within 1 meter vicinity of the Steak Ager, they may a

ect the operation of the 

Steak Ager. 

NOTES: 

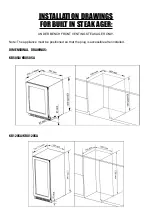
- KB50SA/KBU50SA models are built-in ONLY

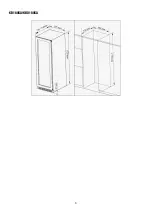
- KB120SA/KBU120SA, KB180SA/KBU180SA models are Both built-in and free-standing type as 
per the drawings thereafter.

Steak Ager should be install at suitable ambient temperature (please refer the end of User 
Manual). If the temperature is higher or lower the ambient temperature range, it will a

ect 

temperature fluctuation and can’t reach cooling performance. 

GROUNDING INSTRUCTIONS: 

The Steak Ager must be grounded in case of wire leakage. Grounding reduces the risk of 
electrical shock. The Steak Ager is equipped with a power cord having a grounding wire and 
plug. The Steak Ager plug must be plugged into a properly a

xed and grounded electrical outlet.

Note:

 In locations where there is frequent lightning, it is advisable to use surge protectors.

Improper use of the grounding plug can result in the risk of electric shock. Consult a qualified 
electrician or service person if the grounding instructions are not completely understood.

If the supply cord is damaged, it must be replaced by a qualified person in order to avoid 
electrical hazard.

INSTALLING YOUR STEAK AGER 

Unpack and remove all of the protection and adhesive strips from the packaging around and 
inside the Steak Ager.

The Steak Ager must be positioned such that the plug is accessible. Release the power cord. 
Move your Steak Ager to its final location. The Steak Ager should be installed in a suitable place 
where the compressor will not be subject to physical contact.

LEVELING YOUR STEAK AGER:  

Steak Ager must be leveled BEFORE loading your Steak Ager.

Your Steak Ager is equipped with 4 adjustable feet to facilitate easy leveling. recommends that 
you tighten the back feet to the maximum and adjust the front feet to level the Steak Ager.


5

Содержание KBU120SA

Страница 1: ...vanced products will give your meat a di erent and pleasant taste Before use please read and follow all safety rules and operating instructions 1 USER MANUAL KBU 50 180SA STEAK AGER FRIDGE The model n...

Страница 2: ...APPLIANCE IS ONLY SUITABLE FOR THE COOLING OF MEAT OR FOOD IN COMMERCIAL ENVIRONMENT OR SIMILAR All other types of use are not permitted Any misuse of the appliance may result in damage to the stored...

Страница 3: ...R600a WARNINGS For your safety observe the following recommendations This appliance contains a small quantity of R600a refrigerant which is environmentally friendly but flammable It does not damage t...

Страница 4: ...iance WARNING Do not use extension cords or ungrounded two prong adapters WARNING If the supply cord is damaged it must be replaced by the manufacturer Its service agent or similar qualified person in...

Страница 5: ...electrical outlet Note In locations where there is frequent lightning it is advisable to use surge protectors Improper use of the grounding plug can result in the risk of electric shock Consult a qua...

Страница 6: ...ght side at the back when looking from front of cabinet 7 As with most appliances of today the Steak Ager has sensitive electronic components which are susceptible to damage through lightning and elec...

Страница 7: ...RAWINGS FOR BUILT IN STEAK AGER UNDER BENCH FRONT VENTING STEAK AGER ONLY Note The appliance must be positioned so that the plug is accessible after installed DIMENSIONAL DRAWINGS KB50SA KBU50SA KB120...

Страница 8: ...KB180SA KBU180SA 8...

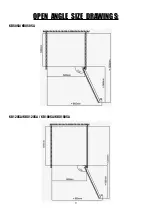
Страница 9: ...OPEN ANGLE SIZE DRAWINGS KB50SA KBU50SA KB120SA KBU120SA KB180SA KBU180SA 9...

Страница 10: ...wer is lost or turned off wait 3 to 5 minutes before restarting the unit The Steak Ager will not start if you attempt to restart before this time delay OPERATING NOISES To reach the desired temperatur...

Страница 11: ...0 5m therefore you will need 2 hangers 8 Load capacity with shelves max 20kg individual pieces or cuts will fit on our shelves 9 When maturing individual cuts on the shelves pay attention on a protect...

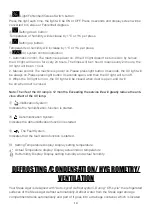
Страница 12: ...o Press again without delay the power turns on UV system control instruction 1 Automatic control The machine is power on If the UV light doesn t be turned on by human the UV light will turn on for eve...

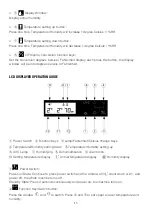
Страница 13: ...enheit LCD DISPLAYER OPERATION GUIDE Power Switch Function Keys Lamp Fahrenheit Celsius change Keys Temperature Humidity setting down Temperature Humidity setting up UVC Lamp Humidifying Dehumidificat...

Страница 14: ...n o 3 When the UV light turn on the UV light will be closed when door is open and it will be on when door is closed Note The life of the UV lamp is 12 months Exceeding the service life will greatly re...

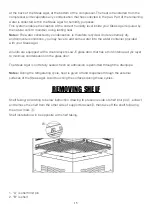
Страница 15: ...r container provided with your Steak Ager All units are equipped with a double layers Low E glass door that has a third internal acrylic layer to minimize condensation on the glass door The Steak Ager...

Страница 16: ...ll display E5 indicates a water shortage fault and the light will flash when this fault occurs The following is a schematic diagram of the addition of water 1 First press the arrow to open the water t...

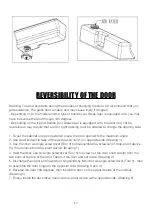
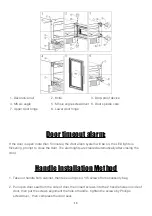
Страница 17: ...ned to the maximum angle 2 Use small knife 2 to take o the decorative nail 1 on opposite side Drawing 1 3 Use the inner six angle screwdriver Tool 5 to disassemble the screws 4 of drop proof device 3...

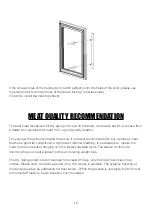
Страница 18: ...out handle from cabinet then take out 4pcs 4 35 screws from accessory bag 2 Pull open door seal from the side of door then insert screws into the 2 handle holes on side of door then put the screws ali...

Страница 19: ...e result It is always recommended to buy a piece of meat that has a good fat content and a high rate of internal marbling It is advisable to mature the meat on the bone either hanging or in the larges...

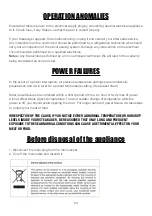
Страница 20: ...id POWER FAILURES In the event of a power interruption all previous temperature settings are automatically preservation and it will revert to a preset temperature setting See preset chart Most power f...

Страница 21: ...d too often The door is not closed completely The temperature control is not set correctly The door gasket does not seal properly The light does not work Not plugged in The circuit breaker tripped or...

Отзывы: