OPERATION & MAINTENANCE
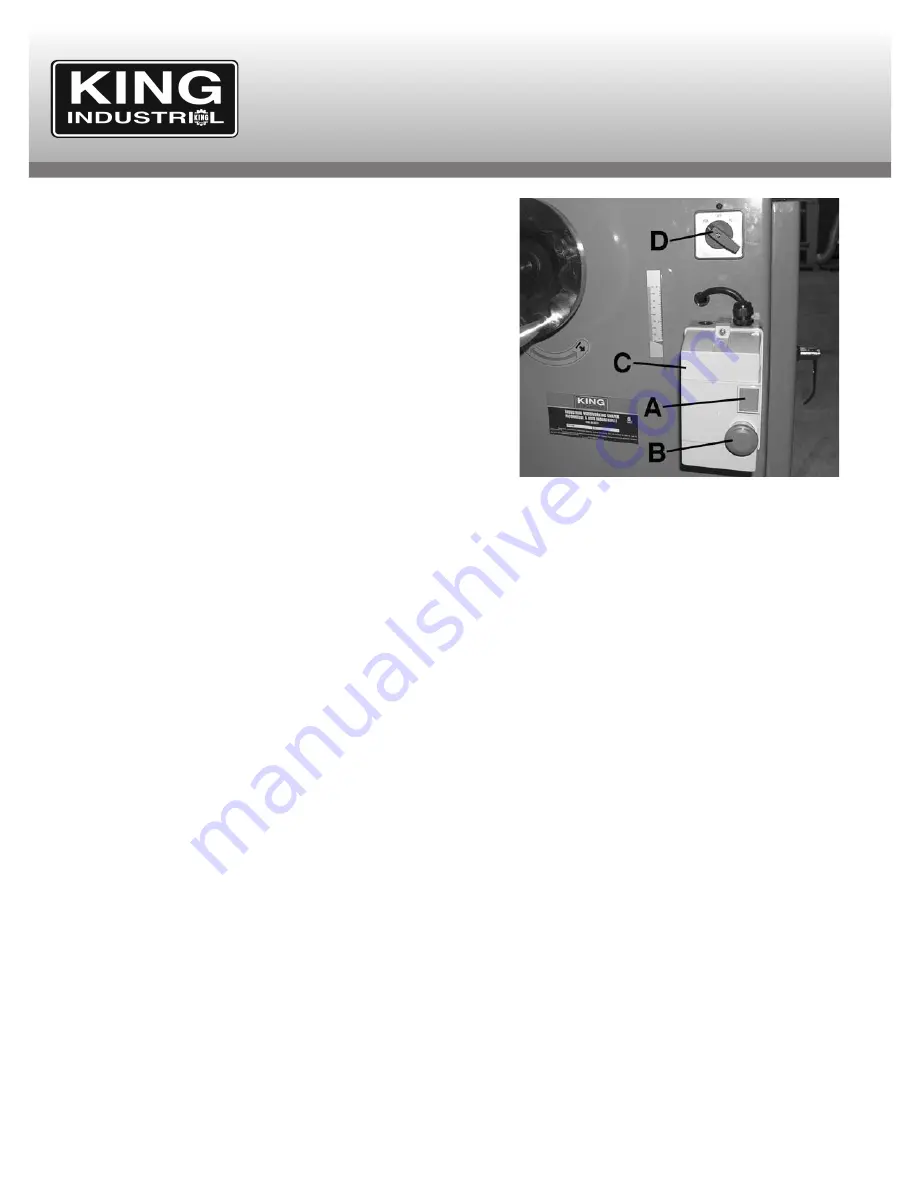
Magnetic Switch and Forward/Reverse Switch Operation
To turn the shaper on, press the ON button (A) Fig.20 on the
magnetic switch (C), to turn the shaper off, press the OFF button (B)
on the magnetic switch (C).
This shaper also comes with a forward/reverse switch (D) which
controls the direction of rotation of the spindle. The direction of
rotation cannot be changed while the magnetic switch is ON, the
forward/reverse switch must be placed in the OFF position first. Wait
for the spindle to come to a
complete stop
before switching to either
the FOR (forward-counterclockwise) or REV (reverse-clockwise)
position. Use the correct cutter orientation in relation to the rotation of
the spindle.
General Start-up/Operation
This shaper is a simple machine capable of performing very complex
work. With the number of operations this shaper is capable of, it’s
nearly impossible to address all of the techniques available. You can
obtain a lot of this information through woodworking magazines,
videos, internet and your local library.
If you have limited experience, start simple. Try several basic projects
before taking on complex pieces. When operating this shaper, keep
the following guidelines in mind:
1) The direction of feed should always be against the direction of the
cutter rotation.
2) Always use some type of safety guard, such as hold-downs, fixtures
or jigs when using this shaper.
3) Always cut the end grain first when putting an edge around the
perimeter of your workpiece.
4) Double check your installation when replacing spindles or cutters.
5) Make sure the workpiece is free of defects, such as knots, twist,
cupping, etc...
6) Always wear safety glasses.
7) Always use the correct table insert.
8) Inspect your cutters for sharpness.
9) Keep as much of your cutter below the table surface as possible.
Steps and Precautions for Shaping Straight Stock
When shaping straight stock, use the fence assembly, see adjustment
section for aligning fences. To shape straight stock;
1) Select the appropriate cutter and corresponding spindle size and
install them.
2) Check the cutter rotation.
3) Adjust the spindle height to align the workpiece with the cutter.
4) Lock the spindle into position.
5) Position the fences to your desired depth of cut.
6) Use a hold-down, or other safety device.
7) Make a sample cut on a scrap piece of wood to check your adjustments.
8) If everything is correct, run your workpiece through the shaper
using your left hand to support the workpiece against the fence and
your right hand to feed (if the rotation is counterclockwise). Switch
hands for clockwise rotation.
9) Use the miter gauge to shape the ends of your workpiece.
Maintenance
Warning! Before making any maintenance, make sure to disconnect
the power cord from the power source.
Your shaper requires very little maintenance. A thorough cleaning after
each use will greatly increase the shaper’s durability and efficiency, by
removing dust and grime that can gum up moving parts.
Sharp cutters are essential for top performance. If you find that the
machine cuts less than efficiently than usual, inspect the cutter(s),
replace or repair them as necessary.
Lubrication
Your shaper comes with factory sealed ball bearings. A sealed ball
bearing requires no lubrication during its lifetime. Should a ball
bearing fail, your shaper wil probably develop a noticeable vibration,
which will increase when the machine is put under load. If the bad ball
bearing is not replaced, it will eventually seize- possibly damaging
other parts of the machine.
V-Belt Maintenance
Warning! Avoid getting grease or oil on the V-belt or the pulleys, not
respecting this warning will considerably reduce the life of your V-belt.
The V-belt should be checked on a monthly basis for proper tension
and belt condition. Cracking and glazing could result in belt failure.
Replace the V-belt if such conditions appear.
FIGURE 20


