King Canada PERFORMANCE PLUS 8199N Скачать руководство пользователя страница 8

OPERATION & ADJUSTMENTS

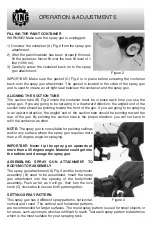
FILLING THE PAINT CONTAINER


WARNING! Make sure the spray gun is unplugged. 
 
1) Unscrew the container (A) Fig.2 from the spray gun 

attachment. 

2) After the paint/material has been properly thinned, 

fill the container. Never fill over the max fill level of 1 
liter (1000 ml). 

3) Carefully screw the container back on to the spray 

gun attachment. 

 
IMPORTANT: Make sure the gasket (C) Fig.2 is in place before screwing the container 
back onto the spray gun attachment. The gasket is located in the collar of the spray gun 
and is used to create an air-tight seal between the container and the spray gun. 
 

ALIGNING THE SUCTION TUBE


The suction tube (B) Fig.2 inside the container must be in place each time you use the 
spray gun. If you are going to be spraying in a downward direction, the angled end of the 
suction tube should be pointing toward the front of the gun. If you are going to be spraying 
in an upward direction, the angled end of the suction tube should be pointing toward the 
rear of the gun. By pointing the suction tube in the proper direction, you will not have to 
refill the container as often. 
 

NOTE:

 The spray gun is not suitable for painting ceilings 

and/or any surface where the spray gun requires more 
than a 45 degree angle for spraying. 
 

IMPORTANT: Never tip the spray gun upwards at 
more than a 45 degree angle. Material could get into 
the turbine and damage the spray gun.


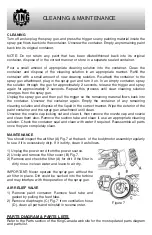
ASSEMBLING SPRAY GUN ATTACHMENT TO 
BODY/MOTOR ASSEMBLY


The spray gun attachment (A) Fig.3 and the body/motor 
assembly (B) need to be assembled. Insert the spray 
gun attachment into the opening of the body/motor        
assembly. Push as far as it will go, then turn the lock 
knob (C) clockwise to secure both parts together. 
 

SETTING SPRAY PATTERN


This spray gun has 3 different spray patterns: horizontal, 
vertical and round. The vertical and horizontal patterns 
are recommended for larger surfaces. The round spray pattern is used for small objects or 
for areas, such as corners which are difficult to reach. Test each spray pattern to determine 
which is the most suitable for your spraying task.

Figure 2

Figure 3

Содержание PERFORMANCE PLUS 8199N

Страница 1: ...INSTRUCTION MANUAL COPYRIGHT 2020 ALL RIGHTS RESERVED BY KING CANADA TOOLS INC MODEL 8199N ELECTRIC HVLP SPRAY GUN...

Страница 2: ...y or for incidental special or consequential damages arising from the use of our products To take advantage of this limited warranty return the product at your expense together with your dated proof o...

Страница 3: ...g the power tool Keep cord away from heat oil sharp edges or moving parts Damaged or entangled cords increase the risk of electric shock e When operating a power tool outdoors use an extension cord su...

Страница 4: ...Such preventive safety measures reduce the risk of starting the power tool accidentally d Store idle power tools out of the reach of children and do not allow persons unfamiliar with the power tool o...

Страница 5: ...ating switches Such spark sources can ignite the spraying vicinity environment 5 Do not spray any liquid of unknown hazard potential Unknown materials can create hazardous conditions 6 Wear additional...

Страница 6: ...not alter the plug in any way Only use rounded jacket extension cords listed by the Underwriters Laboratories UL Improper use of extension cords may cause inefficient operation of your tool which can...

Страница 7: ...d To determine the correct viscosity fill the cup to the brim with the paint Measure the amount of time it takes for the cup to empty back into the can The table below shows recommended times for diff...

Страница 8: ...suction tube should be pointing toward the rear of the gun By pointing the suction tube in the proper direction you will not have to refill the container as often NOTE The spray gun is not suitable f...

Страница 9: ...verse order FLOW RATE ADJUSTMENT This spray gun comes with an adjustable paint flow rate control dial A Fig 6 located on the rear of the trigger B To adjust Simply turn the paint flow rate control dia...

Страница 10: ...ning cleaning solution and dispose of the liquid in the correct manner Wipe the exterior of the paint container and the spray gun attachment until clean Unscrew the nozzle cap locking nut and clean it...

Отзывы: