


CLEANING & MAINTENANCE
CLEANING
Turn off and unplug the spray gun, and press the trigger so any painting material inside the
spray gun flows back into the container. Unscrew the container. Empty any remaining paint
back into its original container.
NOTE: Do not return any paint that has been diluted/thinned back into its original
container, dispose of in the correct manner or store in a separate sealed container.
Pour a small amount of appropriate cleaning solution into the container. Clean the
container and dispose of the cleaning solution in an appropriate manner. Refill the
container with a small amount of new cleaning solution. Re-attach the container to the
spray gun attachment, plug in the spray gun and turn it on. In an empty container, spray
the solution through the gun for approximately 2 seconds, release the trigger and spray
again for approximately 2 seconds. Repeat this process until clear cleaning solution
emerges from the spray gun.
Unplug the spray gun and then pull the trigger so the remaining material flows back into
the container. Unscrew the container again. Empty the container of any remaining
cleaning solution and dispose of the liquid in the correct manner. Wipe the exterior of the
paint container and the spray gun attachment until clean.
Unscrew the nozzle cap locking nut and clean it, then remove the nozzle cap and nozzle
and clean them also. Remove the suction tube and clean it, use an appropriate cleaning
solution. Check the container seal and clean with water if required. Reassemble all parts
once they are completely clean.
MAINTENANCE
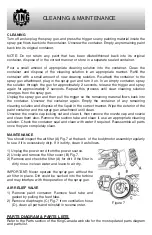
You should inspect the air filter (A) Fig.7 at the back of the body/motor assembly regularly
to see if it is excessively dirty. If it is dirty, clean it as follows.
1) Unplug the power cord from the power source.
2) Unclip and remove the filter cover (B) Fig.7.
3) Remove and check the filter (A) for dirt. If the filter is
dirty, rinse in clean water and leave to air dry.
IMPORTANT: Never operate the spray gun without the
air filter in place. Dirt could be sucked into the turbine
and may interfere with the operation of the spray gun.
AIR RELIEF VALVE
1) Remove paint container. Remove feed tube and
gasket by pulling the feed tube.
2) Remove diaphragm (C) Fig.7 from ventilation hose
(D), clean all parts and reinstall in reverse order.
Figure 7
PARTS DIAGRAM & PARTS LISTS
Refer to the Parts section of the King Canada web site for the most updated parts diagram
and parts list.