MAINTENANCE
INSPECTING/REPLACING CARbON bRUSHES
Remove and check the carbon brushes regularly
(normally after 50 hours of use). The carbon brushes
are installed inside the motor housing. Using a
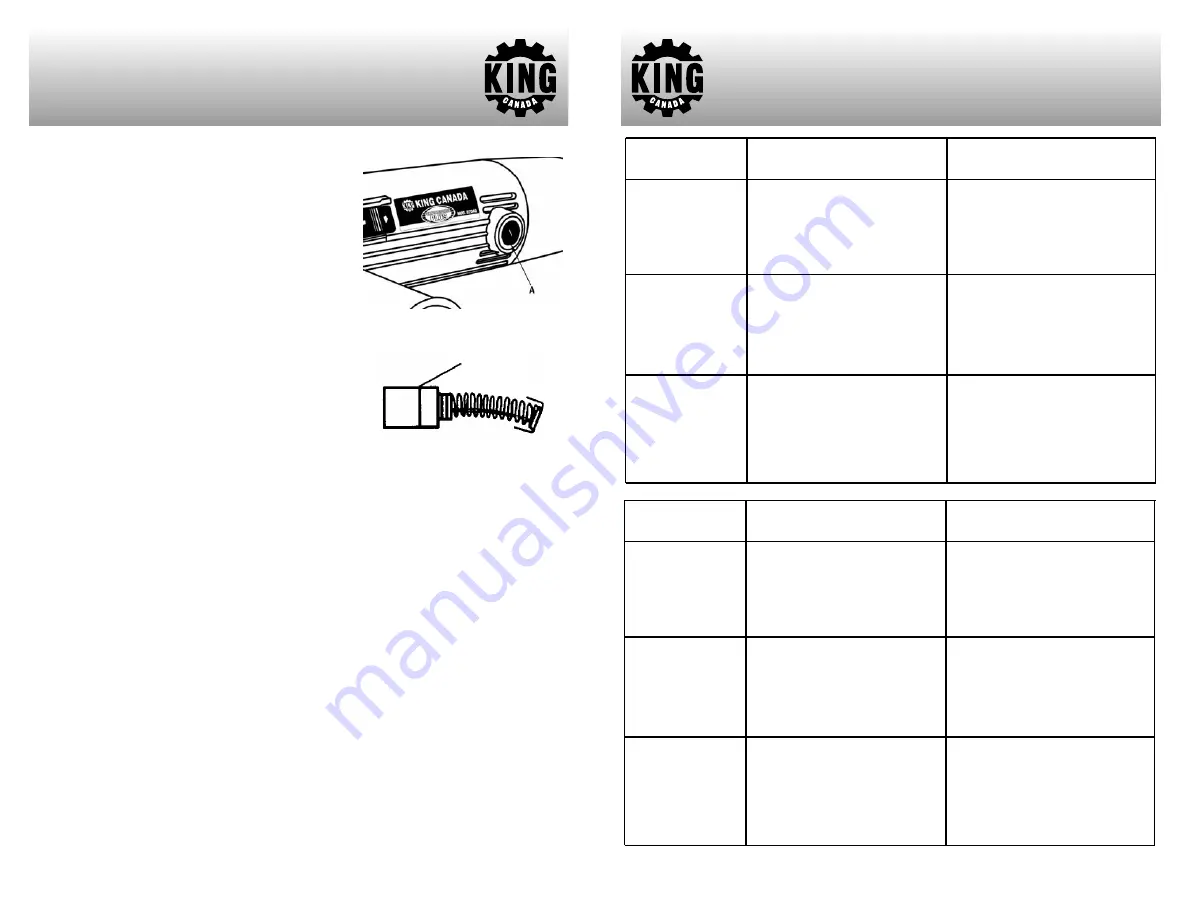
screwdriver, remove the carbon brush caps (A) Fig.7
on both sides of the motor housing.
Remove the carbon brush (A) Fig.8 from the motor
housing and inspect it. Repeat this step for the
second carbon brush. Carbon brushes need to be
replaced once they wear down to the small limit mark
as shown in Fig.8. Keep the carbon brushes clean
and free to slip in the holders.
If they have worn down to the limit mark, purchase a
set of identical replacement carbon brushes (both
carbon brushes should be replaced at the same
time). Install new carbon brushes and reinstall the
carbon brush caps.
If you are unsure about these instructions, we
recommend that you get a qualified service technician to replace the carbon brushes.
Contact a King Canada service centre.
FREqUENT INSPECTION AND MAINTENANCE
The tool should be inspected and maintained frequently. Check and make sure the power
cord, internal wires, plug and switch are in good condition. Make sure the insulation
resistance is within normal limits, contact between the brushes and the commutator are
good, and that there is no short-circuit or breakage of the armature and stator windings.
Check the grinding wheel, bearings and driving parts also.
grease the tool frequently. grease can be volatilized and therefore the grease in the gear-
box should be kept clean, replenish or renew as needed.
Do not allow brake fluid, gasoline, petroleum-based products such as penetrating oils to
come in contact with plastic parts. They contain chemicals which can damage, weaken or
destroy the motor housing, thus compromising the intergrity of the double insulation.
Inspect mounting screws regularly, making sure they are properly tightened. Tighten all
loose screws before operating.
Service should be done by a qualified service technician using identical replacement parts.
Figure 8
Figure 7
Limit mark
TROUBLESHOOTINg
Faults
Causes
Solution
1. Motor fails to
run.
2. Motor gives
out an abnormal
sound, will not
start or runs
slowly.
3. Head
enclosure gets
too hot.
1. Power supply broke off or
connections loosened.
2. Switch contact is not good.
3. Windings of armature or
stator burnt out.
4. Stator short-circuited.
1. Switch contactors burnt out.
2. Mechanical obstruction.
3. Too much pressure on tool,
motor is overloading.
4. Armature slightly short-
circuited or opencircuited.
1. Lack of grease in head
enclosure or the grease is
contaminated by dirt.
2. Mashing of the gears too
tight or entrance of foreign
matters.
1. Reconnect or change
connections.
2. Repair or replace switch.
3. Replace the windings.
4. Weld broken leadout or
rewind the winding.
1. Repair or replace the switch.
2. Inspect the mechanical parts.
3. Reduce pressure on tool.
4. Replace or repair the
armature.
1. Add or change grease.
2. Inspect gears or clean off
foreign matters.
Faults
Causes
Solution
4. Motor runs,
but is not turning.
5. Casing gets
too hot.
6. Heavy spark-
ing occurs on the
commutator.
1. gear shaft or woodruff key
is broken.
2. Nut at small bevel gear is
not tightened.
1. Working load is too heavy.
2. Winding got wet.
3. Not properly assembled.
4. Regulated voltage drop.
1. Armature short-circuited or
opencircuited.
2. Surface of commutator is
not clean.
1. Inspect if the gear shaft or
the woodruff key is broken.
2. Tighten the nut.
1. Reduce pressure on the tool.
2. Dry the motor.
3. Inspect if the armature is
blocked or touches the stator
core.
4. Regulate supply voltage.
1. Repair the armature.
2. Clean off foreign matters
and make the surface of the
commutator is clean and
smooth.


