background image

1

step 3.

Footboard  installation (2 legs & screws)

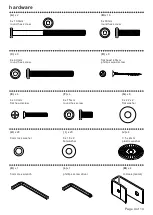
(B)

 x 4

8 x 30mm
round hex screw

(K)

 x 1

5mm Hex wrench

(A)

 x 2

8 x 100mm
round hex screw

2

Do not tighten the screws.

Tighten the leg.

About 1/2 inches

A

H

I

K

B

H

I

K

2

2

2

2

2

Page 7 of 14

( I )

 x 6

8 x 18 x 2 
flat washer

(H)

 x 6

8mm lock washer

11

11

11

11

11

11

Содержание HomePop K7068

Страница 1: ...Upholstered Bed Style Number K7068 assembly instructions Page 1 of 14 ...

Страница 2: ...or to assembly 1 Remove hardware from box and sort by size 2 Please check to see that all hardware and parts are present prior to start of assembly 3 Please follow attached instructions in the same sequence as numbered to assure fast easy assembly 1 Don t attempt to repair or modify parts that are broken or defective please contact the store immediately 2 This product is for home use only and not ...

Страница 3: ... 9 10 11 headboard footboard left side rail right side rail wood slat cleat headboard leg left wing panel right wing panel wood slat slat support with leveler footboard leg 1 1 1 1 4 2 1 1 4 4 2 Page 3 of 14 1 7 6 6 8 2 9 10 5 5 4 11 11 5 5 3 ...

Страница 4: ...ook metal I x 20 8 x 18 x 2 flat washer F x 4 8 x 15mm round hex screw H x 28 8mm lock washer E x 4 6 x 30mm flat head screw C x 8 8 x 60mm round hex screw A x 2 8 x 100mm round hex screw J x 4 3 5 x 2mm plastic washer G x 8 8 x 22 x 2 flat washer D x 8 flat head 40mm phillips wood screw Page 4 of 14 ...

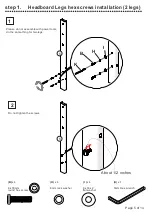
Страница 5: ...installation 2 legs 2 Please do not assemble with power tools do the same thing for two legs Do not tighten the screws About 1 2 inches 6 6 B x 4 8 x 30mm round hex screw K x 1 5mm Hex wrench B H I K I x 4 8 x 18 x 2 flat washer H x 4 8mm lock washer ...

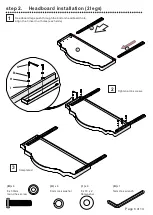
Страница 6: ...ard legs push through the bottom headboard hole align the 3 insert nut holes each side Tighten all 6 screws Completed B x 6 8 x 30mm round hex screw K x 1 5mm Hex wrench 3 1 6 6 K B H I Page 6 of 14 I x 6 8 x 18 x 2 flat washer H x 6 8mm lock washer ...

Страница 7: ...x 4 8 x 30mm round hex screw K x 1 5mm Hex wrench A x 2 8 x 100mm round hex screw 2 Do not tighten the screws Tighten the leg About 1 2 inches A H I K B H I K 2 2 2 2 2 Page 7 of 14 I x 6 8 x 18 x 2 flat washer H x 6 8mm lock washer 11 11 11 11 11 11 ...

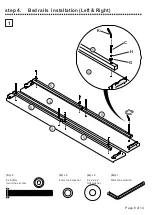
Страница 8: ...1 step 4 Bed rails installation Left Right K x 1 5mm Hex wrench 4 3 4 5 5 5 5 5 G H C K G x 8 8 x 22 x 2 flat washer C x 8 8 x 60mm round hex screw H x 8 8mm lock washer Page 8 of 14 ...

Страница 9: ...Page 9 of 14 1 step 5 Tighten all 8 screws on HB FB 3 3 3 2 2 6 6 1 1 Now you may tighten all 8 screws 4 ...

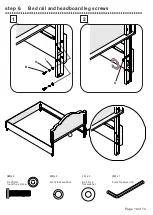
Страница 10: ...Page 10 of 14 1 step 6 Bed rail and headboard leg screws B x 4 8 x 30mm round hex screw K x 1 5mm Hex wrench 2 K B H I I x 4 8 x 18 x 2 flat washer H x 4 8mm lock washer 1 ...

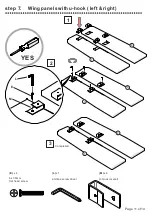
Страница 11: ...1 step 7 Wing panels with u hook left right YES Page 11 of 14 E x 4 6 x 30mm flat head screw L x 1 phillips screw driver M x 4 U Hook metal L E M 2 Completed 3 7 8 7 7 8 8 ...

Страница 12: ...step 8 Wing panels attach to headboard Page 12 of 14 F x 4 8 x 15mm round hex screw K x 1 5mm Hex wrench 8 7 1 7 1 2 Completed Do not tighten the screw all the way 3 About 3 8 inches or less K F ...

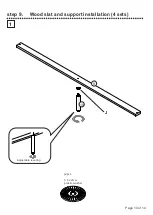
Страница 13: ...1 step 9 Wood slat and support installation 4 sets Adjustable leveling J x 4 3 5 x 2mm plastic washer 9 10 J Page 13 of 14 ...

Страница 14: ...Page 14 of 14 1 step 10 Wood slats installation 2 YES D x 8 flat head 40mm phillips wood screw L x 1 phillips screw driver L D 9 3 9 10 4 2 3 1 ...

Отзывы: