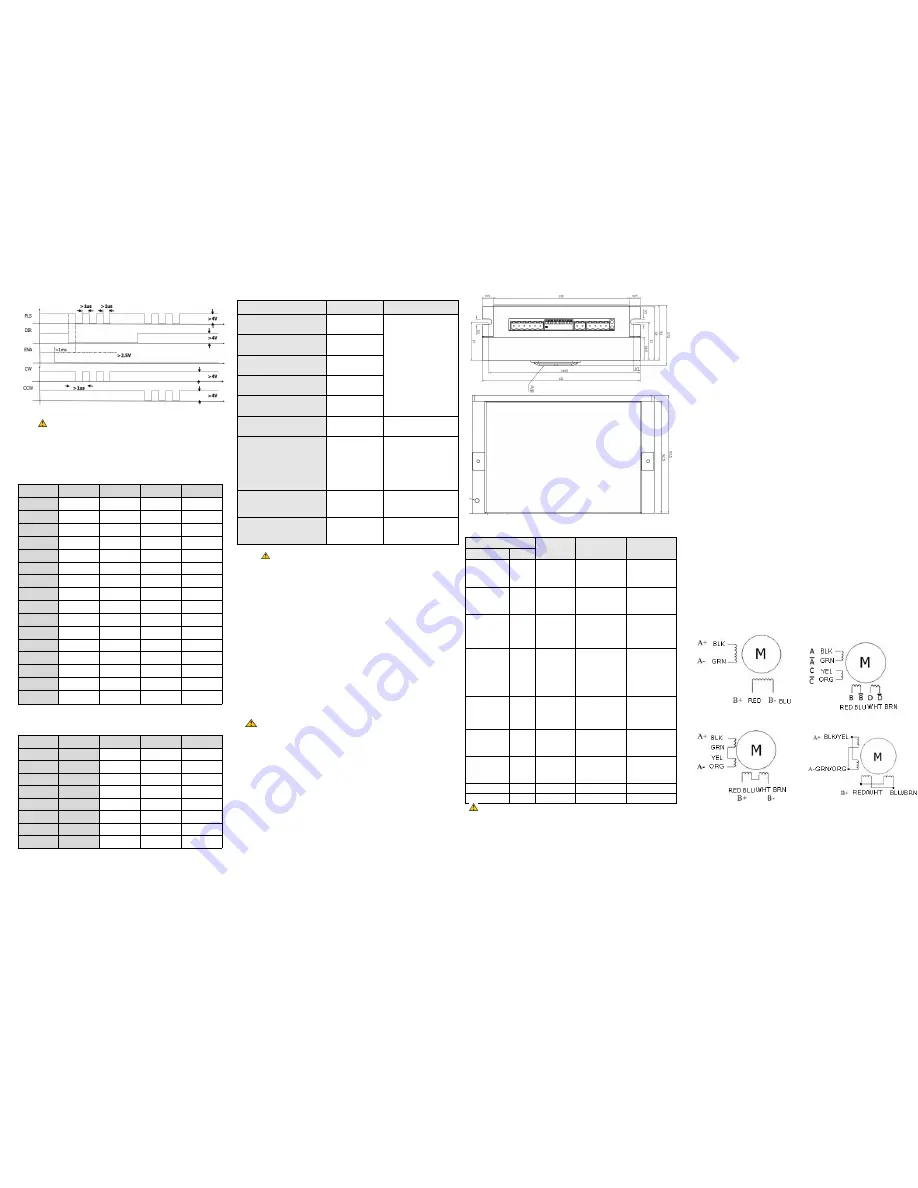
3.4 Time sequence diagram of control signal
Sheet 3-4 Time sequence diagram of control signal
Precautions on Control Signal
The direction signal is forbidden changing at pulse rising edge.
The low level of control control signal should be lower than 0.5V.
Free signal should be set 1ms earlier than pulse signal.
3.5 DIP setting
Sheet 3-5 subdivision setting
(
Unit: Pulse/rev
)
PULSE/REV
SW5
SW6
SW7
SW8
400
ON
ON
ON
ON
800
OFF
ON
ON
ON
1600
ON
OFF
ON
ON
3200
OFF
OFF
ON
ON
6400
ON
ON
OFF
ON
12800
OFF
ON
OFF
ON
25600
ON
OFF
OFF
ON
51200
OFF
OFF
OFF
ON
1000
ON
ON
ON
OFF
2000
OFF
ON
ON
OFF
4000
ON
OFF
ON
OFF
5000
OFF
OFF
ON
OFF
8000
ON
ON
OFF
OFF
10000
OFF
ON
OFF
OFF
20000
ON
OFF
OFF
OFF
40000
OFF
OFF
OFF
OFF
Sheet 3-6 Current setting (Unit: A)
REF Current
PK Current
SW1
SW2
SW3
2.00A
2.40A
ON
ON
ON
2.57A
3.08A
OFF
ON
ON
3.14A
3.77A
ON
OFF
ON
3.71A
4.45A
OFF
OFF
ON
4.28A
5.14A
ON
ON
OFF
4.86A
5.83A
OFF
ON
OFF
5.43A
6.52A
ON
OFF
OFF
6.00A
7.2A
OFF
OFF
OFF
Sheet 3-7 DIP switch setting
Function
DIP switch
setting
Description
Micro-step smooth&dynamic
filter disable
SW5,SW6,
SW10=ON,
Others=OFF
Set
DIP
switches
according to functions
required when power
off. Power on driver,
RUN LED blinks in
green, ERR LED is red.
Then it means settings
take effect. Then power
off the driver, reset
subdivision and current
for normal use.
Micro-step
smooth
filter
enable
SW5,SW7,
SW10=ON,
Others=OFF
Micro-step
dynamic
filter
enable
SW5,SW8,
SW10=ON,
Others=OFF
Test motor parameter upon
power on disable
SW6,SW7,SW8
,SW10=ON,
Others=OFF
Test motor parameter upon
power on enable
SW5,SW6,SW7
,SW10=ON,
Others=OFF
Test running
SW6,SW8,
SW10=ON,
Others=OFF
Motor
running @ 80RPM
Automatic half current
SW4=ON,
Or SW4=OFF
Set SW4=OFF to enable
automatic half current.
Phase current will
reduce to half of the set
value after motor stops
for 1.5s. SW4=ON
indicates to disable this
function.
CW/CCW
SW9=ON,
Set SW9=ON,
subdivision and current
for normal use
PLS+DIR
SW9=OFF,
Set SW9=OFF,
subdivision and current
for normal use
Precautions for DIP switch setting:
The driver is set to PUL+DIR control mode by default when
leave factory.
Micro-step smooth filter could improve vibration during motor
running, to make sure motor run more smoothly. While micro-step
dynamic improves based on micro-step smooth filter to make sure
low speed performance more stable (For example:10rpm).
Micro-step smooth & dynamic filter will slow down motor
response. The micro-step filter is recommended to be disabled for
application requiring high response speed.
Micro-step filer is
enabled by default when drivers leave factory.
Test motor parameter upon power on is enabled by default
when drivers leave factory.
Driver automatically detects motor
parameters upon power on. If users do not need this function, then
could power off the driver, set SW6/SW7/SW8/SW10=ON,
others=OFF. Then driver only detects and save motor parameters
when motor is connected for the first time. Then when users power
on driver again, driver will recall the previous saved motor
parameters instead of detecting motor parameters again.
Please set SW10=OFF for normal work.
3.5 Mechanical dimensions and installation precautions
Installation precautions:
It is recommended that the driver be mounted on a side and kept in
an upright position, so as to maintain a well ventilated installation
environment.
For better heat dissipation, two drivers shall be installed at a
clearance of at least 30mm.
With an ingress protection class of IP20, the driver shall be
installed in an industry-compliant indoor switching cabinet; failure
to do so may cause damage to the driver or personal injury.
Enhanced heat dissipation is required if the driver generates
overheat alarms frequently. A fan may be installed in a position
close to the driver for forced cooling and heat dissipation, so as
to ensure the driver works in an allowable temperature range
Unit: mm
Fig.3-5 installation dimensions of 2CM0870
4.FAQ
4.1 Driver indicators
Indicator
Definition
Reason
Solutions
RUN
ERR
OFF
OFF
Internal
power failure
There is no power
internally.
Check power
supplyconnection
OFF
Blink
quic
kly
Over-current
alarm
1. Motor phase to
phase short circuit
2. Driver internal
error
1.Check motor
connection
2. Change driver
Blink quickly
Blink
quic
kly
Over-voltage
alarm
1. Voltage of
power supply is
too high
2. Stop motor at
high speed
1.Check power
supply
2.Add braking
resistor
OFF
Blink
slowly
Over heat
alarm
Internal
temperature of
driver is higher
than 85
℃
.
Ambient
temperature is
higher than
40
℃
.Need to add
auxiliary cooling
device.
OFF
ON
Under
voltage alarm
1. Voltage of
driver is too low
2.Quickly start
1. Check power
of the power
supply
2. Reduce
acceleration
Blink quickly
ON
Motor error
Motor cable is not
connected or
connection is
wrong.
Check motor
cable and
connection
Blink
quickly/slowl
y
ON
EEPROM
error
Read EEPROM
error
Reboot driver.
Change driver if
the error occurs
again.
ON
OFF
Normal
running
Blink slowly
OFF
Test running
Note:
Blinking slowly means blinking at a frequency of 0.5Hz, and
blinking quickly means at a frequency of 5Hz.
To clear any alarm of the driver, it is necessary to disconnect the
power supply and then reboot the driver.
In the case of any alarm, it is necessary to disconnect the power
supply in time, and never touch the driver and motor when the
power supply of the driver is on.
If any indication not covered in the above table occurs, please
contact our customer service personnel.
4.2 What is the maximum allowable surface temperature for a stepper
motor?
1.
What is the maximum allowable surface temperature for a stepper
motor?
The excessively high temperature will demagnetize the magnetic
materials of a stepper motor and as a result, cause lower torque or out
of step of the motor. Therefore, the maximum allowable surface
temperature of a stepper motor depends on the demagnetization point
of different magnetic materials. In general, the demagnetization point
for magnetic materials is above 130
℃
for motor with insulation class
B, so it is normal if the surface temperature of a stepper motor
remains at 80
℃
- 90
℃
.
2.
How to calculate output power of a stepper motor?
The output power of a stepper motor varies with the rotation speed
and is generally measured by torque. The calculation formula for
output power of a stepper motor is: P=ω*M; whereω=2
π
*n/60, ω
indicates the angular speed and M indicates the output torque.
3. How to calculate input power of stepper driver?
Input power of stepper driver compose of consumption and output
power:P=P1+P2. P1 indicates power consumption, is usually several
wats. P2 could be calculated by stepper motor power output: P2=P3/A. A
indicates the efficiency. Power factor also should be taken into
consideration for the AC power supply. Usually take power factor as 0.6.
So the input power P=(P1+M*2∏*n/
(
60*77%
)
)/0.6. n is rotate
speed(rpm),M is motor torque output(N.M).
4.
What is the subdivision function of the driver intended for?
The subdivision function of a stepper motor driver is a kind of
electronic damping technology. It has three distinctive functions: A.
It enhances the control accuracy due to the subdivision of step angles.
B. Subdivision is the best method to suppress the low-frequency
oscillation of the motor.
C. It can enhance the motor torque to some extent.
5.How to connect 4-wire and 8-wire motors?
There are two methods to connect 8-wire motors. The differences are as
follows: a. parallel connection could reduce inductance, which is
adaptable for high speed application. Motor requires larger current of
driver to abtain required torque. b. series connection could increase
inductance, which is adaptable for lower speed application. Motor
requires lower current output of driver to abtain required torque.
Fig. 4-140wire motor
Fig. 4-28-wire motor
Fig. 4-3 Series connection of 8-wire motor
Fig. 4-4 Parallel connection of
8-wire motor


