


A:
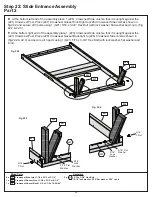
Remove previously installed (H12) Hex Bolt 1/4 x 3 (with flat washer, lock washer and t-nut) from Step 9, Nest
Joist Assembly.
B:
Place (231) Crowsnest Bottom Side Back on the outside left of the assembly so that it lines up with the bolt
hole as shown in fig.23.1. Re-install bolt loosely.
C:
Place 1 (232) Wall Board Support on the inside of (231) Crowsnest Bottom Side Back so that it’s tight to the
wall panel and flush with the bottom of (231) Crowsnest Bottom Side Back. Loosely install 2 (H10) 1/4 x 2-1/4”
Hex Bolts (with lock washer, flat washer and t-nut). (Fig. 23.1 & 23.2)
D:
Check to make sure the (231) Crowsnest Bottom Side Back is level and install 1 (S2) #8 x 1-1/2” Wood Screw
in the inside bottom hole as shown in Fig. 23.1 & 23.3. Tighten all bolts.
E:
Repeat to install (233) Crowsnest Bottom Side Front on the right side of the assembly. (Fig. 23.1 & 23.3)
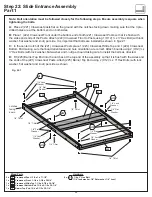
Step 23: Attach Crowsnest Sides
Fig. 23.1
Fig. 23.2
Fig. 23.3
1 x
Crowsnest Bottom Side Back 15/16 x 5-1/4 x 35”
2 x
Wall Board Support 1-1/4 x 2-3/8 x 10-1/2”
1 x
Crowsnest Bottom Side Front 15/16 x 5-1/4 x 35”
Wood Parts
231
233
Hardware
232
1/4” T-Nut
(hidden)
(hidden)
A
B
42
4 x
1/4 x 2-1/4” Hex Bolt
(1/4” lock washer, 1/4” flat washer, 1/4” t-nut)
H10
2 x
#8 x 1-1/2” Wood Screw
S2
231
231
233
232
231
233
232
1/4” T-Nut
1/4” Flat
Washer
1/4” Flat
Washer
1/4” Lock
Washer
1/4” Lock
Washer
S2
H10
H12
56
Содержание Cedar Summit COPPER RIDGE PLAYSET
Страница 111: ...NOTES ...