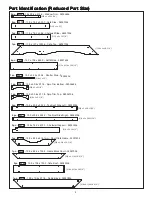
KidKraft Cedar Summit Bancroft Playhouse Скачать руководство пользователя страница 9

38031536

3pc. 

-

0315  

-


15.9 x 76.2 x 673.1 - Chalkwall Support - 

(5/8 x 3 x 26‐1/2")

8037836

1pc. 

-

0378  

-


15.9 x 108 x 971.6 - Gable Block - 3

(5/8 x 4‐1/4 x 38‐1/4")

8033236

2pc. 

-

0332  

-


15.9 x 108 x 730.3 -Cafe Roof - 3

(5/8 x 4‐1/4 x 28‐3/4")


1pc. 

-

0314  

-


15.9 x 82.6 x 616.1mm - Short Cafe Gable - 38031436

(5/8 x 3‐1/4 x 24‐1/4")

8033736

2pc. 

-

0337  

-


15.9 x 50.8 x 932.2 - Top Roof Side Right - 3

(5/8 x 2 x 36‐11/16")

8037936

1pc. 

-

0379  

-


15.9 x 82.6 x 755.6 - Gable Block Short - 3

(5/8 x 3‐1/4 x 29‐3/4")
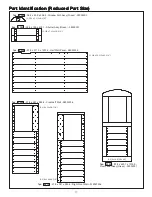
38037736

1pc. 

-

0377  

-


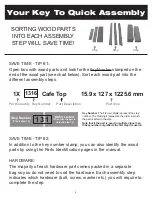
11.9 x 127 x 1225.6 - Cafe Top - 

(7/16 x 5 x 48‐1/4")

38037336

1pc. 

-

0373  

-


11.9 x 76.2 x 556 - Chalkwall Side 

-


(7/16 x 3 x 21‐7/8")

38037536

2pc. 

-

0375  

-


11.9 x 76.2 x 533.7 - Cafe Side - 

(7/16 x 3 x 21")

Part Identification (Reduced Part Size)


Part Identification (Reduced Part Size)


Part Identification (Reduced Part Size)


Part Identification (Reduced Part Size)


2pc. 

-

0336  

-


10 x 25.4 x 413.8 - Window Trim - 3

8033636

(3/8 x 1 x 16‐5/16")

38036636

1pc. 

-

0366  

-


15.9 x 50.8 x 231.8 - Spin Trim Bottom - 

(5/8 x 2 x 9‐1/8")

38036736

1pc. 

-

0367  

-


15.9 x 50.8 x 231.8 - Spin Trim Top - 

(5/8 x 2 x 9‐1/8")

8033336

1pc. 

-

0333  

-


15.9 x 22.2 x 330.2 - Shutter Stop - 3

(5/8 x 1 x 13")

8033036

2pc. 

-

0330  

-


15.9 x 50.8 x 932.2 - Top Roof Side Left - 3

(5/8 x 2 x 36‐11/16")

8037636

4pc. 

-

0376  

-


12.7 x 108 x 665.0 - Soffit Wide - 3

(1/2 x 4‐1/4 x 26‐3/16")

 9 

Содержание Cedar Summit Bancroft Playhouse

Страница 1: ...ions for Proper Maintenance pg 2 Keys to Assembly Success pg 3 About Our Wood Limited Warranty pg 4 Keys to Quick Assembly pg 6 Part ID pg 9 Step By Step Instructions pg 16 Installation of I D Warning...

Страница 2: ...lure to prohibit these items even helmets with chin straps increases the risk of serious injury and death to children from entanglement and strangulation TIP OVER HAZARD Choose a level location for th...

Страница 3: ...ed for this purpose This identifies information that requires special attention Improper assembly could lead to an unsafe or dangerous condition Where this is shown 2 or 3 people are required to safel...

Страница 4: ...all our consumer relations department for further assistance warranty service province to province This warranty excludes all consequential damages however some states do not allow the limitation or e...

Страница 5: ...the manufacturer responsible for compliance could void the user s authority to operate the equipment Please retain the information on this pack for future reference Batteries should always be installe...

Страница 6: ...1 Open box with wood parts and look for the Key Number stamped on the end of the wood part see chart below Sort each wood part into the different assembly steps SAVE TIME TIP 2 In addition to the key...

Страница 7: ...HARDWARE LENGTH CHART inches vs millimetres 6 152 5 140 5 127 4 114 4 102 3 89 3 76 2 64 2 51 1 38 1 32 1 1 8 29 1 25 4 7 8 22 3 4 19 1 2 12 7 1 4 6mm Flat Washer 1 4 6mm Lock Washer 1 4 0 25 6mm Hex...

Страница 8: ...8 85 7 60 3 2 3 8 15 9 5 8 1505mm KIDKRAFT DESIGN WOOD PROFILES LENGTH CONVERSION For example 1 inch 25 4mm BOARD LENGTH 59 59 25 inches 59 25 inches x 25 4mm Dimensions in brackets mm represent mill...

Страница 9: ...1 4 38037336 1pc 0373 11 9 x 76 2 x 556 Chalkwall Side 7 16 x 3 x 21 7 8 38037536 2pc 0375 11 9 x 76 2 x 533 7 Cafe Side 7 16 x 3 x 21 Part Identification Reduced Part Size Part Identification Reduced...

Страница 10: ...x 44 5 x 463 6 Shutter Bottom Green 3 1 1 2 x 1 3 4 x 18 1 4 8039701 1pc 0397 38 1 x 44 5 x 463 6 Shutter Top Green 3 1 1 2 x 1 3 4 x 18 1 4 8039001 1pc 0390 23 8 x 108 x 762 1 Cafe Table Top Green 3...

Страница 11: ...7 16 x 2 1 2 x 8 1 8 28 6 x 190 x 419 1 Shutter Assy Green 38039301 2pc 0393 1 1 8 x 7 1 2 x 16 1 2 38033536 1pc 0335 27 8 x 571 5 x 1073 2 Half Wall Panel 1 1 8 x 22 1 2 x 42 1 4 27 8 x 381 x 990 6...

Страница 12: ...on Reduced Part Size Part Identification Reduced Part Size Part Identification Reduced Part Size 38032536 1pc 0325 27 8 x 1016 x 1214 4 Back Wall Panel 1 1 8 x 40 x 47 13 16 38032436 1pc 0324 27 8 x 1...

Страница 13: ...tion Reduced Part Size Part Identification Reduced Part Size Part Identification Reduced Part Size 38032036 1pc 0320 33 7 x 920 5 x 1270 Back Roof Panel 1 5 16 x 36 1 4 x 50 38032136 1pc 0321 33 7 x 9...

Страница 14: ...45512 17pc S0 Truss Screw 8 x 7 8 52935505 70pc S26 Pan Screw 8 x 2 52445520 9pc TS Trim Screw 6 x 30mm 52955911 16pc S15 Wood Screw 8 x 1 3 4 52045513 8pc S3 Wood Screw 8 x 2 1 2 52045522 Hardware Id...

Страница 15: ...Deep 9320539 2x Flower Box Green 9320401 1x Spin Chalk Sign 3320715 1x Small Gable Vent White 3320547 2x Door Hinge Assembly 9201712 1x Magnetic Catch 9207713 2x Door Handle 9201711 2x Door Handle Amb...

Страница 16: ...n if you contact the Consumer Relations Department Please refer to Page 3 for proper hardware assembly Each step indicates which bolts and or screws you will need for assembly as well as any flat wash...

Страница 17: ...Attach with 2 S13 6 x 5 8 Pan Screws per handle B On the opposite side as the Door Handles attach 2 Shutter Pivots to each 0393 Shutter Assembly using provided hardware as shown in fig 2 1 0393 Door...

Страница 18: ...316 Roof Side to another flush at the peak using 2 S3 8 x 2 1 2 Wood Screws Do this twice so you have 2 Roof Support Assemblies fig 3 1 Wood Parts Hardware 4 x 8 x 2 1 2 Wood Screw S3 4 x Roof Side 1...

Страница 19: ...tightly fig 3 4 C Attach each Roof Support Assembly to the Roof Panels with 6 S26 8 x 2 Pan Screws per side fig 3 2 Wood Parts Hardware 12 x 8 x 2 Pan Screw 1 x Front Roof Panel 1 5 16 x 36 1 2 x 50...

Страница 20: ...ntre 1 Corner Bracket on each Joist and attach with 3 S13 6 x 5 8 Pan Screws per bracket as shown in fig 3 5 and 3 6 Other Parts Hardware Fig 3 5 Corner Bracket Fig 3 6 S13 Joist centred View from Und...

Страница 21: ...o the peaks are tight and the bottom of each board is flush to the bottom of each Roof Panel Notice the pilot holes are towards the Roof Panel fig 3 7 Wood Parts Hardware 16 x 8 x 1 1 2 Wood Screw S2...

Страница 22: ...0371 Front Bottom should be towards the back of the panel fig 4 1 C Flush to the back edges of the 0322 Front Left Wall and 0575 Right Front Wall attach 1 0369 Corner Trim to each Wall and to 0372 Top...

Страница 23: ...flush Notice the middle pilot holes are towards the bottom of the board Attach 0369 Corner Trim to 0374 Top Side Panel with 2 S26 8 x 2 Pan Screws fig 5 1 C Flush to the inside edges of the 0324 Shut...

Страница 24: ...5 Back Wall Panel so the inside edges are flush Attach 0369 Corner Trim to 0370 Top Back Panel with 2 S26 8 x 2 Pan Screws fig 6 1 C Flush to the inside edges of the 0325 Back Wall Panel and 0370 Top...

Страница 25: ...r Trims Attach 0335 Half Wall Panel to both 0369 Corner Trims with 3 S26 8 x 2 Pan Screws per side fig 7 1 B Maintain measurement of 47 13 16 between the inside of the Half Wall and Window Wall fig 7...

Страница 26: ...e of the assembly Remaining holes will be used in the next step Attach 0376 Soffit Wides to 0372 Top Front Panel and both 0369 Corner Trims with 4 S2 8 x 1 1 2 Wood Screws per board fig 8 1 C Repeat S...

Страница 27: ...of Sides are flush to the ends of each 0376 Soffit Wide fig 9 1 and 9 2 B Attach 0376 Soffit Wides to Roof Assembly with 3 S2 8 x 1 1 2 Wood Screws per soffit Make sure screws go into each 0316 Roof S...

Страница 28: ...Soffit Wides and attach to 0316 Roof Sides with 4 S2 8 x 1 1 2 Wood Screws fig 10 1 Wood Parts Hardware 4 x 8 x 1 1 2 Wood Screw S2 1 x Cafe Top 7 16 x 5 x 48 1 4 0377 Fig 10 1 0377 hidden 0376 Tight...

Страница 29: ...able and place 0314 Short Cafe Gable against the 0316 Roof Sides with arch facing down and tight to the Roof Panels then attach with 4 S2 8 x 1 1 2 Wood Screws fig 11 1 and 11 2 Wood Parts Hardware 8...

Страница 30: ...315 Chalkwall Supports to 0377 Cafe Top and 0335 Half Wall Panel with 2 S0 8 x 7 8 Truss Screws per board fig 11 3 and 11 4 E From the outside of the assembly attach the middle 0315 Chalkwall Support...

Страница 31: ...to 0316 Roof Sides with 4 S13 6 x 5 8 Pan Screws fig 12 1 and 12 2 Note 6 screws are shown in fig 12 2 but only 4 are used The remaining 2 will be used in the next step Tight Fig 12 2 0316 S13 Hardwar...

Страница 32: ...s fig 12 3 and 12 4 C From inside the assembly attach Small Gable Vent to 0313 Roof Gable Support with 2 S13 6 x 5 8 Pan Screws fig 12 5 Wood Parts Hardware 2 x 8 x 1 1 2 Wood Screw 2 x 6 x 5 8 Pan Sc...

Страница 33: ...Sides with 4 S2 8 x 1 1 2 Wood Screws fig 12 6 F Tight to the top of 0378 Gable Block place 0379 Gable Block Short and attach to both 0316 Roof Sides with 4 S2 8 x 1 1 2 Wood Screws fig 12 6 Wood Par...

Страница 34: ...inside the assembly attach 0374 Top Side Panel to 0345 Window Arch Assembly and 0324 Shutter Wall Panel to 0397 Shutter Top with 4 S15 8 x 1 3 4 Wood Screws fig 13 3 and 13 4 Wood Parts Hardware 1 x...

Страница 35: ...Shutter Top Make sure it is snug fig 13 6 and 13 7 E Make sure 0396 Shutter Bottom is square to 0397 Shutter Top then from inside the assembly attach 0396 Shutter Bottom to 0324 Shutter Wall Panel wit...

Страница 36: ...f the assembly fig 13 9 and 13 10 G Place 0333 Shutter Stop tight to top of 0396 Shutter Bottom and tight to the panel then attach to 0396 Shutter Bottom using 3 TS 6 x 30 mm Trim Screws fig 13 10 Woo...

Страница 37: ...shown in fig 13 11 using 2 S2 8 x 1 1 2 Wood Screws per 0318 Tie Block J Attach 2 0318 Tie Blocks flush to top of 0372 Top Front Panel 1 to 0322 Front Left Wall and 1 to 0575 Right Front Wall in the p...

Страница 38: ...oor Handle at the same spot as the one on the outside Use 2 S13 6 x 5 8 Wood Screws fig 14 1 and 14 2 D On the inside of 0329 Door Panel measure 15 up from the bottom and attach Catch Plate flush to t...

Страница 39: ...p of 0371 Front Bottom then attach remaining side of the Door Hinges on 0329 Door Panel to 0322 Front Left Wall with 3 S13 6 x 5 8 Pan Screws per hinge fig 14 3 and 14 4 6 x 6 x 5 8 Pan Screw Step 14...

Страница 40: ...the 0575 Right Front Wall and place 0319 Door Latch Block so it overhangs and the Catch Plate can connect to the Magnetic Catch Attach with 2 S15 8 x 1 3 4 Wood Screws fig 14 5 and 14 6 Step 14 Door A...

Страница 41: ...or Panel There should be 5 Playhouse Windows in total Attach with 4 S13 6 x 5 8 Pan Screws per Playhouse Window fig 15 1 and 15 2 Step 15 Attach Windows Playhouse Window x 5 Hardware Other Parts 5 x P...

Страница 42: ...0322 Front Left Wall and 0575 Right Front Wall and attach with 2 S13 6 x 5 8 Pan Screws per Flower Box fig 16 1 and 16 2 Step 16 Attach Flower Boxes Fig 16 1 0575 Flower Box Hardware Other Parts 2 x F...

Страница 43: ...r side angled edge at the top Top of board should be tight to first 0332 Cafe Roof Attach 0332 Cafe Roof to 0316 Roof Side with 3 S2 8 x 1 1 2 Wood Screws fig 17 2 and 17 3 C Measure 1 1 4 in from the...

Страница 44: ...of 0390 Cafe Table Top so it lines up with the pilot holes on 0335 Half Wall Panel Attach from the top with 1 S15 8 x 1 3 4 Wood Screws and from the inside of the assembly with 3 S15 8 x 1 3 4 Wood Sc...

Страница 45: ...0315 Chalkwall Support so the inside edges are flush The top of 0373 should be tight to the bottom of 0377 Cafe Top Attach with 3 S0 8 x 7 8 Truss Screws fig 17 8 H From the Front and Back sides of th...

Страница 46: ...ttach Roof Peak Mount to 0332 Cafe Roof with 4 S13 6 x 5 8 Pan Screws B Insert Roof Peak Spinner into Small Pivot Mount then attach Small Pivot Mount to 0317 Long Cafe Gable with 2 S13 6 x 5 8 Pan Scr...

Страница 47: ...19 2 B Place 0367 Spin Trim Top on 0377 Cafe Top between both 0315 Chalkwall Supports so the arches are flush then attach with 2 S18 6 x 1 Wood Screws fig 19 1 and 19 2 Wood Parts Hardware 4 x 6 x 1...

Страница 48: ...Chalkwall Supports and attach with 6 S13 6 x 5 8 Pan Screws fig 19 3 19 4 and 19 5 Wood Parts Hardware 6 x 6 x 5 8 Pan Screw 1 x Spin Chalk Sign 0315 Fig 19 3 Inside View x 6 Fig 19 4 Fig 19 5 Outsid...

Страница 49: ...nt Wall with 2 S13 6 x 5 8 Pan Screw as shown in fig 20 1 and 20 2 Step 20 Attach Door Bell Assembly 0575 Fig 20 1 Doorbell Fig 20 2 Fig 20 3 S10 Inside View Hardware Other Parts 2 x 8 x 1 Pan Screw 2...

Страница 50: ...8 Pan Screw S13 Step 21 Attach Playhouse Plaque A From outside the Playhouse attach Playhouse Plaque to 0316 Roof Sides with 2 S13 6 x 5 8 Pan Screws as shown in fig 21 1 and 21 2 Outside View Outside...

Страница 51: ...NOTES...

Страница 52: ...embly Excellent Very Good Average Below Average Poor How would you rate our instructions Excellent Very Good Average Below Average Poor How would you rate the quality of packaging Excellent Very Good...

Отзывы: