


24
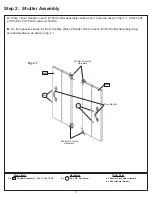
Step 6: Back Wall Assembly
A:
Place (0325) Back Wall Panel tight to (0369) Corner Trim on (0324) Shutter Wall Panel so the inside board is
flush to the inside edge of (0369) Corner Trim. Attach (0369) Corner Trim to (0325) Back Wall Panel with 5 (S26)
#8 x 2” Pan Screws. (fig. 6.1)
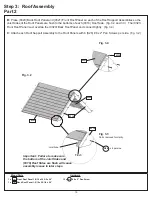
B:
Place (0370) Top Back Panel on top of (0325) Back Wall Panel so the inside edges are flush. Attach (0369)
Corner Trim to (0370) Top Back Panel with 2 (S26) #8 x 2” Pan Screws. (fig. 6.1)
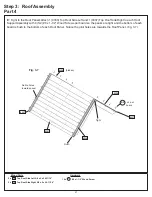
C:
Flush to the inside edges of the (0325) Back Wall Panel and (0370) Top Back Panel attach 1 (0369) Corner
Trim with 7 (S26) #8 x 2” Pan Screws. (fig 6.1)
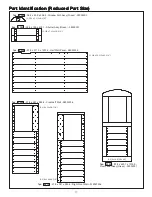
Wood Parts
Hardware
1 x
Corner Trim 1-1/8 x 1-1/8 x 44”
1 x
Top Back Panel 1-1/8 x 4 x 47-13/16”
1 x
Back Wall Panel 1-1/8 x 40 x 47-13/16”
0369
0370
x 7
Fig. 6.1
0370
14 x
#8 x 2” Pan Screw
S26
x 7
S26
0325
0369
0369
0324
Flush
0325
S26
Содержание Cedar Summit Bancroft Playhouse
Страница 51: ...NOTES...


