background image

21

ALWAYS CHECK THE OWNER’S MANUAL FOR COMPLETE OPERATING INFORMATION AND SAFETY WARNINGS. 

*IF EQUIPPED 

A/C

MAX

0

1

2

3

4

RE AR

A/C

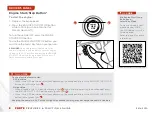
Defrost Outside Windshield:

1.  Set 

Fan Speed

 to the highest position

2.  Set desired 

Temperature

3.  Select 

Defrost

  mode 


Defog Inside Windshield:

1.  Set 

Fan Speed

 to desired position   

2.  Set desired 

Temperature

3.  Select 

Defrost

 mode 


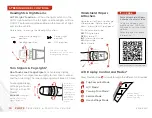
Manual Climate Control*

đŏ

đŏ

Defrost 

Mode activates A/C and opens Fresh Air Vent

đŏ

MAX A/C Mode automatically engages Recirculated Air 

đŏ

Keep inside glass as clean as possible to reduce window 
fogging 

QUICK

 TIPS

REMINDER: 

Your Manual 

Climate Control system 
may differ from those in the 
illustrations. See your Owner’s 
Manual for more details.

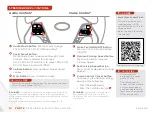
Temperature control

Rear defrost ON/OFF button

Mode selection knob

Fan speed control

Air conditioning* ON/OFF button

Recirculated/fresh air buton


Forte Climate Control 
Video 

  
To view a video on your 
mobile device, SNAP this 
QR code or visit the listed 
website.

Refer to page 2 for more 
information.

QR

 CODE

www.KuTechVideos.com/yd13/2014

Air Flow Modes 

To select Air Flow modes, press the MODE selection button :

Face-Level

Floor-Level

Floor/Defrost-Level

Defrost/Defrost-Level

Bi-Level

CENTER PANEL

Содержание FORTE

Страница 1: ...umer Roadside Assistance 1 800 333 4KIA 4542 See Back Cover for Vehicle Maintenance Schedule Always check the Owner s Manual for complete operating information and safety warnings F E A T U R E S F U N C T I O N S G U I D E ...

Страница 2: ... while the detailed illustrations ensure the instructions are easy to follow This Features Functions Guide and the specific operational and safety information it provides is not a substitute for your Owner s Manual In the interest of your safety and that of your family and to help you avoid risks that may result in death or serious injury Kia reminds you to carefully read your Owner s Manual in ord...

Страница 3: ...eats 24 6 Way Manual Adjustable Driver s Seat 25 Front Seat Headrest Adjustment 25 Power Adjustable Driver s Seat 25 Folding Rear Seat 26 OTHER KEY FEATURES Sunroof Operation 28 Map Room Dome Lamps 28 Remote Keyless Entry 29 Double Turn Lock Unlock All 29 Smart Key 29 HomeLink Auto Dimming Rearview Mirror 30 Sunvisor 31 Trunk Release Button 31 Rear Camera Display 31 Fuel Cap Malfunction Indicator ...

Страница 4: ...iate barcode or QR Code Reader App The app reads the barcode image and then launches uploads the specific information the code contains such as URLs text photos videos and so much more 1 1 If you re having trouble scanning codes check the following đŏ The code should be centered and focused in your mobile device s camera screen đŏ Consider moving your device closer to or farther away from the code ...

Страница 5: ... B Speedometer C Turn Signal Indicators D LCD Display Odometer Tripmeter E Gear Shift Position Indicator F Fuel Gauge G Engine Temperature Gauge A B C C D E F Instrument Cluster Overview đŏ ŏ 10 ŏ ŏ0 ŏ 0 0ŏ ĵ đŏ ŏ ŏ ŏ0 ŏ 0 0ŏ ŏ đŏ 0ŏ0 ŏė Ęŏ ŏė Ęŏ0 ŏ 0 0ŏ ĵŏŏ đŏ ŏ 0 0ŏ 100 ŏ3 0 ŏ 0ŏ 5ĵ đŏ ŏ 0 0ŏ 100 ŏ ŏ đŏ ŏ ŏ đŏ 1 ŏ ŏ đŏ 1 ŏ ĵŏ đŏ 3ŏ ŏ 1 ĵŏ đŏ 1 ŏ ŏė ŏ Ęĵŏ đŏ 5ŏ 0ŏ ŏ2 ŏ đŏ 5ŏ 0ŏ 0 0 ŏ đŏ 3ŏ 5ŏ 00 ...

Страница 6: ...Fluid Warning Electronic Stability Control Warning Indicator High Beam Indicator Safety Belt Warning Electronic Stability Control OFF Indicator Engine Coolant Temperature Warning Indicator Engine Oil Pressure Warning Low Tire Pressure Indicator TPMS Malfunction Indicator Cruise Control ON OFF Door Ajar Indicator Low Washer Fluid Level Warning Indicator Cruise Control Set Charging System Warning Lo...

Страница 7: ...ew a video on your mobile device SNAP this QR Code or visit the listed website Refer to page 2 for more information QR CODE www KuTechVideos com yd13 2014 Trip Computer Tripmeter REMINDER Appearance of Tripmeter display may differ as equipped REMINDER All stored driving information except Odometer and Distance to Empty is reset if the battery is disconnected The Trip Computer is a driver informati...

Страница 8: ...ep tires inflated to the recommended pressure đŏ Be sure the wheels are properly aligned QUICK TIPS đŏ đŏ Even with TPMS tire pressure should be checked manually at least once a month Only adjust tire pressure on cold tires đŏ To help ensure proper maintenance and optimal fuel economy maintain recommended tire inflation pressures and stay within the load limits and weight distribution recommended fo...

Страница 9: ...Advanced Mood Lighting Speaker REMINDER The Instrument Panel Dimmer does not adjust brightness on the Navigation System screen Use Navigation setup to adjust brightness on the Navigation System C A Hill start Assist Control HAC HAC helps prevent the vehicle from rolling backwards when accelerating from a stop while on a steep incline The HAC automatically activates whether the ESC is OFF or ON but...

Страница 10: ...art Stop Button To start the engine 1 Depress the brake pedal 2 Press the ENGINE START STOP button while in Park or while in Neutral for Manual Gear Shift To turn the vehicle OFF press the ENGINE START STOP button To use the ENGINE START STOP button you must have the Smart Key fob on your person REMINDER In an emergency situation while the vehicle is in motion you are able to turn the engine off a...

Страница 11: ...he gear shift is moved into or out of P PARK all doors will Lock Unlock Electric Folding Mirrors Toggle D left or right to select mirror Then press one of the points to adjust mirror position Toggle button E left right to unfold fold the outside rearview mirrors Toggle to center of button E to fold unfold mirrors automatically when đŏ The key fob or Smart Key Lock Unlock buttons are pressed đŏ The...

Страница 12: ...pe Turn Signals Fog Lights Move lever Up Down for Right Left Turn Signal Slightly move lever up down to activate One Touch Lane Change Signal Push lever to turn High Beams ON Pull lever to flash Headlights High Beams Rotate lever to change the Headlight function AUTO Automatic Headlights position Parking light position Headlight position OFF OFF position AUTO One Touch Lane Change Signal is activat...

Страница 13: ...display the steering mode on the LCD display đŏ Then press the button A again within 4 seconds to switch modes Steering Mode Steering Mode Steering Mode NORMAL SPORT COMFORT CRUISE SET RES CANCEL MUTE MODE VOL VOL A REMINDER Your vehicle s steering wheel buttons may differ from those in the illustrations See your Owner s Manual for more details FlexSteer Steering Wheel Mode Video To view a video o...

Страница 14: ...h Wireless Technology phone pairing and operation instructions D Receive Place Call button Press to receive place transfer calls Press to place a call using voice command prompts from the system or to answer an incoming call E End Call button Press to end a call or cancel a function A Volume button Press up down to raise lower speaker volume B Mute button Press to mute the microphone during a call...

Страница 15: ...ial pairing This allows you to make calls without waiting for your phone contact list to download QUICK TIPS Bluetooth Wireless Technology Pairing a Phone For instructions on how to pair a phone refer to the audio system s user s guide How to Place a Call When using the voice command feature wait for the system BEEP before speaking the command There are two options for placing a call Standard Audi...

Страница 16: ... Cruise Control ON OFF button Press to turn the Cruise Control ON OFF F Resume Cruising Speed button Press to resume or increase Cruising Speed G Set Cruising Speed button Press to set or decrease Cruising Speed H Cruise Control Cancel button To cancel Cruise Control setting do one of the following đŏ Press the brake pedal đŏ Press the CANCEL button H A Audio Mode button Press to cycle through FM ...

Страница 17: ... SiriusXM station CD USB iPod Aux My Music BT Audio category folder Rotate to change Radio SiriusXM station or CD USB iPod Aux My Music BT Audio song file Press to play CD USB iPod Aux My Music BT Audio song file Press Preset buttons 1 6 to select Radio SiriusXM stations Press and hold to save Radio SiriusXM stations Audio System Setup Options Press the SETUP button then use the TUNE knob to cycle...

Страница 18: ...OFF Rotate to adjust Volume Press to select CD USB iPod Aux My Music BT Audio song file Press to change modes CD USB iPod Aux My Music BT Audio Press to scan and play CD USB iPod Aux My Music BT Audio song file for 10 seconds Press again to continue playing current song file Press to enter Setup mode for Display Sound Phone and System settings Press to select CD USB iPod Aux My Music BT Audio cate...

Страница 19: ... select previous next Radio SiriusXM station or CD USB iPod Aux BT Audio Jukebox Zune song file Press to select SiriusXM category Rotate to change Radio SiriusXM station or CD USB iPod Jukebox file Press to play CD USB iPod Jukebox Zune song file Press to change modes CD USB iPod Aux BT Audio Jukebox Zune Press to select Setup mode đŏ đŏ When using the voice command feature wait for the system BEE...

Страница 20: ...ay ON OFF SD Card Memory for Navigation Map only Press to eject CD Insert CD Prolonged use of the Navigation System in ACC mode may drain the vehicle s battery A warning screen may appear periodically to remind users that the Navigation System should be operated with the engine running to prevent battery discharge QUICK TIPS When using the voice command feature wait for the system BEEP before spea...

Страница 21: ...V MAX 180W 12V MAX 180W Aux USB iPod Port Power Outlets Digital Clock đŏ đŏ Press and hold both buttons for more than 5 seconds to switch from 12 to 24 hour formats đŏ Press and hold both buttons for 1 3 seconds to switch temperature modes Fahrenheit Celsius QUICK TIPS Press the DONE button on the navigation screen to ensure changes are saved QUICK TIPS The power outlets are inactive when ignition...

Страница 22: ...dshield defroster button Mode Selection button Recirculated air button Fan speed climate control button Air conditioning ON OFF button Face Level Floor Level Floor Defrost Level Bi Level Climate Control Auto Function 1 Press AUTO to select Full Auto Operation 2 Press MODE button to control which vents air flows through REMINDER Your Automatic Climate Control system may differ from those in the illu...

Страница 23: ...eep inside glass as clean as possible to reduce window fogging QUICK TIPS REMINDER Your Manual Climate Control system may differ from those in the illustrations See your Owner s Manual for more details Temperature control Rear defrost ON OFF button Mode selection knob Fan speed control Air conditioning ON OFF button Recirculated fresh air buton Forte Climate Control Video To view a video on your m...

Страница 24: ...ever up to Upshift or down to Downshift Paddle Shifters are available when the shift lever is in the D position or in Sport Mode Paddle Shifting Pull the or paddle shifter once to shift up or down one gear đŏ Press brake pedal and depress release button to move gearshift from N to P N to R or from P to any gear đŏ Sport Mode downshifts are made automatically when the vehicle slows down When the ve...

Страница 25: ...the Shift Lever can be moved without pulling the Shift Lever Knob QUICK TIPS Manual Gear Shift Starting the Engine 1 Apply Parking Brake A 2 Depress Clutch fully B 3 Shift into Neutral C 4 Turn Ignition to START E Shifting into Reverse 1 Depress Clutch fully B 2 Shift into Neutral C 3 Press Shift Lever button D up 4 Shift into Reverse E R 1 3 5 2 4 6 B A CENTER PANEL ...

Страница 26: ...ns off or on automatically depending on the seat temperature đŏ System does NOT turn off when ignition is cycled To turn off press the seat warmer switch QUICK TIPS Driver Position Memory System Warming Top Yellow color Ventilated Bottom Blue color SET 1 2 A B To store a seating position into memory first place the gear shifter into P Park while the ignition switch is ON Then 1 Adjust the driver s ...

Страница 27: ...ll press lever B to adjust Seat Height Pull lever C to adjust Seatback Recline Power Adjustable Driver s Seat Move Press controls to adjust Seat forward backward Seat Cushion Seatback and Lumbar Seat forward backward Seat Cushion A A Seatback Lumbar B C B B A A C C Front Seat Headrest Adjustment To raise Headrest Pull Headrest up To lower Headrest Press lock then press the Headrest down PRESS ...

Страница 28: ...Rear Seatbelt is secured into the guide 2 Pull Seatback Lock Release Lever A to release Rear Seatback Lever located in trunk 3 Fold Seatback B down PULL A A B đŏ It may be necessary to adjust the front Seatbacks by sliding forward to fully lower rear Seatbacks đŏ Lower Rear Headrests to the lowest position QUICK TIPS PULL ...

Страница 29: ...ar Seat 5 Door Model 1 Lower the headrest A to the farthest position 2 Pull the Lock Release Lever B located on Seatback shoulder 3 Fold the Seatback C forward A B đŏ It may be necessary to adjust the front Seatbacks by sliding forward to fully lower rear Seatbacks đŏ Lower Rear Headrests to the lowest position QUICK TIPS ...

Страница 30: ...urns ON when doors are unlocked with a key fob or Smart Key đŏ The lamp stays ON continuously when the ignition is in the ON position and a door is open đŏ The lamp stays ON for about 20 minutes when the ignition is in the ACC or LOCK OFF position and a door is open Map Room Dome Lamps To stop the Sunroof Sunshade at any position push or pull the Sunroof control lever in any direction QUICK TIPS Q...

Страница 31: ...d more than 1 second for Panic Alarm To turn off Alarm press any button Kia Engine Start Stop Button Smart Key Video To view a video on your mobile device SNAP this QR Code or visit the listed website Refer to page 2 for more information Smart Key Fob A Press to lock All Doors B Press to unlock Driver s Door Press twice in 4 seconds to unlock All Doors C Press and hold to unlock Trunk Hatch and ma...

Страница 32: ...garage door s motor head unit Press and release the button and complete Step 4 within 30 seconds 4 Firmly press and release the programmed HomeLink button up to three times Press and hold the left A and center D buttons simultaneously for approximately 20 seconds and then release both buttons within 30 seconds Operating HomeLink Press one of the programmed HomeLink buttons REMINDER Mirror indicato...

Страница 33: ...Video To view a video on your mobile device SNAP this QR Code or visit the listed website Refer to page 2 for more information QR CODE www KuTechVideos com yd13 2014 C L I C K REMINDER The Rear Camera Display is not a substitute for proper and safe backing up procedures Always drive safely and use caution when backing up The Rear Camera Display may not detect every object behind the vehicle REMIND...

Страница 34: ... com yd13 2014 REMINDER Child Safety Lock is located on rear passenger s door jamb Seatbelts To properly fasten your safety belts 1 Insert the tongue belt plate A into the buckle B until it clicks 2 Position the lap portion of the belt across your lap as LOW ON THE HIPS as possible C Adjust the belt to a SNUG FIT by pulling up on the shoulder portion D Seatbelt Retractor Inertia Locks Inertia lock...

Страница 35: ...ly when it is safe to do so At launch the Apple iPhone will be the only UVO eServices compatible device iPhone is a registered trademark of Apple Inc Apple iOS 6 compatibility expected early 2013 Additional compatible devices expected late 2013 iPod is a registered trademark of Apple Inc iPod mobile digital device sold separately The Bluetooth word mark and logos are registered trademarks owned by...

Страница 36: ...f additive is recommended Additives are available from your authorized Kia dealer along with information on how to use them Do not mix other additives 3 Inspect Water Pump when replacing the drive belt or timing belt 4 Fuel filter fuel tank air filter are considered to be maintenance free but periodic inspection is recommended for this maintenance schedule depends on fuel quality If there are some i...

Страница 37: ...Speed Pull to spray and wipe MIST Single wipe INT Intermittent wipe LO Slow wipe HI Fast wipe OFF Wiper off Confirm Good Battery with Kia GR8 1299 battery tester Verify all tire pressures are to spec see driver s door label LF_______ LR_______ RF_______ RR_______ Verify proper operation of Remote Keyless Entry and Smart Key lock unlock Ensure floor mats are snapped into place if applicable Verify ...

Страница 38: ... E R Y C H E C K L I S T continued Sales Consultant ____________________________________________________________Date ____________________ Sales Manager _______________________________________________________________Date ____________________ Customer ____________________________________________________________________Date ____________________ Cruise Control page 14 Demonstrate operation Aux USB iPo...

Отзывы: