Installation & Operating Instructions
Laptop Garage
®
February 2015
Assemble units as described herein only. To do otherwise
may result in instability. All screws, nuts and bolts must be
tightened securely and must be checked periodically after
assembly. Failure to assemble properly, or to secure parts
may result in assembly failure and personal injury.
WorkZone desks for required
specific assembly of these desk
systems, and complete all desk
assembly prior to completing
these set-up instructions.
Remote Lock Option Installation
Note:
If your Laptop Garage unit
does not have the remote lock
option, skip now to the “Release
Lever Operation” section, page 3.
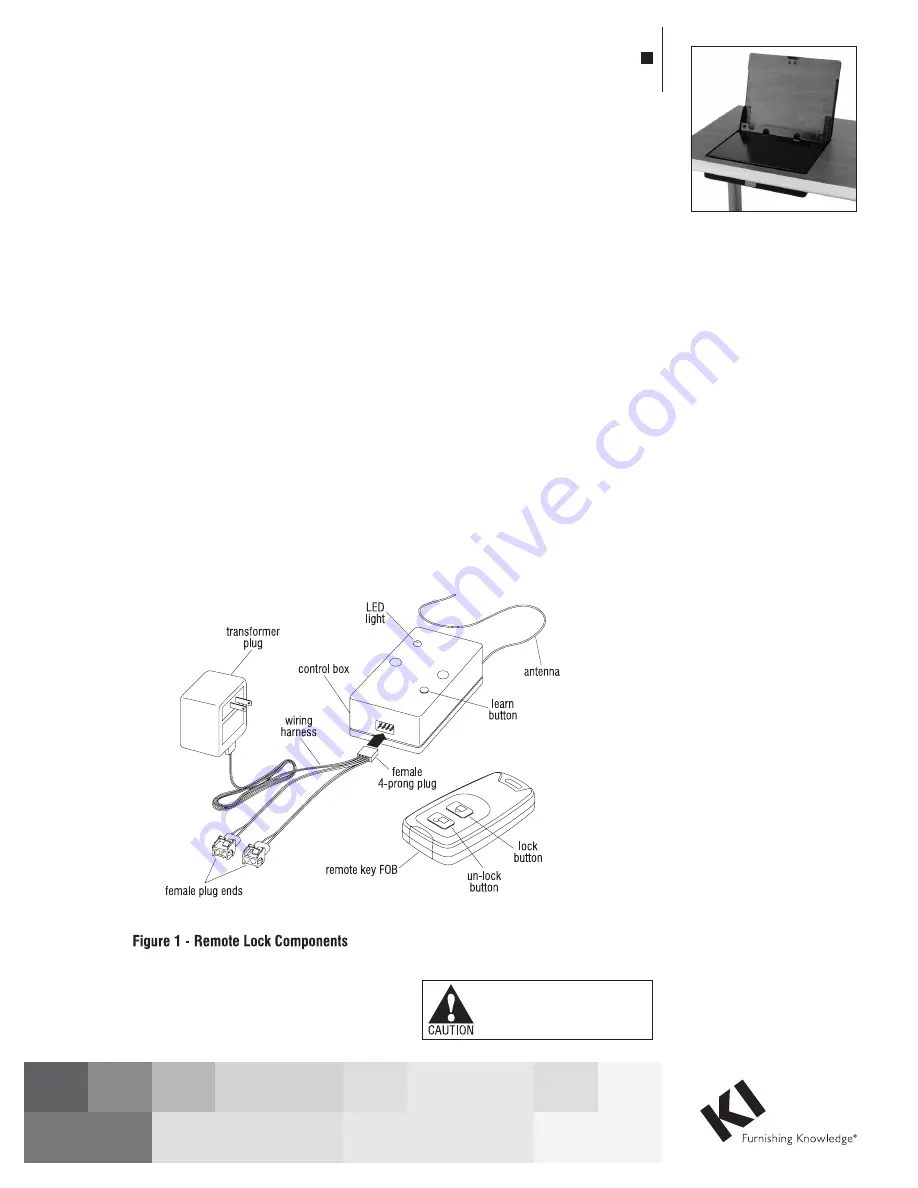
1. Locate the remote lock
components (see Figure 1).
Carefully plug the white female
4-prong plug of the white wire
harness onto the four male
prongs on the side of the control
box (Figure 1).
2. Place the control box with
attached wiring harness/
transformer plug into the
wireway or modesty panel of
desk. Route the transformer plug
toward a power source, but do
NOT connect it to power until
instructed (Figure 1).
3. The installed Laptop Garage unit
has a remote lock wire which runs
from the solenoid lock at the front
(Figure 2), goes under the shelf
of the unit, and out the back of the
Laptop Garage unit. Locate that
remote lock wire and plug it into
one of the two female plug-ends
of the control box wiring harness.
If the desk has a second Laptop
Garage unit, attach its remote lock
wire into the second female plug
end of the control box at this time
(Figures 1 & 2).
Caution:
Make sure that any
excess remote lock wire, from the
solenoid lock is routed outside of
the Laptop Garage housing so it
does not become tangled in the
moving mechanism.
Remote Lock Programming and
Operation
Note:
The remote lock control
box requires programming and
can be re-programmed if lock is
experiencing problems.
1. Connect the control box
transformer plug to a power
source and begin programming
by pressing the “learn button”
until the LED light turn from red
to green (Figure 1).
2. After the LED light turns green,
press the “lock button” on the
remote key FOB and then press
the “un-lock button” (Figure 1).
Press buttons again to verify that
the key FOB correctly controls the
solenoid mechanism to lock or
un-lock the Laptop Garage unit.
Note:
The following instructions
cover the optional remote lock
components, general
programming & operation, as
well as proper installation of a
laptop computer into the Laptop
Garage unit. The Laptop Garage
unit comes factory-installed
into worksurfaces; please refer
to instructions for InTandem or


