KHIND VC9E31 Скачать руководство пользователя страница 5

Specifications

Model

Power

Adaptor Input Voltage

Adaptor Output Voltage

Battery type 

Battery Voltage

Filtration Type 

Dust Container Capacity

Water Container Capacity

Suction Power

Operating Time

Charging Time

Charging Option

Anti-collision Sensor

Anti-falling Sensor

Gyroscope

Noise Level

Net Weight

Product Dimension (Diameter x Height)mm

Wi-Fi specification 

Model

Feature :

Frequency Band :

Channel Bandwidth :

Half/Full Duplex :

Radio Technology :

Modem Compatibility

VC9E31

IEEE 802.11 b / g / n

2412MHz – 2472MHz

20 MHz

Half

CKK DSSS / OFDM / OFDM

2.4G (5G is not supported)

VC9E31

28W

AC100-240V~ 50/60Hz


Lithium Ion Battery Pack

14.4V 2500mAH

HEPA filter

600ml 

350ml

2000Pa

90-120min

4-5hours

i) Auto charging
ii) Manual charging

11 sensors

3 sensors

Yes

<65db

2.7kg

330x76mm

19V

0.6A

Remove the

protective strip

Remove

protective flim

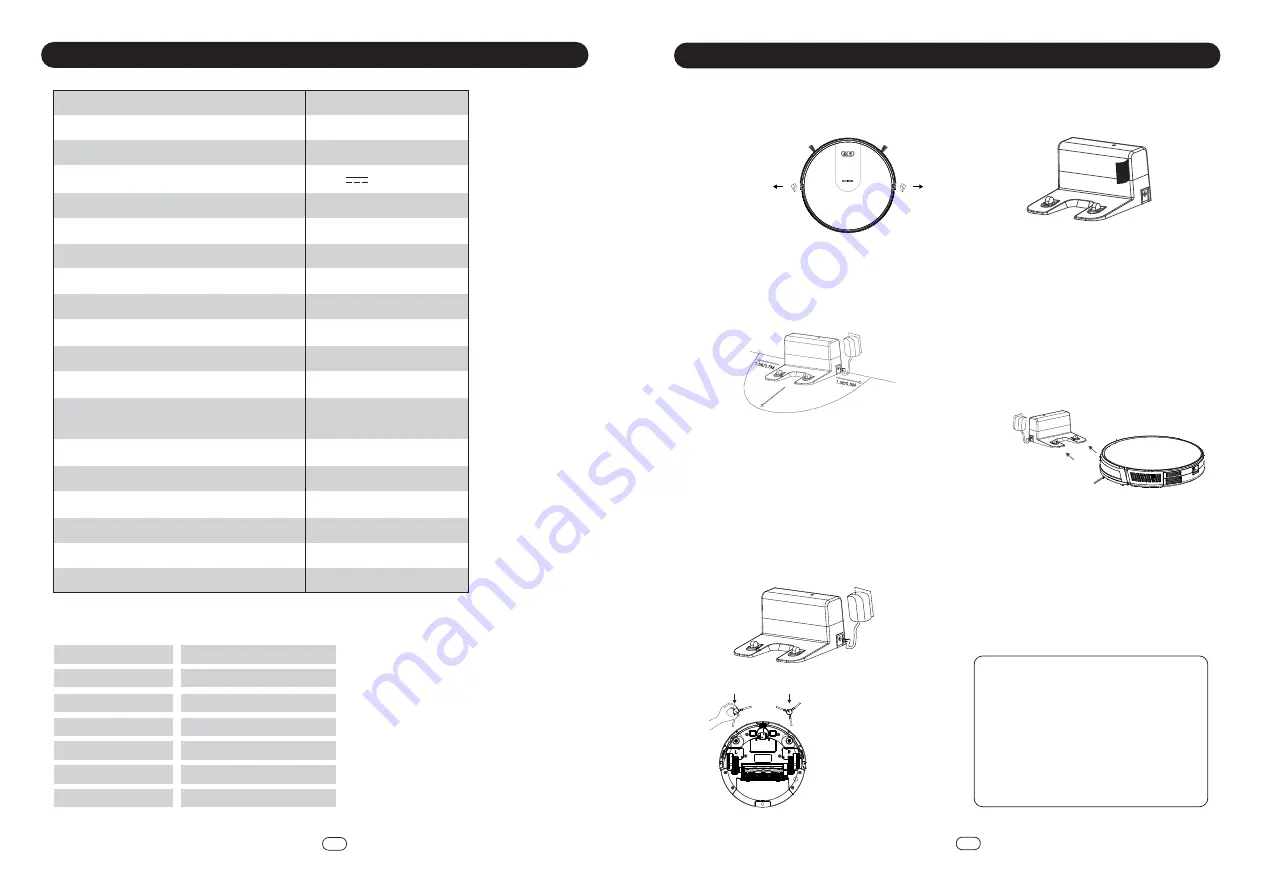
Product Use / Host Charging

1.  Place the Charging Dock on a hard, level  


surface and against a wall. Remove objects  


within 1.5 ft/0.5 m on both sides and within 


3 ft/1 m in front of the Charging Dock.

2.  Plug the adapter into a wall outlet and plug  


the DC jack into the DC socket of the Charging  


Dock. When the Charging Dock connects to  


AC power, the LED indicator on the Charging  


Dock is flashing green.


•  Install the Charging Base in a location that  


  Robot can easily access.


•  Always keep the Charging Base plugged  


  in, otherwise the Robot will not


  automatically return to it.

3.  Install the side brushes before use.

Warning:

There is a marking on 

the brush which shows 

“L” for left brush and “R” 

for right brush

4.  Charging your robot


•  Place the robot on the Charging Dock for  


battery charging (When charging, indication  


  light is flashing. Light will stay light up  


  when charging is finished. Normal    


  charging time is about 4-5 hours)


•  Robot returns to the Charging Dock at the  


  end of a cleaning cycle or when its battery  


  is running low

ATTENTION :

1.   Charge the appliance for at least 4-5  


hours before the first use.

2.   If the battery is fully charged and  


not used for a long period of time,  


its capacity may decrease and need  


to re-charged. Power switch OFF to  


prevent rapid battery drain.


•  Do not expose Charging Dock to direct  


  sunlight or any strong reflection on light  

   source.
 

•  Recommend to fully charge the robot to  


  ensure operating time.


•  Avoid to have Water Tank inserted in robot  


  when charging


•  Avoid to have wet mopping cloth in which  


  may damage wooden floor.

7

EN

8

EN

How To Use

Product Usage (Preparation)
Before using the Robot, remove the protective strip on the Robot and Charging Dock
Remove Protection

Содержание VC9E31

Страница 1: ...ease read this manual carefully before operating this product Keep this manual handy for further reference 请在使用此产品前 详读此说明书 并将之收藏以作日后参考 Sila baca buku panduan ini dengan teliti sebelum menggunakan produk ini Simpanlah untuk rujukan masa depan Important 重要 Mustahak This manual is also available online www khind com my ...

Страница 2: ... sucked up Any large or broken objects such as glass Anything that is burning or smoking such as cigarettes matches or hot ashes Liquid spills Reactive liquids solvents corrosives detergents Flammable or explosive substances such as alcohol thinners etc Pet litter or anything with pet waste attached SAFETY CONCERN WITH LI ION BATTERIES 1 Before charging please check whether the adaptor and dock st...

Страница 3: ...ase ensure the high efficiency filter screen and the primary filter screen are dry before installing Do not expose the high efficiency filter screen and the primary filter screen to the sun 8 Put the filters and pre filter back into the dust container 4 Clean the dust container and filters with a cleaning brush or soft brush 5 Use water to rinse the primary filter screen 6 The dust container can b...

Страница 4: ... Recharge or Home button 2 Omnidirectional Lens 3 Power button 4 Top Cover 5 Dust Box Water Tank button B Robot Back View 6 Drop Sensor 7 L Side R Side Brush 8 Drive Wheel 9 Dust box 10 Magnetic Sensor 11 Charging Contact Pins 12 Omnidirectional Wheel 13 Battery Compartment 14 Rolling Brush 15 Brush Guard C Dust Box 16 High Efficiency Strainer 17 Primary Filter Strainer 18 Dust Box Metal Sheet 19 ...

Страница 5: ...to AC power the LED indicator on the Charging Dock is flashing green Install the Charging Base in a location that Robot can easily access Always keep the Charging Base plugged in otherwise the Robot will not automatically return to it 3 Install the side brushes before use Warning There is a marking on the brush which shows L for left brush and R for right brush 4 Charging your robot Place the robo...

Страница 6: ...dly until the icon of Edge Cleaning Mode is displayed on the screen 4 Single Room Cleaning Select this mode only when one specific room needs to be cleaned Make sure to confine Robot to the room by closing the door Robot will also clean the edges before finish cleaning Press on the Remote Control repeatedly until the icon of Single Room Cleaning Mode is displayed on the screen 5 Manual Cleaning Yo...

Страница 7: ...after mopping is completed Please empty the water tank after each use Take out the mopping cloth and place it on top of the water tank Press the mopping cloth gently to ensure it stick firmly with water tank Replace the dust box of the robot with water tank Mopping is ready Press Power button to start mopping 11 EN 12 EN Scan to download APP TUYA Smart Please read this manual carefully before use ...

Страница 8: ...nd Robot Fig 6 9 Your robot is initialized and you may start using your TUYA App to control your Robot Vacuum Fig 7 Before connecting your device turn on the robot vacuum After the voice prompts Welcome to use robot vacuum cleaner please press and hold the Home button until voice prompts Smart Link Fig 8 Fig 9 Fig 10 APP Operations 10 Select Auto Cleaning Recharge mode Room cleaning Edge cleaning ...

Страница 9: ...er sleeping mode If it is in sleeping mode press the robot will be wakened up to standby mode Press the cleaning mode as you want to start working 15 The App will show the map of working cleaning path of the robot It may not update in real time Fig 15 16 Tap Cleaning record it will show the cleaning records of working time and cleaned area also you can clear the data Fig 16 Fig 17 Fig 18 Fig 19 Fi...

Страница 10: ...heck whether the wheel is entangled with foreign objects and clean up the entangled objects 5 Bumper stuck Front bumper stuck Check whether the front bumper can rebound normally 6 Connection failed Robot connected to server failure Check whether can access internet when connection is done 7 Low power please charge Battery power less than 20 Robot automatically enters the recharge mode 8 Side brush...

Отзывы: