


Side Brushes
Foreign substances, such as hair, can easily get tangled in the side brushes
and dirt adhere to them. Be sure to clean them regularly
1. Remove the side brushes
2. Carefully unwind and pull off any hair or string that is wrapped
between the main unit and the side brushes
3. Use a cloth dampened with warm water to remove dust from the brushes or to gently reshape them
• Only use the side brushes when completely dried
Replace the Side Brushes
The side brushes may become bent or damaged after being used
for a period of time. Follow the instructions below to replace them.
Pull off the old side brushes and snap the new ones into place
Warning:
There is a marking on the brush which shows “L” for left
brush and “R” for right brush
Clean the Sensors and Charging Pins
To maintain the best performance, clean the drop sensors and charging pins regularly. Dust off the drop
sensors and charging contact pins using a soft cloth or cleaning brush
• Please use dry soft cloth for cleaning and do not use wet cloth to prevent damage caused by water
Charging
Dock Pins
Down-view
Sensor
Drive Wheels and
Omnidirectional
Wheel
Robot front view
Robot back view
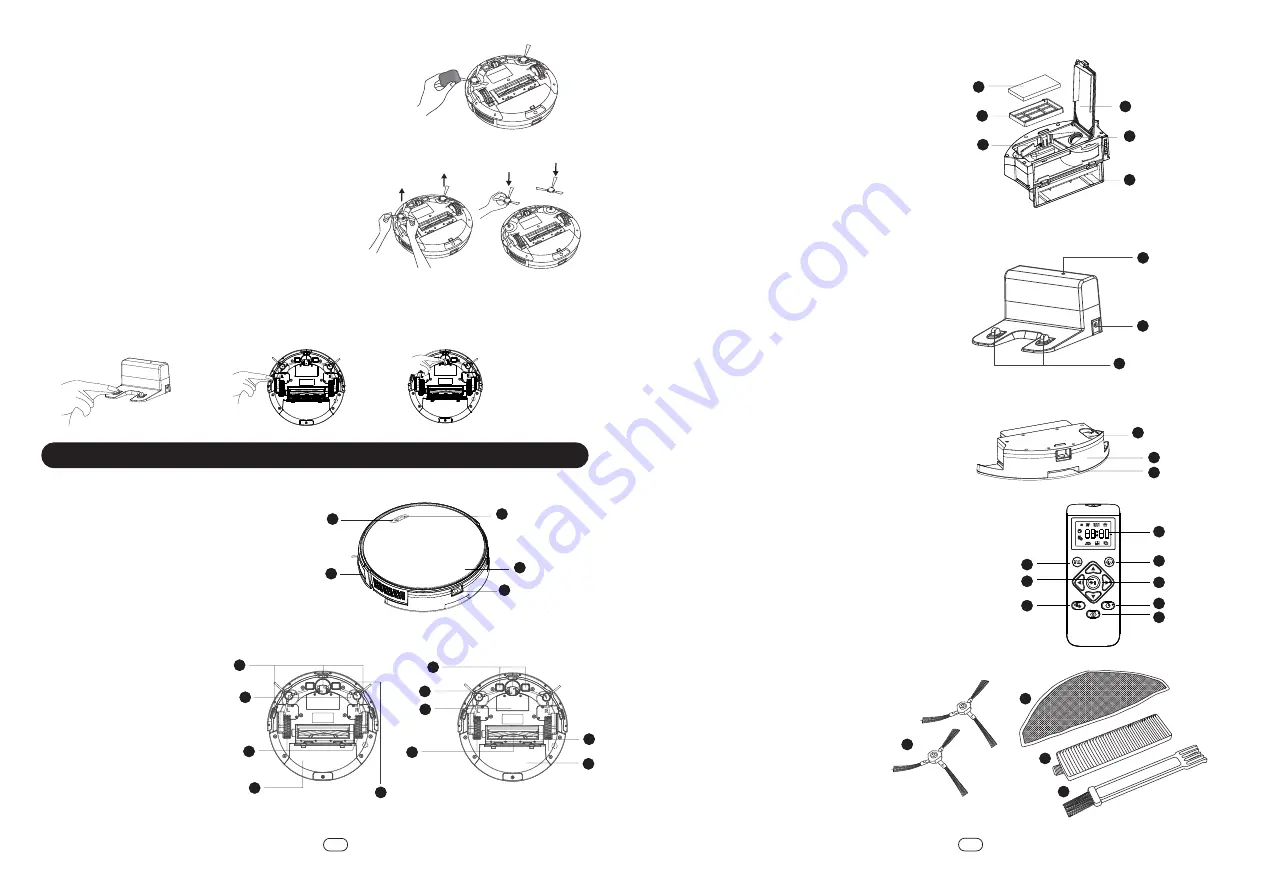
A. Robot Front View
1. “Recharge” or “Home” button
2. Omnidirectional Lens
3. Power button
4. Top Cover
5. Dust Box / Water Tank button
B. Robot Back View
6. Drop Sensor
7. “L” Side & “R” Side Brush
8. Drive Wheel
9. Dust box
10. Magnetic Sensor
11. Charging Contact Pins
12. Omnidirectional Wheel
13. Battery Compartment
14. Rolling Brush
15. Brush Guard
C. Dust Box
16. High Efficiency Strainer
17. Primary Filter Strainer
18. Dust Box Metal Sheet
19. High Efficiency Top Cover
20. Vent
21. Dust Box Swivel Cover
D. Charging Dock
22. Signal Sensor
23. DC Socket
24. Charging Pin
E. Water Tank and Mopping Cloth
25. Water Injection Port
26. Water Tank
27. Mopping Pad
F. Remote Control
[Battery type: 2 pieces of leak-proof UM4
AAA 1.5V battery (not provided)]
28. Auto Cleaning Mode Button
(Turbo / Quiet / Standard Mode)
29. Start / Pause Button
30. Schedule Cleaning Setting Button
31. Display Screen
32. Cleaning Mode Switching Button
(Using dust tank -Edge / Room cleaning
mode available;
Using water tank- Edge / Room / Mopping
cleaning mode available)
33. Direction Control Button
34. Time Setting Button
35. Recharging Button
G. Accessories
1. Replacement Side Brushes x2 pieces
2. Replacement HEPA Filter x1 pieces
3. Replacement Fiber Mop Cloth x1 piece
4. Cleaning Tool
Dust Box
Charging Dock
Water Tank and Mopping Cloth
1
2
4
3
6
EN
5
EN
Parts Identification
1
2
3
4
5
6
7
8
9
9
10
11
12
13
14
15
16
19
20
22
23
24
25
26
27
28
31
32
33
34
35
29
30
21
17
18


