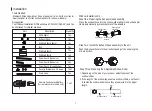
background image

Water drainage

-During dehumidifying modes, remove the drain plug from the back of 

 the unit, install the drain connector(5/8" universal female mender) with 

 3/4" hose(locally purchased). For the models without drain connector, 

 just attach the drain hose to the hole. Place the open end of the hose 

 directly over the drain area in your basement floor. 

NOTE:When the continuous drain hose is not used,  ensure that the drain 

plug and knob are installed firmly to prevent leakage.


Remove the 

drain plug

Continuous 

drain hose

Safety Precautions

Maintenance Tips

-Always unplug the unit before cleaning or servicing.

-DO NOT use flammable liquids or chemicals to clean the unit. 

-DO NOT wash the unit under running water. Doing so causes 

 electrical danger.

-DO NOT operate the machine if the power supply was damaged 

 during cleaning. A damaged power cord must be replaced with a 

 new cord from the manufacturer.

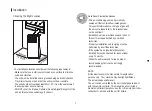
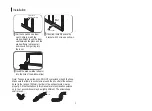
Clean the Air Filter

Clean the Unit

Store the unit when not in use 

-Be sure to clean the air filter every 2 

 weeks for optimal performance.

-The water collection tray should be 

 drained  immediately after P1 error occurs, 

 and before storage to prevent mold. 

-In households with animals, you will have 

 to periodically wipe down the grill to 

 prevent blocked airflow due to animal hair. 

Remove the air filter 

Air filter

(take out)

Clean the unit using a damp, lint-free cloth and mild detergent. Dry the 

unit with a dry lint-free cloth. 

-Drain the unit’s water collection tray according to the instructions in 

 the following section. 

-Run the appliance on FAN mode for 12 hours in a warm room to dry 

 it and prevent mold.

-Turn off the appliance and unplug it.

-Clean the air filter according to the instructions in the previous section. 

 Reinstall the clean, dry filter before storing. 

-Remove the batteries from the remote control.

Be sure to store the unit in a cool, dark place. 

Exposure to direct sunshine or extreme heat can 

shorten the lifespan of the unit.  

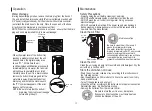
-When the water level of the bottom tray 

 reaches a predetermined level, the unit 

 beeps 8 times, the digital display area 

 shows "P1" . At this time the air 

 conditioning/dehumidification process will 

 immediately stop. However, the fan motor 

 will continue to operate(this is normal). 

 Carefully move the unit to a drain location, 

 remove the bottom drain plug and let the 

 water drain away. Reinstall the bottom

 drain plug and restart the machine until 

 the "P1" symbol disappears. If the error 

 repeats, call for service.

 NOTE: Be sure to reinstall the bottom 

             drain plug firmly to prevent leakage 

             before using the unit.


Bottom drain 

plug

Operation

Maintenance


12

Содержание R-KSTAP08D

Страница 1: ...e Air Conditioner REFURBISHED Portable Air Conditioner Instruction Manual Before using your air conditioner please read this instruction manual carefully and keep it for future reference READ AND SAVE...

Страница 2: ...Contents 1 Preparation Safety Precautions Cautions Installation Operation Mai ntenance Faults Diagnosis Design and Compliance Notes 2 4 5 6 10 12 13 14...

Страница 3: ...horizontal louver control lever adjust manually NOTE PHA can not be adjusted NOTE PHA can not be adjusted vertical louver control lever adjust manually panel Caster bottom tray drain outlet air filte...

Страница 4: ...Preparation NOTE The unit you purchased may be look like one of the followings 3...

Страница 5: ...NOT share a single outlet with other electrical appliances Improper power supply can cause re or electrical shock DO NOT install your air conditioner in a wet room such as a bathroom or laundry room T...

Страница 6: ...d persons in order to avoid a hazard Prior to cleaning or other maintenance the appliance must be disconnected from the supply mains Do not install the appliance in a location that may be exposed to c...

Страница 7: ...speci c information on the type of gas and the amount please refer to the relevant label on the unit itself Installation service maintenance and repair of this unit must be performed by a certi ed te...

Страница 8: ...models only Press the exhaust hose into the window slider adaptor and unit adaptor clamp automatically by elastic buckles of the adaptors Push the Exhaust hose into the airoutlet opening of the unit...

Страница 9: ...between the glass and the window frame to prevent air and insects from getting into the room If desired install the security bracket with 2 screws as shown Insert the window slider adaptor into the ho...

Страница 10: ...ndow slider adaptor into the hole of the window slider Foam seal C Non adhesive type 2 Screws Security Bracket Note To ensure proper function DO NOT overextend or bend the hose Make sure that there is...

Страница 11: ...Down buttons at the same time for 3 seconds Power button Power switch on off Power indicator light Timer mode indicator light set only by remote controller Up and Down buttons LED display Shows the se...

Страница 12: ...ct Do not put the duct to window AIR FLOW DIRECTION ADJUSTMENT Adjust the air flow direction manually The louver can be set to the desired position manually Do not place any heavy objects or other loa...

Страница 13: ...to periodically wipe down the grill to prevent blocked air ow due to animal hair Remove the air filter Air filter take out Clean the unit using a damp lint free cloth and mild detergent Dry the unit w...

Страница 14: ...nnected or is blocked The Water Collection Tray is full Turn off the unit drain the water from the Water Collection Tray and restart the unit There are heat sources inside the room Turn off the unit a...

Страница 15: ...to change without prior notice The Energy Rating for this unit is based on an installation using an un extended exhaust duct without window slider adaptor as shown in the Installation section of this...

Отзывы: