


10
Computing and Viewing Decoded Transactions
118
Keysight U4301 PCIe Gen3 Analyzer User’s Guide
3 You can also add a new device details by clicking
Add Device
and then selecting the appropriate
device type applicable for the DUT.
4 To delete the setup details of an existing device, click
Remove Device
.
5 Double-click the device row to view/edit its details. Alternatively, select the device row and click
Edit Details...
The
Device Setup
dialog box is displayed. The tabs and fields in this dialog box differ based on the
storage protocol decode applicable for the device. The following steps describe these
device-type specific fields.
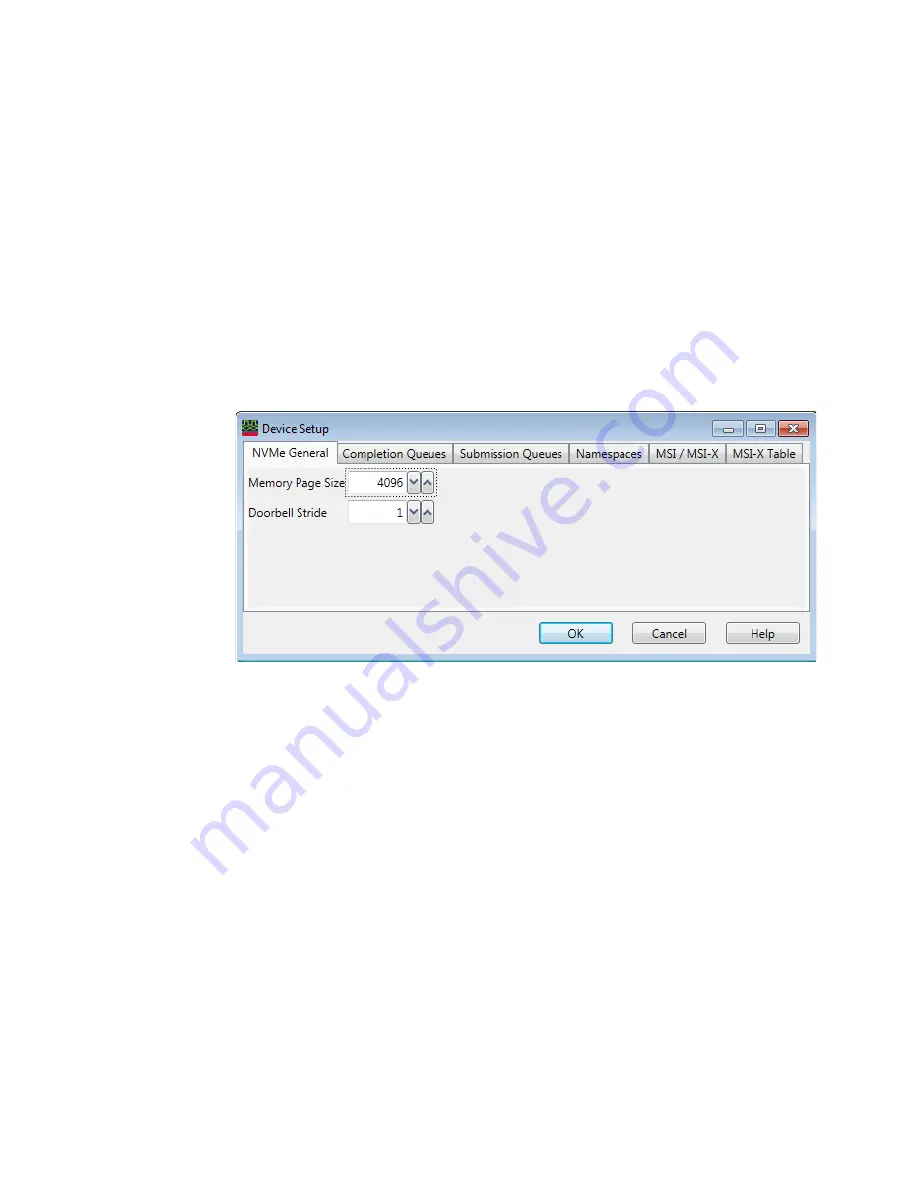
To view/edit details of an NVMe device
All device details such as its submission and completion queues and namespaces are autodiscovered
while computing decoded transactions. If needed, you can add, remove, or edit these details of an
NVMe device in the Device Setup dialog box.
1 The
Memory Page Size
field indicates the size of the physical memory page configured by the host
software. The Memory Page Size value is a part of the controller configurations that the host can
set and modify. This value is used to set the size of PRP entries.
2 The
Doorbell Stride
field indicates the number of bytes to be used in memory space to separate
doorbell registers. This value is a part of the controller capabilities.
3 Click the
Completion Queue
tab. The details of Admin and I/O completion queue(s) autodiscovered
by the software from the captured data are displayed. If these are not autodiscovered, you can
add a new queue by clicking
Add Queue
and specifying its ID, size, base address, and the unique
MSI-X vector that the controller allocated to this queue to respond back.
Содержание U4301
Страница 1: ...Keysight U4301 PCIe Gen3 Analyzer User s Guide ...
Страница 10: ...10 Keysight U4301 PCIe Gen3 Analyzer User s Guide ...
Страница 15: ...Keysight U4301 PCIe Gen3 Analyzer User s Guide 15 Contents 12 Glossary Index ...
Страница 16: ...16 Keysight U4301 PCIe Gen3 Analyzer User s Guide Contents ...
Страница 18: ...1 Hardware and Software Installation 18 Keysight U4301 PCIe Gen3 Analyzer User s Guide ...
Страница 20: ...2 Probing Options for PCIe Gen3 20 Keysight U4301 PCIe Gen3 Analyzer User s Guide ...
Страница 32: ...3 Specifying the Connection Setup 32 Keysight U4301 PCIe Gen3 Analyzer User s Guide ...
Страница 49: ...Keysight U4301 PCIe Gen3 Analyzer User s Guide 49 Tuning the Analyzer for a Specific DUT 5 6 Click Apply or OK ...
Страница 54: ...5 Tuning the Analyzer for a Specific DUT 54 Keysight U4301 PCIe Gen3 Analyzer User s Guide ...
Страница 72: ...7 Running Stopping Captures 72 Keysight U4301 PCIe Gen3 Analyzer User s Guide ...
Страница 78: ...8 Viewing PCIe Gen3 Packets 78 Keysight U4301 PCIe Gen3 Analyzer User s Guide ...
Страница 79: ...Keysight U4301 PCIe Gen3 Analyzer User s Guide 79 Viewing PCIe Gen3 Packets 8 ...
Страница 96: ...8 Viewing PCIe Gen3 Packets 96 Keysight U4301 PCIe Gen3 Analyzer User s Guide ...
Страница 156: ...10 Computing and Viewing Decoded Transactions 156 Keysight U4301 PCIe Gen3 Analyzer User s Guide ...
Страница 187: ...Keysight U4301 PCIe Gen3 Analyzer User s Guide 187 Viewing Offline Performance Summary 11 Line Dash Line ...
Страница 188: ...11 Viewing Offline Performance Summary 188 Keysight U4301 PCIe Gen3 Analyzer User s Guide Dot Line Triangle Up Down ...
Страница 190: ...11 Viewing Offline Performance Summary 190 Keysight U4301 PCIe Gen3 Analyzer User s Guide Dot Circle Box Square ...
Страница 200: ...12 Glossary 200 Keysight U4301 PCIe Gen3 Analyzer User s Guide ...
Страница 203: ...Keysight U4301 PCIe Gen3 Analyzer User s Guide 203 ...
Страница 204: ...This information is subject to change without notice Keysight Technologies 2017 May 2017 U4301 97001 www keysight com ...


