background image

Keysight 86120D and 86122C Multi-Wavelength Meters User’s Guide

43

Getting Started

1


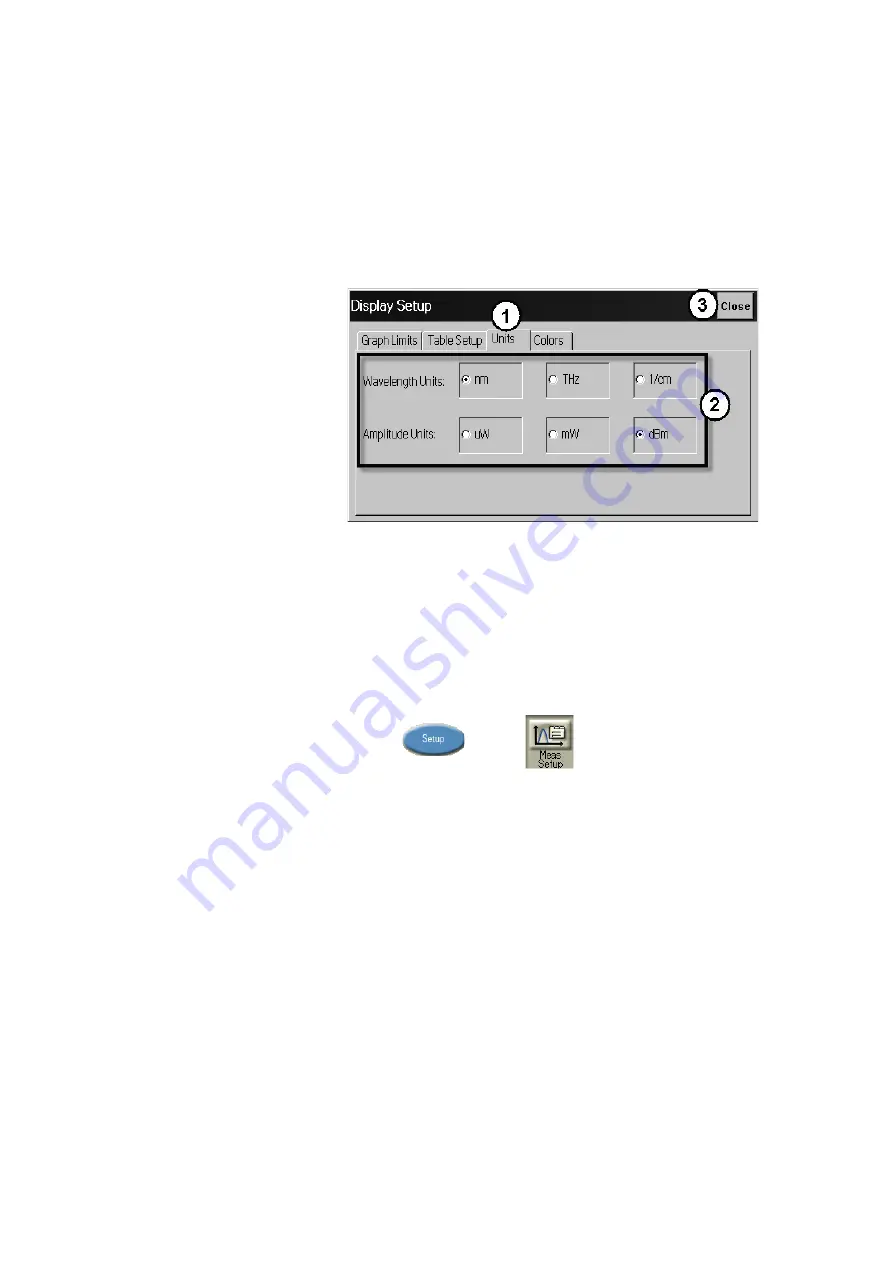
Figure 23

Select the Device Type

You can optimize (or match) the measurement technique of the 

multi-wavelength meter to the type of device you are measuring – 

narrowband or broadband. Narrowband devices include DFB lasers and 

modes of Fabry-Perot lasers. Broadband devices include LEDs, optical 

filters, and chirped lasers.4

1 Press  and 

click 

2 Click the Device Type tab, and select Narrowband or Broadband.
3 Click  Close.

Содержание 86120D

Страница 1: ...User s Guide Keysight 86120D and 86122C Multi Wavelength Meters ...

Страница 2: ...uirements beyond those set forth in the EULA shall apply except to the extent that those terms rights or licenses are explicitly required from all providers of commercial computer software pursuant to the FAR and the DFARS and are set forth specifically in writing elsewhere in the EULA Keysight shall be under no obligation to update revise or otherwise modify the Software With respect to any techn...

Страница 3: ...nal 21 Step 5 Connect the Line Cord 22 Step 6 Turn On the Line Power 23 Step 7 Calibrate the Touch Screen Optional 25 Step 8 Set the Time and Date 27 Step 9 Set the System Standby Mode 28 Step 10 Add a Printer 30 Step 11 Change Region and Language Settings 33 Step 12 Avoid Costly Repairs 38 Step 13 For More Information 38 Making Measurements 39 Step 1 Consider Measurement Limitations 39 Step 2 Sel...

Страница 4: ...r Introduction 64 Differences Between the 86120D 86122C and Previous Models 65 Differences in General Operation 65 Differences in Remote Commands 66 Front and Rear Panel Features 68 Main Screen Layout 70 Graphs and Tables 72 Front Panel Buttons 73 Menus 76 The File menu 76 The View menu 77 The Setup menu 78 The Measure menu 78 The Utilities menu 79 The Apps menu 79 The Help menu 79 Dialog Box Oper...

Страница 5: ...85 Preserving Connectors 90 How to clean connector interfaces 92 How to clean bare fiber adapters 93 How to clean instruments with a fixed connector interface 94 Additional Cleaning Information 95 Other Cleaning Hints 95 4 Specifications and Regulatory Information Definitions of Terms 98 Specifications 100 Compliance with German Noise Requirements 103 Compliance with Canadian EMC Requirements 103 ...

Страница 6: ......

Страница 7: ...ulti Wavelength Meters User s Guide 1 Getting Started General Safety Considerations 8 Setting Up the Multi Wavelength Meter 14 Making Measurements 39 Returning the Instrument for Service 59 Keysight Technologies Service Offices 62 ...

Страница 8: ... the user to ensure safe operation and to maintain the product in a safe condition Warnings and Notices WARNING To avoid the possibility of injury or death you must observe the following precautions before switching on the instrument Insert the power cable plug only into a socket outlet provided with a protective earth contact Do not negate this protective action by the using an extension cord wit...

Страница 9: ...nt power line switch The OFF symbols are used to mark the positions of the instrument power line switch The CE Marking to state compliance within the European Union This product is in conformity with the relevant European Directives This text denotes the instrument is an Industrial Scientific and Medical Group 1 Class A product The Safety Mark of the Canadian Standards Association CSA The C Tick C...

Страница 10: ...uct is not used as specified the protection provided by the equipment could be impaired This product must be used in a normal condition in which all means for protection are intact only WARNING No operator serviceable parts inside Refer servicing to qualified service personnel To prevent electrical shock do not remove covers WARNING This is a Safety Class 1 Product provided with protective earth T...

Страница 11: ...ontrols or adjustment or performance of procedures other than those specified herein may result in hazardous radiation exposure CAUTION This Multi Wavelength Meter uses a specially designed Windows application program Windows is a U S registered trademark of Microsoft Corp All Multi Wavelength Meter functionality is directly available from within the Multi Wavelength Meter application Windows conf...

Страница 12: ...REQUIREMENTS When installing the product in a cabinet the convection into and out of the product must not be restricted The ambient temperature outside the cabinet must be less than the maximum operating temperature of the product by 4 C for every 100 watts dissipated in the cabinet If the total power dissipated in the cabinet is greater than 800 watts then forced convection must be used CAUTION I...

Страница 13: ...22C Laser type HeNe Laser Wavelength 0 1 nm 632 8 nm Max CW output power1 1 nW Beam waist diameter 9 μm Numerical aperture 0 1 Laser Class according to IEC 60825 1 2014 Class 1 Max permissible CW output power 0 39 mW 1 Max CW output power is defined as the highest possible optical power that the laser source can produce at its output connector ...

Страница 14: ...p your instrument Step 1 Inspect the Shipment 1 Use proper lifting techniques to remove the items from the shipping container 2 Inspect the shipment Figure 1 Inspect the shipping container for damage Inspect the instrument NOTE Keep the shipping container and cushioning material until you have inspected the contents of the shipment for completeness and have inspected the instrument ...

Страница 15: ... repair or replacement at Keysight s option without waiting for claim settlement Options and Accessories The following table lists the accessories that may be on the shipping list The information on your actual shipping list is more accurate and should supersede the information in this table Table 2 Accessories Included Table 3 Instrument Options Accessories Part Number Stylus 1150 7997 Getting St...

Страница 16: ...cription 86122C Multi Wavelength Meter 86122C 100 Wavelengths 1270 nm to 1650 nm 0 2 ppm 86122C 110 Wavelengths 1270 nm to 1650 nm Fast Update 0 2 ppm Optical Connectors 86122C 021 Straight non angled Contact Interface PC default 86122C 022 Angled Contact Interface APC Accessories 86122A 1CM Rack Mount Kit without Handles 86122A 1CN Rack Handle Kit 86122A 1CP Mount Kit plus Handles Keysight Part N...

Страница 17: ... FC APC narrow key 81000SI Connector Interface DIN 47256 4108 81000VI Connector Interface ST 81000MI Connector Interface MU Keysight Part Number Description 86120D 86122C General Indoor use only Operational Temperature 0 to 55 C 15 to 35 C Humidity 95 R H at 40 C 75 R H at 35 C Storage Temperature 40 C to 70 C 40 C to 70 C Humidity 90 R H at 65 C for 24 hrs 95 R H at 40 C for 5 day cycle NOTE Humi...

Страница 18: ... peak 5 to 500 Hz 1 octave per minute Table 7 NOTE Shock is type tested NOTE Vibration is type tested 86120D 86122C Power Requirements Voltage 100 V 115 V 230 V 240 V 100 240 V Frequency 50 60 Hz 50 60 Hz Maximum Power 310 VA max 240 W Weight 14 5 kg 32 lb 14 5 kg 32 lb Dimensions Height 138 mm 5 2 in 138 mm 5 2 in Width 425 mm 16 7 in 425 mm 16 7 in Depth 520 mm 20 5 in 520 mm 20 5 in ...

Страница 19: ...t flange with three screws per side NOTE You must have a rack mount kit to continue with this procedure Refer to Accessories on page 16 NOTE If any items are damaged or missing from the kit contact the nearest Keysight Technologies sales or service office to order a replacement kit Items within the kit are not individually available Qty Description 2 Rack Mount Flange 6 Screws 4 Dress screws 2 Fro...

Страница 20: ...20 Keysight 86120D and 86122C Multi Wavelength Meters User s Guide 1 Getting Started Figure 2 NOTE Front Handle Assembly are included with Option 86122A 1CP only ...

Страница 21: ...to the instrument Refer to the figure below for PS 2 connections You can also use the USB port for a USB keyboard and mouse You can also connect USB mouse and keyboard with the USB port in the front panel of the instrument NOTE A keyboard and mouse are not supplied with the multi wavelength meter NOTE Do not stack other objects on the keyboard this will cause self test failures at power on ...

Страница 22: ...s to the applied AC power Auto Selection and monitors the AC power range The mains supply voltage fluctuation shall not exceed 10 of the specified supply voltage CAUTION The product must be operated from a power source providing Line grounded Neutral and Protective Earth PE connections The instrument is not intended for operation from two phases of a multiphase ac system or across the legs of a si...

Страница 23: ...h a touch screen display You can explore the instrument s functions and settings by touching elements on the display such as menus buttons and other controls with your finger or the supplied stylus You can also operate the instrument by using an optional mouse For simplicity the term click is used throughout this book to represent clicking or touching an element on the display When you see the ter...

Страница 24: ...20D and 86122C Multi Wavelength Meters User s Guide 1 Getting Started Figure 5 CAUTION Avoid touching the screen with a sharp object as this could result in damage to the display Use your finger or the supplied stylus ...

Страница 25: ... the display screen the instrument can detect the task you want to perform 1 On the Utility menu click Touch Screen Calibration The touch screen calibration utility opens Figure 6 2 Touch the center of the X with your finger or a stylus Several X will appear on different positions of the display screen Touch them precisely as the first one When the display is calibrated the touch screen configurat...

Страница 26: ...yboard to exit the touch screen calibration NOTE If you miss the center of the X by a significant amount the instrument will display an error message and revert back to the previous calibration This will prevent the touch screen from being rendered useless due to a poor calibration In case a failed touch screen calibration leads to a non working condition you can restart the touch screen calibrati...

Страница 27: ...p of the display The Set Time and Date dialog box opens 2 Enter the current time and date in one of the following ways Click the time and date text boxes and enter the desired number Click the up or down arrows next to the time and date text boxes until the desired number is displayed 3 Click Set Time Date Now to apply the changes and close the dialog box Figure 8 ...

Страница 28: ...t activity front panel or remote will reactivate the instrument and return it to it s previous state Using this feature can help extend the life of your instrument To extend the life of the reference laser you should turn off the instrument during long periods of inactivity e g several hours or over night To configure standby mode 1 On the Setup menu click Preferences 2 Select a time out period fr...

Страница 29: ...ulti Wavelength Meters User s Guide 29 Getting Started 1 Figure 9 To reactivate the display Touch the display screen or a front panel button Move the mouse or press a key on the external keyboard if attached Send a remote command ...

Страница 30: ...10 Add a Printer Use of a printer with the instrument is optional Follow the steps of your printer s documentation 1 In the File menu of the multi wavelength meter software click Print Setup Figure 10 NOTE The multi wavelength meter only supports USB and LAN printers no parallel printer port ...

Страница 31: ...f the setup window is not fully visible move the cursor to the lower edge of the display to pan and scan the window within the visible area of the display Figure 11 b Using the pan and scan function the lower end of the Printer Properties window becomes accessible c Click OK Cancel Apply button to confirm cancel or apply your changes ...

Страница 32: ... s Guide 1 Getting Started Figure 12 CAUTION Installation of programs other than drivers necessary for your printer is not recommended or supported Installation of additional software could render the 86120D or 86122C multi wavelength meter software inoperable ...

Страница 33: ...e steps to change the region and language settings 1 Exit the multi wavelength meter software a On the Utilities menu click Protected Functions b Enter the protected functions password exit to windows and click Activate Figure 13 2 From the Windows 7 Start menu open the Control Panel 3 In the Control Panel click Clock Language and Region ...

Страница 34: ...34 Keysight 86120D and 86122C Multi Wavelength Meters User s Guide 1 Getting Started Figure 14 ...

Страница 35: ...is not fully visible Move the cursor to the lower edge of the display to pan and scan the window within the visible area of the display Figure 15 b The Windows 7 task bar may come up In that case move the cursor slightly upwards until the task bar disappears and the lower edge of the active window becomes visible again ...

Страница 36: ...36 Keysight 86120D and 86122C Multi Wavelength Meters User s Guide 1 Getting Started Figure 16 c Click OK Cancel Apply button to confirm cancel or apply your changes ...

Страница 37: ...Keysight 86120D and 86122C Multi Wavelength Meters User s Guide 37 Getting Started 1 Figure 17 ...

Страница 38: ...instrument Refer to the Help The Help opens the user s and programmer s guide in PDF format Visit our website at http www keysight com Use the keyword 86120D or 86122C in your search CAUTION Optical channel fiber optic connectors are easily damaged when connected to dirty or damaged cables and accessories When you use improper cleaning and handling techniques you risk expensive instrument repairs ...

Страница 39: ...imitations Before connecting a signal and making a measurement please consider the following measurement limitations Figure 19 NOTE The front panel OPTICAL INPUT connector uses a single mode input fiber CAUTION 10 dBm is the maximum total displayed input power Do not exceed 18 dBm source power The Keysight 86120D or 86122C s input circuitry can be damaged when total input power exceeds this level ...

Страница 40: ...rs damaged cables and compromised measurements Before you connect any fiber optic cable to the Keysight Variable Optical Attenuator modules and Keysight Variable Optical Attenuator modules with Power Control refer to Cleaning Instructions on page 84 WARNING Always remove both ends of fiber optic cables from any instrument system or device before visually inspecting the fiber ends Disable all optic...

Страница 41: ... Figure 21 If the measured amplitudes are low clean the front panel OPTICAL INPUT connector The maximum input range for 86120D is 700 1700 nm and the maximum input range for is 700 1650 nm Laser line widths are assumed to be less than 10 GHz for 86120D and less than 2 5 GHz for 86122C ...

Страница 42: ...ype units and sweep mode Select the Medium The multi wavelength meter can display wavelength values in a vacuum or in standard air 1 Press and click 2 Click the Medium tab and select In Air or In Vacuum 3 Click Close Figure 22 Select the Units The instrument can display wavelength and amplitude values in several types of measurement units 1 Press and click 2 Click the Units tab and select the wave...

Страница 43: ... measurement technique of the multi wavelength meter to the type of device you are measuring narrowband or broadband Narrowband devices include DFB lasers and modes of Fabry Perot lasers Broadband devices include LEDs optical filters and chirped lasers 4 1 Press and click 2 Click the Device Type tab and select Narrowband or Broadband 3 Click Close ...

Страница 44: ...to continuously measure the input spectrum In this mode a measurement sweeps occurs approximately every 0 3 seconds 86122C Option 110 or every 0 5 seconds 86122C Option 100 or every 0 6 seconds 86120D This is useful if you want the data to be continuously updated You can also set up data logging to perform measurement sweeps at any desired interval The green SWP indicator in the lower right hand c...

Страница 45: ...greater than the peak threshold limit and the rise and fall excursion is greater than or equal to the peak excursion In addition peaks are only measured within the wavelength limits that you specify Figure 25 In this figure only three laser lines are identified as peaks responses 1 3 and 4 Response 2 is not identified as a peak because it is below the peak threshold Responses 4 and 5 are identifie...

Страница 46: ...t Relative or Absolute threshold type 4 Click the Threshold Value box and enter the threshold value 5 Click the Peak Excursion box and enter the excursion value 6 Click Close Figure 26 Use Wavelength Limiting to Define Peaks 1 Press and click 2 Click the Wavelength Limiting tab 3 Select On 4 Click the Limit Start Wavelength box and enter the start wavelength value ...

Страница 47: ...Keysight 86120D and 86122C Multi Wavelength Meters User s Guide 47 Getting Started 1 5 Click the Limit Stop Wavelength box and enter the stop wavelength value 6 Click Close Figure 27 ...

Страница 48: ...It is often important to measure the wavelength and power separation between multiple laser lines This is especially true in wavelength division multiplexed WDM systems where channel spacing must be adhered to The Keysight multi wavelength meter can display the wavelength and amplitude of any laser line relative to another 1 Press and click 2 Select a channel as the reference by clicking in the Re...

Страница 49: ...ss and click 2 Select the channel with the largest amplitude as the reference by clicking in the Ref column of that peak s row 3 To determine channel flatness from the reference simply read the relative power values in the Delta Pwr column Laser Channel Separation Flatness You can also measure channel separation and flatness at the same time Press and click Laser Drift Laser drift can be easily me...

Страница 50: ... amount of attenuation at the instrument s input accurate amplitude measurements are shown on the display 1 Connect an optical attenuator between the front panel OPTICAL INPUT connector and the fiber optic cable from your device The attenuator must reduce the total input power to the Keysight multi wavelength meter so that it is below 10 dBm 2 Press and click 3 Click the Power Offset tab 4 Click t...

Страница 51: ...u have set up your measurement you may wish to adjust the graph x axis or move markers Adjust the X Axis You can adjust the x axis in any of the following ways Click and enter graph limits as start stop or center span Figure 28 Select an x axis control from the Graph Control list Click anywhere on the graph and drag to the left or right ...

Страница 52: ...52 Keysight 86120D and 86122C Multi Wavelength Meters User s Guide 1 Getting Started Figure 29 Figure 30 ...

Страница 53: ...Click any cell in the Peak column of the table The peak marker will move to the corresponding peak wavelength in the graph Figure 31 If ClickZoom is enabled click any cell in the Wavelength column of the table The peak marker will move the corresponding peak wavelength in the graph and the graph will zoom in to that peak To zoom out click the Wavelength cell again ...

Страница 54: ...length Meters User s Guide 1 Getting Started Figure 32 Select Peak Marker from the Graph Control list Click close to a peak on the graph Select Peak Marker from the Graph Control list Click anywhere on the graph and drag to the left or right ...

Страница 55: ...raph Select Peak Marker from the Graph Control list Click anywhere on the graph and drag to the left or right Move the Trace Marker You can move the trace marker in any of the following ways Select Trace Marker from the Graph Control list Click any point on the graph Select Trace Marker from the Graph Control list Click anywhere on the graph and drag to the left or right ...

Страница 56: ...er you have set up your measurement and the graphical display you ay wish to save measurement results Save Data Figure 34 Press to open the Save Meas Data dialog box Select a file name and click Save Print Data Figure 35 Press to open the Print Setup dialog box Select the Default Printer and Printout Type and click Print ...

Страница 57: ...86120D and 86122C Multi Wavelength Meters User s Guide 57 Getting Started 1 Save Screen Image Figure 36 On the File menu point to Save and then click Save Screen Image Select a file name and click Save Figure 37 ...

Страница 58: ...menu click Data Logging 2 Enter the Logging Duration and Logging Interval time 3 Click Start Data Logging Figure 38 Consider the following example applications To log data for a long term stability drift test set the data logging duration to 24 hrs and the interval to 5 minutes To log data for a turn on transient test to observe how lasers change during warm up set the data logging duration to 5 m...

Страница 59: ...e as specific as possible about the nature of the problem Include copies of additional failure information such as the instrument failure settings data related to instrument failure and error messages with the instrument being returned Backup your measurement related data before returning the instrument to Keysight service Please notify the service office before returning your instrument for servi...

Страница 60: ...120 lb use a double walled corrugated cardboard carton of 159 kg 350 lb test strength The carton must be large enough to allow approximately 7 cm 3 inches on all sides of the instrument for packing material and strong enough to accommodate the weight of the instrument Surround the equipment with approximately 7 cm 3 inches of packing material to protect the instrument and prevent it from moving in...

Страница 61: ...ifornia 90001 Air Cap looks like a plastic sheet filled with air bubbles Use the pink antistatic Air Cap to reduce static electricity Wrapping the instrument several times in this material will protect the instrument and prevent it from moving in the carton 4 Seal the carton with strong nylon adhesive tape 5 Mark the carton FRAGILE HANDLE WITH CARE 6 Retain copies of all shipping papers ...

Страница 62: ...fices Call Center For technical assistance you can contact your local Keysight Call Center Visit http www keysight com and click Contact Us Service Center Before returning an instrument for service you must first call the Keysight Technologies Instrument Support Center Visit http www keysight com and click Contact Us ...

Страница 63: ...r s Guide 2 Using the Multi Wavelength Meter Introduction 64 Differences Between the 86120D 86122C and Previous Models 65 Front and Rear Panel Features 68 Main Screen Layout 70 Front Panel Buttons 73 Menus 76 Dialog Box Operation 80 Hard Drive Recovery 81 ...

Страница 64: ...ize dense wavelength division multiplexed DWDM systems and the multiple lines of Fabry Perot lasers With the multi wavelength meter you can quickly and easily measure the following parameters Up to 1000 laser lines simultaneously Wavelengths and powers Average wavelength Total optical power Laser line separation Laser drift wavelength and power Optical signal to noise ratios Fabry Perot lasers Thi...

Страница 65: ...al MAX or fast MIN update mode For the 86120D and 86122C this command remains for backward compatibility Without changing the resolution of the 86120D and 86122C this command configures the queries SENSE DATA and CALC1 DATA to return the number of data points used by the 86120C To return all the data available with the 86120D and 86122C use the new parameter EXT1 CALC1 TRAN FREQ POIN EXT1 Elevatio...

Страница 66: ...s you to select between an absolute or relative peak threshold and CALC2 PTHR ABS allows you to set the absolute value Differences in Remote Commands CALC1 TRAN FREQ POIN For the 86120C this command selected the normal MAX or fast MIN update mode For the 86120D and 86122C this command remains for backward compatibility Without changing the resolution of the 86120D and 86122C this command configure...

Страница 67: ... HCOP PRIN These new commands allow you to setup your printer and printout mode MMEM The new commands in this subsystem allow you to manage the mass storage capabilities of the instrument SYST DATE and SYST TIME These new commands allow you to set or query the date and time Questionable status register bits 4 and 12 The 86120D and 86122C use these bits Power offset The 86120C does not apply the cu...

Страница 68: ...re 39 1 Power AC line 2 Mouse PS 2 for optional mouse 3 Keyboard PS 2 for optional keyboard 4 Video Output SVGA 5 Digital Video Output DVI 6 USB For a USB keyboard and mouse USB and LAN printers only no parallel printer port 7 LAN A keyboard must be used to set up LAN connectivity 8 GPIB Fully programmable complies with IEEE 488 2 ...

Страница 69: ...D and 86122C Multi Wavelength Meters User s Guide 69 Using the 86122C 2 Front Panel Figure 40 1 Line button 2 Touch screen display 3 Front panel buttons 4 Two USB 2 0 ports 5 Optical Input 9 125 mm single mode fiber ...

Страница 70: ...d toolbar press the front panel button that corresponds with the functions you want to perform 2 Wavelength Limiting Status Displays the wavelength limiting state 3 Peak Criteria Button Click this button to access the peak criteria settings and change the definition of peak 4 Graph Limit Button Click this button access the graph limits settings and define the x axis limits of the graphical display...

Страница 71: ...ment data in a spectrum analyzer type graph 12 Front Panel Buttons The 10 front panel buttons can be accessed with your finger or a stylus 13 Touch Screen Enable Disable Button Click or touch this button to disable the pointing devices touch screen and mouse The indicator on the button changes from green to red When you disable the pointing devices the mouse is confined to the region surrounding t...

Страница 72: ...a for peak wavelengths C The trace marker allows you to find the approximate wavelength of any point on the measurement trace An area in the upper right corner of the graph displays the approximate trace marker wavelength but not power D The horizontal green line represents the peak threshold one of two criteria used to define peak wavelengths For more information refer to Peak Criteria E The peak...

Страница 73: ...s ten touchkeys buttons that can be accessed with your finger or a stylus These are referred to as the front panel buttons This section explains the function of each front panel button Figure 43 Press this button to return control of the instrument to the front panel The Local and AC power buttons are the only front panel controls active when the instrument is in remote operation ...

Страница 74: ...ate an auto measurement sequence Press this button to open the Setup toolbar You can then modify a variety of measurement and display setup functions Press this button to open the Data View toolbar You can then configure the tabular display as desired Press this button to open the Applications toolbar You can then select your desired measurement application Press this button to place the instrumen...

Страница 75: ...Meters User s Guide 75 Using the 86122C 2 Press this button to open the Save Meas Data dialog box Select a file name and click Save Press this button to open the Print Setup dialog box Select the Default Printer and Printout Type and click Print ...

Страница 76: ...velength Meters User s Guide 2 Using the 86122C Menus The instrument menus provide access to all functions This section shows the layout of each menu For detailed information on each of these menus refer to the Help The File menu Figure 44 ...

Страница 77: ...Keysight 86120D and 86122C Multi Wavelength Meters User s Guide 77 Using the 86122C 2 The View menu Figure 45 ...

Страница 78: ...78 Keysight 86120D and 86122C Multi Wavelength Meters User s Guide 2 Using the 86122C The Setup menu Figure 46 The Measure menu Figure 47 ...

Страница 79: ...Keysight 86120D and 86122C Multi Wavelength Meters User s Guide 79 Using the 86122C 2 The Utilities menu Figure 48 The Apps menu Figure 49 The Help menu Figure 50 ...

Страница 80: ...r s Guide 2 Using the 86122C Dialog Box Operation Dialog boxes allow real time changes to the instrument s settings Because of this the dialog boxes do not have OK Apply and Cancel buttons When you have finished changing a setting simply click Close Figure 51 ...

Страница 81: ...within 5 seconds to select the entry Keysight Recovery System 5 Press Enter key 6 Wait for the dialog keysightRecoverySystem vbs 7 Press the 2 key for Recover the original factory system image 8 Press Enter key A warning dialog will appear 9 Press Enter key to start the recovery When completed the instrument will restart 10 Check the correct operation of the recovered system WARNING All data on dr...

Страница 82: ......

Страница 83: ... Precautions 84 Why is it important to clean optical devices 84 What do I need for proper cleaning 85 Preserving Connectors 90 How to clean connector interfaces 92 How to clean bare fiber adapters 93 How to clean instruments with a fixed connector interface 94 Additional Cleaning Information 95 Other Cleaning Hints 95 ...

Страница 84: ...ting Ensure that the instrument is switched off throughout the cleaning procedures Make sure that you disable all sources when you are cleaning any optical interfaces After cleaning do not switch on optical sources when there is no termination to the optical output connector to the optical fiber or to the attached device The laser radiation is not visible to the human eye but it can seriously dama...

Страница 85: ...ment For certain cleaning procedures you may also require certain Additional Cleaning Equipment Standard Cleaning Equipment Before you can start your cleaning procedure you need the following standard equipment Dust and shutter caps Isopropyl alcohol Cotton swabs Soft tissues Pipe cleaner Compressed air Dust and shutter caps All of Keysight Technologies light wave instruments are delivered with ei...

Страница 86: ...the epoxy used with fiber optic connectors To avoid damage only use isopropyl alcohol Cotton swabs We recommend that you use swabs such as Q tips or other cotton swabs normally available from local distributors of medical and hygiene products for example a supermarket or a chemist s shop You may be able to obtain various sizes of swab If this is the case select the smallest size for your smallest ...

Страница 87: ... has soft bristles which will not produces scratches There are many different kinds of pipe cleaner available from tobacco shops The best way to use a pipe cleaner is to push it in and out of the device opening for example when cleaning an interface While you are cleaning you should slowly rotate the pipe cleaner Only use pipe cleaners on connector interfaces or on feed through adapters Do not use...

Страница 88: ...pe can be found in most photography stores or can be obtained through or specialist mail order companies Special fiber scopes are available from suppliers of splicing equipment Ideally the light source on your microscope should be very flexible This will allow you to examine your device closely and from different angles A microscope helps you to estimate the type and degree of dirt on your device ...

Страница 89: ...ing please contact the manufacturer or your sales distributor Premoistened cleaning wipes Use pre moistened cleaning wipes as described in each individual cleaning procedure Cleaning wipes may be used in every instance where a moistened soft tissue or cotton swab is applied Polymer film Polymer film is available from laboratory suppliers or specialist mail order companies Using polymer film is a g...

Страница 90: ... When you have finished cleaning put the dust cap back on or close the shutter cap if the equipment is not going to be used immediately Keep the caps on the equipment always when it is not in use All of Keysight Technologies lightwave instruments and accessories are shipped with either laser shutter caps or dust caps If you need additional or replacement dust caps contact your nearest Keysight Tec...

Страница 91: ...tors is difficult as the core diameter of a single mode fiber is only about 9 mm This generally means you cannot see streaks or scratches on the surface To be certain of the condition of the surface of your connector and to check it after cleaning you need a microscope In the case of scratches or of dust that has been burnt onto the surface of the connector you may have no option but to polish the...

Страница 92: ...iment and dust by rubbing gently over the surface using a small circular movement 4 Blow away any remaining lint with compressed air An Alternative Procedure A better more gentle but more expensive cleaning procedure is to use an ultrasonic bath with isopropyl alcohol 1 Hold the tip of the connector in the bath for at least three minutes 2 Take a new dry soft tissue and remove the alcohol dissolve...

Страница 93: ...g the pipe cleaner into the opening Rotate the pipe cleaner slowly as you do this 3 Moisten a new cotton swab with isopropyl alcohol 4 Clean the interface by rubbing the cotton swab over the surface using a small circular movement 5 Using a new dry pipe cleaner and a new dry cotton swab remove the alcohol any dissolved sediment and dust 6 Blow away any remaining lint with compressed air How to cle...

Страница 94: ...ant therefore to keep dust caps on the equipment at all times except when your optical device is in use If you do discover filaments or particles the only way to clean a fixed connector interface and the input of the optical block is to use compressed air If there are fluids or fat in the connector please refer the instrument to the skilled personnel of Keysight s service team CAUTION Be careful w...

Страница 95: ...which we hope will help you further For further information please contact your local Keysight Technologies representative Making the connection Before you make any connection you must ensure that all light wave cables and connectors are clean If not then use appropriate the cleaning methods When you insert the ferrule of a patch cord into a connector or an adapter ensure that the fiber end does n...

Страница 96: ...rame When cleaning either the mainframe or the housing of your instrument only use a dry and very soft cotton tissue on the surfaces and the numeric pad Never open the instruments as they can be damaged Opening the instruments puts you in danger of receiving an electrical shock from your device and renders your warranty void ...

Страница 97: ...velength Meters User s Guide 4 Specifications and Regulatory Information Definitions of Terms 98 Specifications 100 Compliance with German Noise Requirements 103 Compliance with Canadian EMC Requirements 103 Declaration of Conformity 103 ...

Страница 98: ...mum wavelength error in measuring the wavelength difference between two signals that are simultaneously present Minimum resolvable separation indicates the minimum wavelength separation of two laser lines input required to measure each wavelength simultaneously Two laser lines closer in wavelength than the minimum resolvable separation are not resolved and one average wavelength is displayed Displ...

Страница 99: ...wer Maximum displayed level indicates the maximum total input power total of all laser lines present to accurately measure wavelength and power Maximum safe input power indicates the maximum total input power total of all laser lines present to avoid permanent optical damage to the instrument Maximum number of lines input Maximum number of lines input is the maximum number of displayed lines If mo...

Страница 100: ...W QP IURP QP 1 1310 nm and 1550 nm 0 5 dB DW QP IURP QP DQG QP Flatness 1 0 2 dB 1200 to 1600 nm 0 2 dB 1270 to 1600 nm QP IURP DQ wavelength 0 5 dB 700 to 1650 nm 0 5 dB 1270 to 1650 nm Linearity 0 3 dB 1200 to 1600 nm 0 3 dB 1270 to 1600 nm Lines above 30 dBm Polarization dependence 0 6 dB 1200 to 1600 nm 0 6 dB 1270 to 1600 nm 1 5 dB 1 700 to 1650 nm 1 0 dB 1 1600 to 1650 nm Display resolution ...

Страница 101: ...noise ratio 1 4 7 Channel spacing Ě 35 dB with 100 averages 0 1 nm noise bandwidth lines above 25 dBm Ě 35 dB with 100 averages Ě 27 dB with 100 averages Drift 0D LPXP PLQLPXP WRWDO GULIW PD PLQ RI ZDYHOHQJWKV DQG SRZHUV RYHU WLPH Fabry Perot characterization 0HDQ ZDYHOHQJWK SHDN ZDYHOHQJWK PRGH VSDFLQJ IXOO ZLGWK KDOI PD LPXP SHDN amplitude total power sigma Additional features 3RZHU RIIVHW SRZHU...

Страница 102: ...re 0 to 55 C 15 to 35 C Humidity 1 95 R H at 40 C 75 R H at 35 C QGRRU XVH RQO Storage Temperature 40 C to 70 C 40 C to 70 C Humidity 1 5 DW IRU KUV 95 R H at 40 C 5 day cycle Non condensing Dimensions and weight Dimensions H x W x D 138 mm x 425 mm x 520 mm 5 2 in x 16 7 in x 20 5 in 14 5 kg 32 lb Power requirements 9ROWDJH DQG IUHTXHQF 9 9 9 9a 50 Hz 60 Hz Maximum power 9 PD 7 SH WHVWHG PHDQV WH...

Страница 103: ...chinenlaermverordnung 3 GSGV Deutschland Table 9 Compliance with Canadian EMC Requirements This ISM device complies with Canadian ICES 001 Cet appareil ISM est conforme a la norme NMB 001 du Canada Declaration of Conformity For the latest Declarations of Conformity for Keysight products browse the link http www keysight com go conformity Acoustic Noise Emission Geraeuschemission LpA 70 dB LpA 70 d...

Страница 104: ...This information is subject to change without notice Keysight Technologies 2017 Edition 4 0 October 2017 www keysight com ...

Отзывы: