background image

KD-VPHD3 Operating Instructions

Page 

KD-VPHD3 Operating Instructions

Page 3

After the above functional settings have been configured, detailed adjustments can be made for 
each individual video input source.  To begin the input source setup, choose an input with which 
to start.  Complete the steps below, and then continue on to the next video input, completing the 
same steps for each source.  The KD-VPHD3 will automatically store every parameter below for 
each input.

1.

  Navigate to the picture menus below to set the desired values for each source:

a.  Picture Contrast – Adjustable from -50 to +50
b.  Picture Brightness – Adjustable from -50 to +50
c.  Picture Saturation – Adjustable from -50 to +50
d.  Picture Tint – Adjustable from -50 to +50
e.  Picture Sharpness – Adjustable from 0 to +50
f. 

Picture Aspect 

i.  Full Screen – use this setting to eliminate black bars on the top or sides of the image.
ii.  Letter Box – this setting applies black bars on the top and bottom of the image, 

simulating a 16:9 ratio
iii.  Pillar Box – this setting applies black bars on the sides of the image, simulating a 4:3 

ratio
iv.  Horizontal Zoom In – apply this setting to eliminate black bars on the sides of a 4:3 

ratio source image
v.  Vertical Zoom In – apply this setting to eliminate black bars on the top and bottom of 

a 16:9 ratio source image
vi.  Horizontal and Vertical Zoom In - 

g.   VGA AR Set –  Set this parameter to match the incoming resolution at the VGA/RGBHV 

input

i.  1024x768
ii.  1280x768
iii.  1366x768

h.  Set Picture Default – Sets all picture adjustments above to the factory default setting.  

2.

  Navigate to the screen menus below in order to make any necessary image adjustments to 

properly size and/or position each source:

i. 

Screen Horizontal Position – Adjustable from -20 to +20

j. 

Screen Vertical Position – Adjustable from -20 to +20

k.  Screen Horizontal Size – Adjustable from -20 to +20*
l. 

Screen Vertical Size – Adjustable from -20 to +20*

m.  Screen Horizontal Offset – Adjustable from -20 to +20**
n.  Screen Vertical Offset – Adjustable from -20 to +20**
o.  Set Screen default – Sets all screen adjustments above to the factory default settings.

*  Note that there are limits to these adjustments on some resolutions.  When using larger resolutions, the range of this 

adjustment is limited.

** Adjustable range is 0 to +20 for analog video.  HDMI is -20 to +20.

»
»

»

»

»

»

»
»
»

Operation

After all of the setup steps above, the KD-VPHD3 is ready for operation.  Most applications will 
involve only input switching for day to day operation.  There are a several options for controlling the 
unit.  Most commands can be issued via IR remote control, RS-232 or simply by using the front 
panel buttons.

Front Panel Control

For switching inputs, simply press the ‘Input Select’ button on the right side of the front panel.  See 
number 8 on Figure 4.  Pressing this button repeatedly will cycle through all video inputs.

IR (Remote Control)

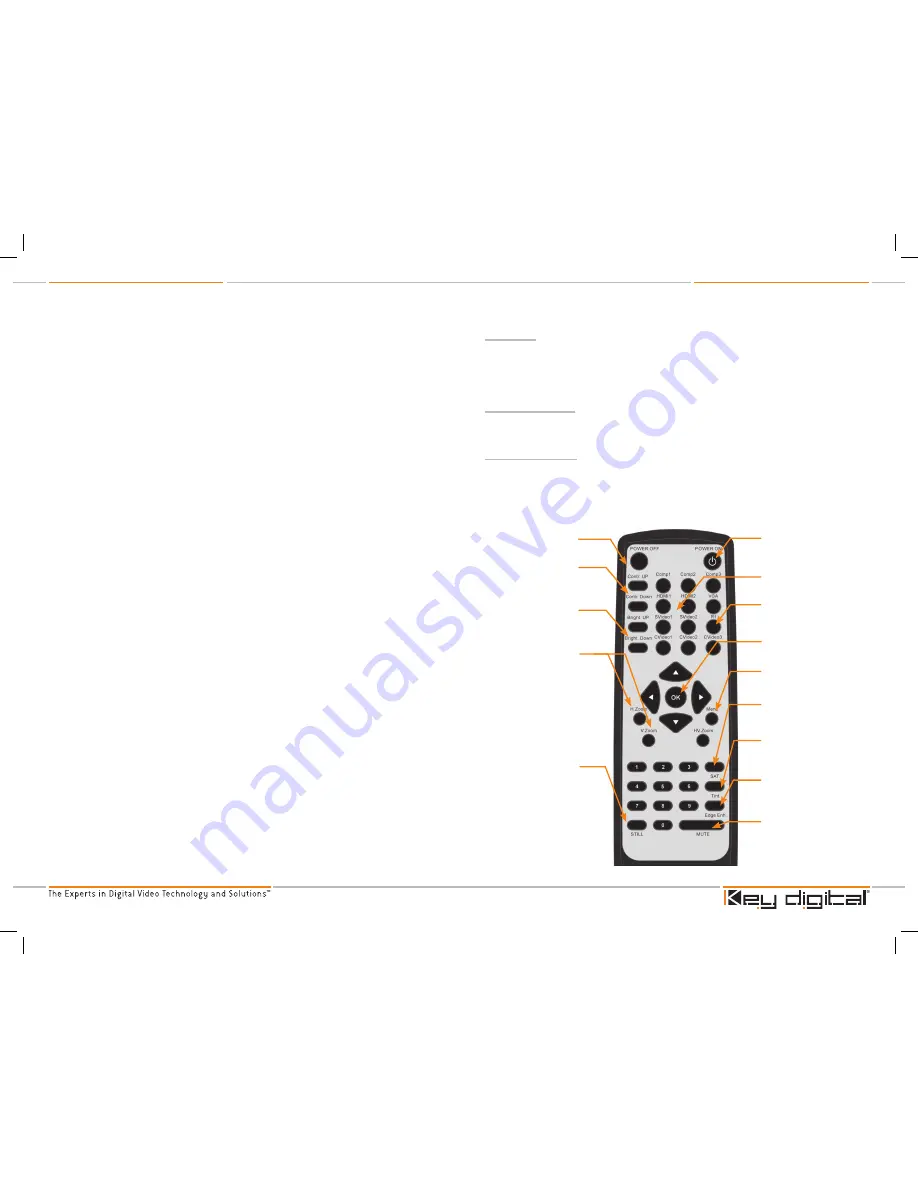
The KD-VPHD3 ships with an IR remote control providing direct selection of inputs and adjustment 
of the most common parameters via ‘hot buttons’.  Hot buttons enable quick adjustment to these 
parameters without the need to access the extensive menu through the LCD.  As illustrated in the 
following diagram, these convenient keys are clearly marked and aid in configuring and operating 
the KD-VPHD3.

Figure 5: IR Remote Buttons

Power Off

Power On

Contrast:  

Higher/Lower

Aspect Ratio 

Zoom Modes 

   H Zoom (toggles H Zoom, 

Pillarbox, Fullscreen)

   V Zoom (toggles V Zoom, 

Letterbox, Fullscreen)

   H&V Zoom (toggles H&V 

Zoom and Fullscreen)

Menu Navigation Buttons

Color Saturation 

Press this, then the up and down 

arrows to adjust

Brightness:  

Higher/Lower

Still:   

Freezes Current 

Video Image

Source Input Selection

Not Used

Menu Button

Tint

Press this, then the up and down 

arrows to adjust

Edge Enhance

Press this, then the up and down 

arrows to adjust

Audio Mute

KD-VPHD3_Manual_Final.indd   12-13

10/17/07   1:21:16 PM

Содержание HD Hot Rod KD-VPHD3

Страница 1: ...nsumers We provide total video system solutions because we know and help drive the technology the industry the business and all the latest up and coming standards Most of all we know exactly what you need for your unique application the right solution Rev 0 Sept 2007 The KD VPHD3 is a full featured video processor and switcher in one compact package The KD VPHD3 is equipped with varied digital and...

Страница 2: ... on the KD VPHD3 3 Connect video audio outputs to display or receiving devices 4 Connect power to the KD VPHD3 and all other input output devices and turn them on 5 On the KD VPHD3 assign audio inputs to appropriate video inputs in the A V Association menu Press the Menu key on the front panel Press the down arrow key on the front panel to get to the A V Set menu for desired video input Press the ...

Страница 3: ...se analog outputs more true to the original content The HDMI outputs are the only signals that are affected by these low cost scaling circuits When HD DVD and Blu Ray devices are connected to the KD VPHD3 via HDMI the Key Digital unit forces the players to output 1080i the signal closest to the original format We then get access to the cleanest possible signal and transfer the responsibility of sc...

Страница 4: ...6P 50Hz 1280x 720P 50 60Hz 1280x 768P 60Hz 1366x 768P 60Hz 1400x 1050P 60Hz 1920x 540P 60Hz 1920x 1080i 50 60Hz 1920x 1080P 50 60Hz HDMI 4 4 4 4 4 4 4 4 4 4 4 4 VGA RGBHV 4 4 4 4 4 4 4 4 4 Component Video 4 4 4 4 4 4 Additional Key Features 1 Programmable input customization for each video input requiring only a one time setup Settings include Horizontal Vertical Size Horizontal Vertical Shift Hor...

Страница 5: ...ipped display For VGA RGBHV displays use the following connection scheme i R Pr ii G Y iii B Pb iv H Hsync v V Vsync b Note that displays with VGA style input connectors will need an appropriate RGBHV to VGA adapter cable c It is important to also note that the analog video output signals above will be disabled when viewing HDMI sources with HDCP copyright encoding present in the source content Th...

Страница 6: ...KD VPHD3 unit from the source devices to the display s and or devices You MUST use the external power supply provided with your unit or you VOID the Key Digital Warranty and risk damage to your unit and associated equipment Menu Navigation The menu structure of the KD VPHD3 allows easy navigation through available system settings To enter the main menu press the menu button on the front panel Pres...

Страница 7: ...f the KD VPHD3 It will help to have a video signal present at selected input Set desired output resolution Navigate to the Output Resolution menu Press the left or right arrow button repeatedly until the desired resolution is displayed These resolutions take effect immediately and there is no need to press the select button to engage the setting Set the A V associations Each video input is able to...

Страница 8: ...tal Size Adjustable from 20 to 20 l Screen Vertical Size Adjustable from 20 to 20 m Screen Horizontal Offset Adjustable from 20 to 20 n Screen Vertical Offset Adjustable from 20 to 20 o Set Screen default Sets all screen adjustments above to the factory default settings Note that there are limits to these adjustments on some resolutions When using larger resolutions the range of this adjustment is...

Страница 9: ...ssociate HDMI2 with audio input 0 11 17 A V Set Component1 11 AV3 Associate Component1 w audio input 0 11 18 A V Set Component2 11 AV4 Associate Component2 with audio input 0 11 19 A V Set Component3 11 AV5 Associate Component3 with audio input 0 11 20 A V Set Composite1 11 AV6 Associate Composite1 with audio input 0 11 21 A V Set Composite2 11 AV7 Associate Composite2 with audio input 0 11 22 A V...

Страница 10: ...P2 4 PAL 2 2 Auto Detect Mode On Off PON POF Example To turn PAL 2 2 on issue the command PON Example To turn PAL 2 2 off issue the command POF The PAL 2 2 pull down process is used specifically for conversion when viewing content filmed at 24 frames second on 50hz displays The KD VPHD3 default setting is On which means it automatically detects the need for this conversion process If the source si...

Страница 11: ...rn on power to the KD VPHD3 unit Power supply must be reconnected to the unit first then push the On button on the front panel The firmware update is now complete and the KD VPHD3 is ready for operation Upon boot up the LCD will display the new firmware version Mechanical CE and RoHS compliant Rack Mountable 1U Dimensions 17 X 7 5 X 1 75 Weight 7 Lbs excluding power supply Enclosure Black Metal Po...

Страница 12: ...duct require warranty service please contact Key Digital to obtain a Returned Materials Authorization RMA number Please contact us at either Phone 1 914 667 9700 E mail rma keydigital com Technical Support For technical questions about using our products please contact us at either Phone 1 914 667 9700 E mail tech keydigital com Customer Support For customer support questions about using our produ...

Отзывы: