


3
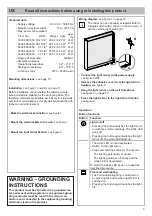
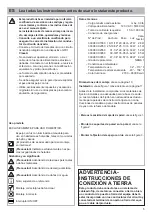
Technical data
– Supply voltage:
120 V AC / 50/60 Hz
– Required electrical outlet:
15 A / 1800 VA
– Max. power consumption:
Prod. No.:
Width
Weight Light
Heat-
ing
33098 XX1550 19-11/16" 20.94 lb 27 W
26 W
33098 XX2050 25-19/32" 25.13 lb 30 W
41 W
33098 XX2550
31-1/2" 29.32 lb 33 W
52 W
33098 XX3050
39-3/8" 35.05 lb 42 W
65 W
33098 XX3550
47-1/4" 40.57 lb 48 W
82 W
– Degree of protection:
NEMA 1
– Ambient conditions:
Operating temperature
32° – 113° F
Storage temperature
-40° – 158° F
– Luminous color
2700 – 6500 Kelvin
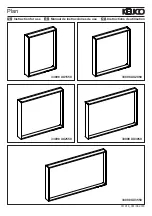
Mounting dimensions
, see page 10.
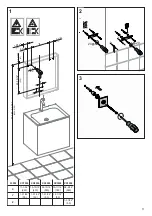
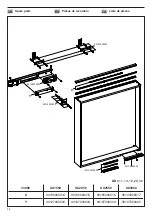
Installation
, see
fi
gure 1 onwards on page 11.
Before installation check whether the fastening mate-
rials included are suitable for the anchoring base. The
fastening materials are suitable exclusively for stud walls
with timber constructions or for drywall constructions with
timber wood reinforcement.
•
Mark the wall bracket position
, see
fi
gure 1.
•
Mount the wall brackets to the wall
, see
fi
gure 2.
•
Mount the light mirror fi xation
, see
fi
gure 3.
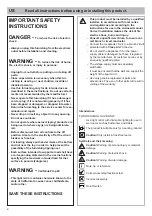
WARNING - GROUNDING
INSTRUCTIONS
This product must be connected to a grounded me-
tal, permanent wiring system, or an equiment-groun-
ding conductor must be run with the circuit con-
ductors and connected to the equipment-grounding
terminal or lead on the product.
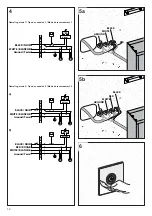
Wiring diagram
, see
fi
gure 4 on page 12.
The mirror can be optionally actuated similar to
a toggle switch with a button on the mirror (A) or
with an external light switch (B).
A
B
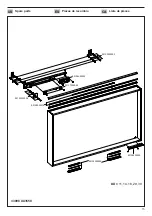
•
Connect the light mirror to the power supply
,
see
fi
gure 5a/5b.
•
Remove the adhesive cover from the light mirror
fi xation
, see
fi
gure 6.
•
Hang the light mirror on the wall from above
,
see
fi
gure 7 on page 13.
•
Press the light mirror to the light mirror fi xation
,
see
fi
gure 8.
Operation
Button functions
Button
Function
Light on/off
• Pressing the button switches the light mirror
on with the selected settings. The white LED
goes off.
• Pressing the button again switches the light
mirror off. The white LED lights up.
• The white LED can be deactivated.
– Switch on the light mirror.
– Press and hold the button for 15 seconds.
- The lighting gets lighter or darker.
- The lighting switches off brie
fl
y and the
white LED is deactivated.
To switch the white LED back on, repeat the
described procedure.
Front and wall lighting
• The front and wall lighting is switched on
by pressing the button when light mirror is
switched on.
• Pressing the button again switches the light
off.
US
Read all instructions before using or installing this product.
Содержание 33098ZZ1550
Страница 13: ...13 7 8 ...