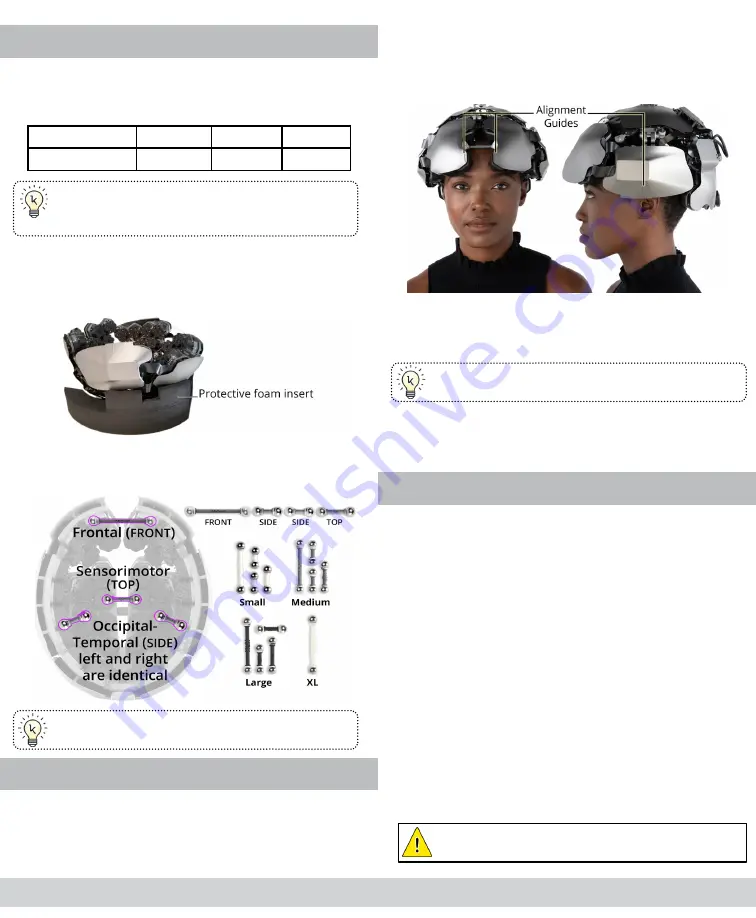
STEP 4: INSTALL THE SIZING BARS
1.
Using the table below, select the size of Sizing
Bars best suited for the current participant.
Sizing Bar Measurement Chart
Circumference
52-54cm
55-57cm 58-60cm
Sizing Bars
S (White)
M (Gray) L (Black)
TIP: Sizing Bars may be mixed to find the best
possible fit. Notate the bars selected and use the
same set every time that participant is recorded.
2.
Turn the headset upside down and place it onto
the inverted protective foam insert from the ship-
ping case, tightening and loosening as described
in the
Handling the Headset
section above.
3.
Insert the four Sizing Bars, using the magnets
to snap the bars into the proper position as
illustrated in the diagram below.
TIP: You may need to loosen the Tension Dial in
order to install the Top Sizing Bar.
STEP 5: PLACE THE HEADSET
1.
Loosen the Tension Dial, then, holding the device
by the Support Tabs, gently set the headset on
the participant’s head.
2.
Using two hands, carefully adjust the headset so
the Alignment Guides on each side of the device
align to matching positions on each side of the
head.
3.
Adjust the headset so the Alignment Guides on
the front of the device are positioned symmetrical-
ly above the eyes.
TIP: You may need to rotate the headset forward
towards the brow for proper alignment.
4.
Tighten the Tension Dial so the headset is as snug
as possible while still remaining comfortable for
the participant.
STEP 6: TUNE THE LASERS
Once the headset is seated on the participant’s head,
you must tune the lasers. This operation turns on the la-
sers and configures the strength of each laser to ensure
every detector is receiving an adequately strong signal.
NOTE: The Tune Lasers tool must be re-run each time
the headset is placed on a participant’s head.
1.
In the Kernel Flow application, at the top of the
main window, click the
Tune Lasers
button.
2.
Click
Tune Lasers
in the window that appears.
A progress bar appears to indicate the duration of
the operation.
3.
Once the operation is complete, click
Close
to
close the Tune Lasers window.
NOTE: When the Tune Lasers command is complete
the lasers remain enabled.
SAFETY WARNING:
Never remove headset from
the participant’s head while lasers are enabled.
8
7


