(1) Perform the following procedure to make sure the O U T -
P U T P R O T E C T feature operates correctly.
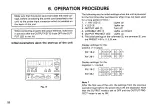
1 ! S e t the L E D s a s s h o w n In Figure 1 1 . In the Figure,.the
V A R I A B L E K E Y © is selected a s an output setting key.
2) Press the O U T P U T K E Y @ , to turn " O N " the output.
3) Nothing can be changed at this point, if the V A R I A B L E K E Y
is pressed.
4) If one of the other keys ( P R E S E T K E Y 1 , 2 , or 3) is pressed,
the L E D corresponding to the pressed key lights up, and
the setting value stored in it is displayed in each of the
voltmeter and the ammeter.
A t the same time, the O U T P U T LED goes off, allowing the
user to confirm that the output is in the O F F state.
Make sure not to turn on the O U T P U T K E Y immediately
after the O U T P U T P R O T E C T feature is started up. Other-
w i s e , the value of the incorrectly selected output setting
key will be output.
(21 Follow the below procedure to make sure that the O U T -
P U T P R O T E C T feature is set O F F .
1) Press the O U T P U T K E Y a s s h o w n in Figure 1 1 , to turn off
its L E D . ' ;
2) Press the O U T P U T K E Y to turn " O N " the output.
3) Nothing can be changed at this point, if the V A R I A B L E K E Y
is pressed.
4) Press one of the k e y s e x c e p t the V A R I A B L E K E Y and
change the output value deliberately. A t this time, the out-
put will not be shut off while the O U T P U T L E D is lit, and
the output setting value entered in the selected key Is dis-
played and output. T h e selection of another output set-
ting key will also lead to the output of the value entered
in it.
T h e O U T P U T P R O T E C T K E Y c a n be turned O N or O F F
while the output is O N .
T o turn the O U T P U T P R O T E C T off, hold d o w n the O U T -
P U T P R O T E C T key for longer than 2 s e c o n d s .
24
Fig. 11 .


