MDX-G1
6
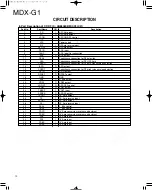
CIRCUIT DESCRIPTION
1. Recordable Disc
No.
Key
Display/Function
1
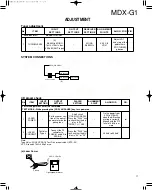
Connect the oscilloscope to TE1 and VC in X33 pcb
2
4
¢
Select [EFBAL ADJU]
3
Load the recordable disc
4 MD
6
[EFBAL MO-W]
5 MD
6
[EF=$
✻✻
MOW]
6
4
¢
Write power adjustment. Adjust the waveform as follows.
7 MD
6
Display shows [EF=$
✻✻
MOR] after [EFB=
✻✻
xSAVE]
to save the data in E2PROM.
Mode changes write to read
Focus and disc servo are on. Tracking servo off.
8
4
¢
Read power adjustment. Adjust the waveform as follows.
9 MD
6
Save the data in E2PROM.
Display shows [EFBAL MO-P]
MOP]
(Pickup travels to search pits and tune the servo to on.)
Adjust the waveform as follows.
xSAVE]
to save the data in E2PROM.
Display shows [EFBAL CHAN]
2. Pre Master Test Disc(TGYS-1)
Load the disc(TGYS-1). [EFBAL CD]
MD
6
Adjust the waveform as follows.
4
Save the data in E2PROM.
Display shows[EFB=
✻✻
xSAVE] in brief time.
[EF PHASE]
5 EJECT
Unload disc.
During this adjustment, the oscilloscope changes in units
of about 2%. Adjust so that the waveform comes nearest
to the specified value. (MO groove read power traverse
adjustment)
(Traverse waveform)
Specification : A = B
Notes :
1. Data is erased during MO write when a recorded disc is
used for this adjustment.
2. If the traverse waveform is difficult to be monitored, con-
nect an oscilloscope as shown in the figure below.
(TE1)
330k
Ω
10pF
(VC)
Oscilloscope
+
-
6-7 EF Balance(Traverse Adjustment)
Connection :
6-8 Automatic EF Balance Adjustment
• Automatic EF balance adjustment is performed.
TE1
VC
Oscilloscope
X33
ADJUSTMENT
+
-
V: 0.5V/div H: 10ms/div
INPUT: DC mode
✽
In this case, lop = 82.5 mA
lop(mA) = Reading of digital voltmeter(mV)/1(
Ω
)
(optical pick-up label)
KMS
260B
27x40
B0825
2. Laser Power Check
No.
Key
Display/Function
1
4
¢
[LDPWR CHEC]
[LDPWR CHEC]
2 MD
6
[(c0.9mW) $xx]
(xx=0.85 to 0.95mW)
3 MD
6
[(c7.0mW) $xx]
4 MD
6
Laser power meter: 7.0
±
1.0mW
✽
VOM:optical pickup indication value
±
10%
✽
No.
Key
Display/Function
1
4 ¢
TE B. ADJ
2
Load a recordable disc.
3
MD
6
TE B. MO-W
(Automatic Adjustment
Mode Indication) = Low Reflection
• Groove
• Writing Power
Automatic Adjustment
4
Display shows
EFB = XXX SAVE
in brief time and save the data in
E2PROM.
Next step
5
TE B. MO-R
(Automatic Adjustment
Mode Indication) = Low Reflection
• Groove
• Reading Power
Automatic Adjustment
6
Display shows
EFB = XXX SAVE
in brief time and save the data in
E2PROM.
Next step
7
TE B. MO-P
(Automatic Adjustment
Mode Indication ) = Low Reflection • PIT
• Reading Power
Automatic Adjustment
8
Display shows
EFB = XXX SAVE
in brief time and save the data in
E2PROM.
Next step
9
EFBAL CHANGE
(Unload a disc)
0
Load a pre-master test disc(TGYS-1).
www. xiaoyu163. com
QQ 376315150
9
9
2
8
9
4
2
9
8
TEL 13942296513
9
9
2
8
9
4
2
9
8
0
5
1
5
1
3
6
7
3
Q
Q
TEL 13942296513 QQ 376315150 892498299
TEL 13942296513 QQ 376315150 892498299


