background image

13

Preparations

Setting up the system

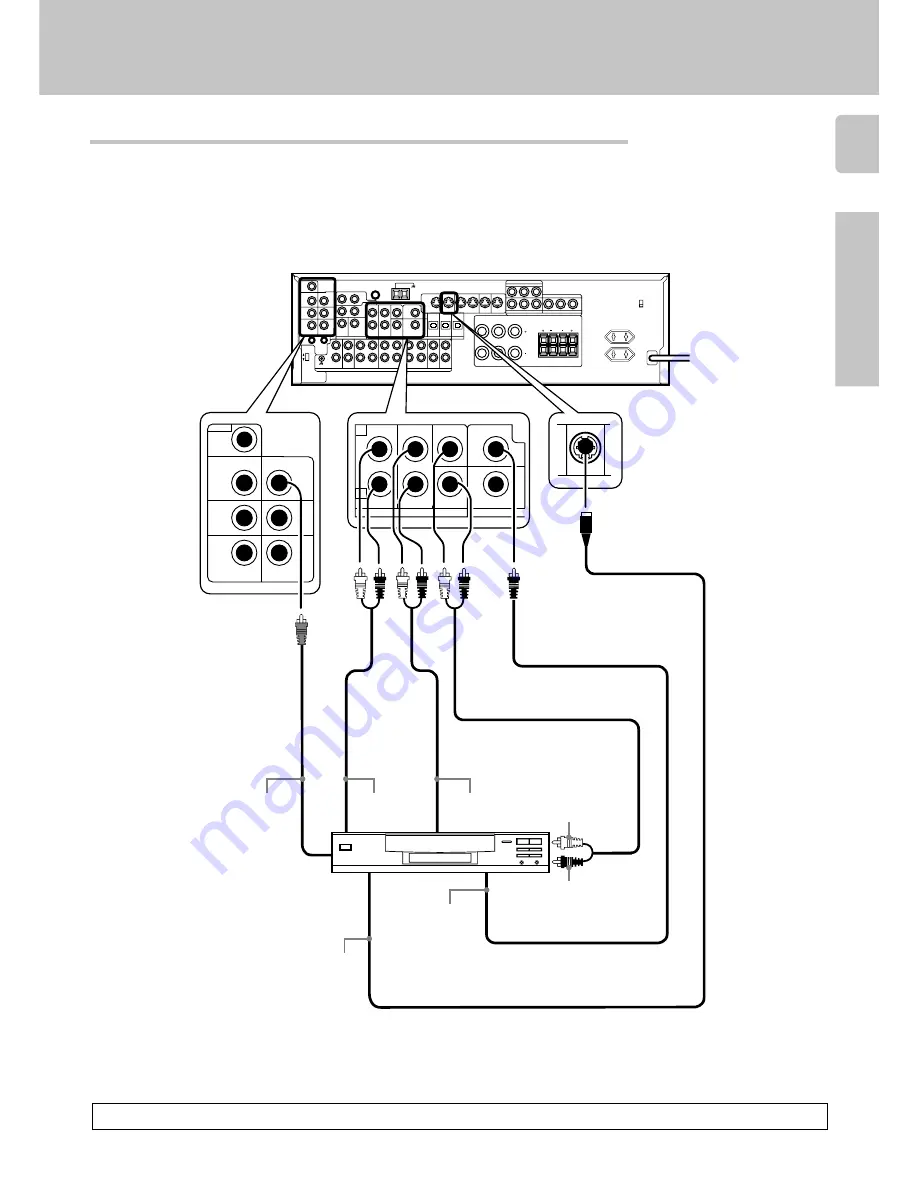
Connecting a DVD player (6-channel input)

FRONT
OUT L/R

S VIDEO
OUT

COAXIAL
DIGITAL
OUT
(AUDIO)

DVD player

S VIDEO cord

SURROUND
OUT L/R

VIDEO OUT
(Yellow RCA
pin cord)

CENTER OUT

SUBWOOFER OUT

If you have connected a DVD player to the receiver  with digital connection, be sure to read the “Input mode settings”
section  carefully.

 8

To switch the speakers off , turn SPEAKERS A and B OFF or press MUTE key on the remote control unit.

L

R

L

VIDEO 3

VIDEO 2

VIDEO 1

S VIDEO

R

A

L

C

L

R

L

R

B

PLAY IN

PLAY IN

PLAY IN

REC OUT

PLAY IN

MONITOR

OUT

VIDEO 1

DVD

R

75

µ

s

AM 10kHz
FM 100kHz

50

µ

s

AM 9kHz
FM 50kHz

DE-
EMPHASIS
CHANNEL 
SPACE

DVD

PLAY IN

FRONT

L

CENTER

DVD

SURROUND

VIDEO 2

COAXIAL

SUB

WOOFER

DVD / 6CH. INPUT

R

VIDEO

ROOM B

OUT

VIDEO 2 IN

VIDEO 1 IN

VIDEO 3 IN

CD/DVD

DVD

MONITOR 
OUT

VIDEO 1

OUT

IN

Содержание KRF-X9050D

Страница 1: ...eration modes These modes enable the remote control to control other audio video components In order to effectively use the remote control it is important to read the operating instructions and obtain a proper understanding of the remote control and how to switch its operation modes etc Using the remote control without completely understanding its design and how to switch the operation modes may r...

Страница 2: ... MAY BE OF SUFFICIENT MAGNITUDE TO CONSTI TUTE A RISK OF ELECTRIC SHOCK TO PERSONS Note Our warranty does not cover damage caused by excessive line voltage due to improper setting of the AC voltage selector switch AC voltage selection Move switch lever to match your line voltage with a small screw driver or other pointed tool AC voltage selector switch The AC voltage selector switch on the rear pa...

Страница 3: ...g to the AV AUX jacks 18 Connecting the antennas 18 Connecting the system control 19 Preparing the remote control 20 Preparing for surround sound 21 Speaker settings 21 Normal playback 23 Preparing for playback 23 Listening to a source component 23 Adjusting the sound 24 Recording 25 Recording audio analog sources 25 Recording video 25 Recording audio digital sources 25 Listening to radio broadcas...

Страница 4: ...ulti channel sound with your multi speakers Now this time try listening to the stereo source ex Audio CD using your multi speakers You may discover a new type of stereo sound through SRS Circle Surround DSP surround modes The DSP Digital Signal Processor used for this receiver incorporates a varietyofhighqualityadjustablesoundfields like ARENA JAZZCLUB THEATER STADIUM and DISCO It is compatible wi...

Страница 5: ...t is connected to the MONITOR jack 9 VOLUME CONTROL knob 0 PHONES jack Use for headphone listening SPEAKERS A B keys Use to turn the A B speakers ON OFF SOUND key Use to adjust the sound quality and ambience effects BAND key Use to select the broadcast band AUTO key Use to change TAPE indication to MD Use to select the auto tuning mode LISTEN MODE key Use to select the listening mode MEMORY key Us...

Страница 6: ...nts CH fi fi fi fi fi key Use to select the channel TV SEL key Use to operate other components VOLUME fi fi fi fi fi RECEIVER keys Use to adjust the receiver volume VOLUME 5 SOURCE keys Use to adjust the source volume 1 Numeric keys r Provide functions identical to those of the original remote control supplied with the component you are controlling 2 RECEIVER key Use to return to the operation of ...

Страница 7: ...PUT SEL key Use to operate other components CH fi fi fi fi fi key Use to select the channel TV SEL key Use to operate other components VOLUME fi fi fi fi fi RECEIVER keys Use to adjust the receiver volume VOLUME 5 SOURCE keys Use to adjust the source volume 1 Numeric keys r Provide functions identical to those of the original remote control supplied with the component you are controlling 2 RECEIVE...

Страница 8: ... settings CD DVD DVD 6ch VIDEO2 and VIDEO3 inputs each include jacks for digital audio input and analog audio input You must select beforehand which type of input is to be used for each connected component The initial factory settings for audio signal playback CD DVD DVD 6ch and VIDEO2 VIDEO3 are digital and analog respec tively To use the analog audio input for playback instead if for example you...

Страница 9: ...er CD player IN OUT Video component 3 head cassette deck or Graphic equalizer IN OUT OUT OUT Record player Moving Coil MC cartridge recordplayercannotbeused directly from the receiver unit Itcanonlybeusedwhen another equalizer amplifier is connected 75µs AM 10kHz FM 100kHz 50µs AM 9kHz FM 50kHz DE EMPHASIS CHANNEL SPACE MONITOR PLAY IN PLAY IN REC OUT AUDIO L R MD TAPE CD DVD PHONO GND REC OUT Sha...

Страница 10: ...T Video deck Monitor TV OUT OUT DVD player or LD player IN Video Inputs Yellow RCA pin cord Audio inputs and outputs Video inputs and outputs yellow RCA pin cord VIDEO IN OUT OUT IN S VIDEO IN L R L VIDEO 3 VIDEO 2 VIDEO 1 S VIDEO R A L C L R L R B PLAY IN PLAY IN PLAY IN REC OUT PLAY IN MONITOR OUT VIDEO 1 DVD R 75µs AM 10kHz FM 100kHz 50µs AM 9kHz FM 50kHz DE EMPHASIS CHANNEL SPACE S VIDEO DVD V...

Страница 11: ...DIO LD player RF digital demodulator DEM 9991D sold separately PCM OUT CD player Component with DTS Dolby Digital or PCM COAXIAL DIGITAL OUT Optical fiber cable OPTICAL DIGITAL IN AUDIO MD player OPTICAL DIGITAL OUT AUDIO Digital connections Setting up the system The digital in jacks can accept DTS Dolby Digital or PCM signals Connect components capable of outputting DTS Dolby Digital or standard ...

Страница 12: ... player with component jacks Video Recorder DVD Recorder Satellite Cable Tuner Game Player with component jacks Monitor TV with component jacks Y OUT CR OUT CR IN Y IN If you have connected the receiver to a video component with COMPONENT jacks you can get a better picture quality than by connecting to the S VIDEO jacks CB OUT Y OUT CR OUT CB OUT Connect to the VIDEO cord When connecting the TV to...

Страница 13: ... read the Input mode settings section carefully 8 To switch the speakers off turn SPEAKERS A and B OFF or press MUTE key on the remote control unit L R L VIDEO 3 VIDEO 2 VIDEO 1 S VIDEO R A L C L R L R B PLAY IN PLAY IN PLAY IN REC OUT PLAY IN MONITOR OUT VIDEO 1 DVD R 75µs AM 10kHz FM 100kHz 50µs AM 9kHz FM 50kHz DE EMPHASIS CHANNEL SPACE DVD PLAY IN FRONT L CENTER DVD SURROUND VIDEO 2 COAXIAL SU...

Страница 14: ...Connecting the speakers L R L VIDEO 3 VIDEO 2 VIDEO 1 S VIDEO R A L C L R L R B PLAY IN PLAY IN PLAY IN REC OUT PLAY IN MONITOR OUT VIDEO 1 DVD R 75µs AM 10kHz FM 100kHz 50µs AM 9kHz FM 50kHz DE EMPHASIS CHANNEL SPACE SUB WOOFER FRONT SPEAKERS SURROUND SPEAKERS 8 16Ω 8 16Ω GRAY ORANGE FRONT SPEAKERS SURROUND SPEAKERS 6 16Ω 6 16Ω GRAY ORANGE FRONT SPEAKERS CENTER SPEAKERS RED BLUE GREEN FRONT SPEAK...

Страница 15: ... or damage to the speakers or receiver Speaker placement Subwoofer Front speakers Place to the front left and right of the listening position Front speakers are required for all surround modes Center speaker Place front and center This speaker stabilizes the sound image and helps recreate sound motion Be sure to connect a center speaker when using the Dolby 3 Stereo mode Surround speakers Place to...

Страница 16: ...om or area ROOM B Setting up the system L R L VIDEO 3 VIDEO 2 VIDEO 1 S VIDEO R A L C L R L R B PLAY IN PLAY IN PLAY IN REC OUT PLAY IN MONITOR OUT VIDEO 1 DVD R 75µs AM 10kHz FM 100kHz 50µs AM 9kHz FM 50kHz DE EMPHASIS CHANNEL SPACE VIDEO ROOM B OUT FRONT SURROUND SUB WOOFER CENTER PRE OUT ROOM B Power amplifier Front speakers L R Monitor TV ROOM A Main System ROOM B ...

Страница 17: ...e PRE OUT jacks press only the SPEAKERS A key to the ON position This connection is available for listening in ROOM B Setting up the system Subwoofer Center Speaker Surround speakers Front speakers Power amplifier Power amplifier Power amplifier Power amplifier L L R R L R L VIDEO 3 VIDEO 2 VIDEO 1 S VIDEO R A L C L R L R B PLAY IN PLAY IN PLAY IN REC OUT PLAY IN MONITOR OUT VIDEO 1 DVD R 75µs AM ...

Страница 18: ...tenna is for use indoors Place it as far as possible from the receiver TV set speaker cords and power cord and adjust the direction for best reception 3 Release lever AM loop antenna FM indoor antenna FM outdoor antenna Use an antenna adaptor Commercially available FM indoor antenna The supplied indoor antenna is for temporary use only For stable signal reception we recommend using an outdoor ante...

Страница 19: ...nsists of this kind of combination please do not connect any system control cords Even without system control cords normal operations can be carried out without effecting performance 2 Do not connect system control cords to any components other than those specified by KENWOOD It may cause a malfunction and damage your equipment 3 Be sure the system control plugs are inserted all the way in to the ...

Страница 20: ... use during operation checks 2 When the remote controllable distance gets shorter than before replace both batteries with new ones 3 Placing the remote sensor in direct sunlight or in direct light from a high frequency fluorescent lamp may cause a malfunction In such a case change the location of the system installation to prevent malfunction 6 m When pressing more than one remote control key succ...

Страница 21: ...tting 1 NML THX normal An average size center speaker is connected to the receiver 2 LRG large A large center speaker is connected to the receiver 3 OFF Center speaker setting mode to the receiver is OFF MEMO ST TUNED FM AM MHz kHz PRO LOGIC 3 DOWN MIX DIGITAL S DIRECT MONITOR DSP AUTO SOUND AUTO CLIP LFE SW S RS LS B MUTE TI VOL RDS EON PTY TP TA NEWS STEREO C SP A L R Blinks 3 SW RE MIX scrolls ...

Страница 22: ...ound sound 1 Use the INPUT SELECTOR knob to select the source which you want to adjust You can store a separate input level for each input source If the MONITOR function is ON you can store an input level for when MONITOR is on independently of the input levels for the input sources 2 Press the SOUND key repeatedly until the INPUT indication appears 3 Use the MULTI CONTROL knob or keys to adjust t...

Страница 23: ...ted to the SPEAKERS A and B terminals on the rear panel A B OFF No sound from the speakers Use this setting when listening with headphones for stereo sound in all playback modes Selecting 6ch INPT by pressing the INPUT MODE key whereby DVD 6ch is the input source will cause SPEAKERS A to be selected automatically When you use the PRE OUT jacks set only SPEAKERS A to ON mode Turning on the receiver...

Страница 24: ...T playback will be canceled To cancel Press the SOURCE DIRECT key again If SOURCE DIRECT playback was activated when using a surround mode canceling SOURCE DIRECT playback will reactivate the previous surround mode Listening with headphones 1 Press the SPEAKERS A and B key so that the speaker indicator goes off If you turn off all of the speakers when in surround mode the surround mode will be can...

Страница 25: ...source CD DVD DVD 6ch VIDEO2 or VIDEO3 you want to record 2 Set the cassette deck or MD recorder to record 3 Press and hold the DIMMER key for more than 2 seconds to select the A REC or M REC mode The mode changes every 2 seconds as shown below 1 Rec mode off The digital input record mode is switched off 2 A REC The digital input signals DTS Dolby Digital or PCM are identi fied automatically and c...

Страница 26: ...y to return to the original display and start again ST lights up when a broadcast is being received in stereo Use the MULTI CONTROL knob or keys to select one of the station presets 1 40 Press the MEMORY key again to accept the setting Use the TUNER key to select the tuner as the source AM kHz PRO LOGIC 3 DOWN MIX DIGITAL S DIRECT MONITOR DSP MEMO ST TUNED AUTO SOUND FM MHz STEREO AUTO AM kHz PRO ...

Страница 27: ...ystem The RDS indicator lights up when an RDS broadcast signal is received Note Some functions and function names may differ for certain countries and areas Before using a function utilizing the RDS be sure to perform the RDS Auto Memory operation by referring to the description in Presetting RDS stations RDS AUTO MEMORY Each press switches the display mode as follows 1 PS Program Service name dis...

Страница 28: ...erforming the RDS Auto Memory operation 3 Press the PTY key to start searching EXAMPLE Searching for a Rock Music broadcast Goes out Station name display Blinks Program type name display To select another program type Display while searching Display when a station is received No sound is heard while PTY is blinking If the desired program type cannot be found NO PROG is dis played then after severa...

Страница 29: ...yer Optional in this mode LFE Low Frequency Effects This channel delivers separate non directional bass signals to the subwoofer for more dynamic deep bass sound effects DTS has a 1 or LFE channel The indication LFE appears in the display when a signal is being input for this channel Manufactured under license from Digital Theater Systems Inc US Pat No 5 451 942 and other worldwide patents issues ...

Страница 30: ...hing Due to human condition listening to sound from various directions of speakers can be very disturbing So it is important to smoothen the flow of sound to suit the home cinema environment Timbre Matching is able to smoothen the flow of sound to the listener who will be able to enjoy the cinema effect at home Adaptive Decorrelation Mono sound track produced form the speaker system comes from onl...

Страница 31: ... DSP mode The DSP mode lets you add the atmosphere of a live concert or hall to almost any type of program source These modes are particularly effective when used with stereo program sources like CD television and FM radio You might enjoy trying the ARENA JAZZ CLUB THEATER STADIUM or DISCO mode the next time you watch a concert or sporting event Front speakers L R Subwoofer SW Surround speakers L ...

Страница 32: ...ndicator lights up 4 3 STEREO 3 STEREO surround 5 CIRCLE SURROUND CS 5 1 surround The CS 5 1 indi cator lights up 6 ARENA DSP Surround ARENA mode The DSP MODE indicator lights up 7 JAZZ CLUB DSP Surround JAZZ CLUB mode The DSP MODE indicator lights up 8 THEATER DSP Surround THEATER mode The DSP MODE indicator lights up 9 STADIUM DSP surround STADIUM mode The DSP MODE indicator lights up 0 DISCO DS...

Страница 33: ...the DVD player For the powered subwoofer you can adjust the volume of the subwoofer using the subwoofer s own volume control Select 6ch INPT by pressing the INPUT MODE key 2 Start playback of the DVD software 3 Adjust the volume 4 Convenient functions Adjusting the sound You can make further adjustments to the sound while listening to playback in the surround mode 1 Press the SOUND key until the d...

Страница 34: ...ED AUTO TI VOL B CLIP MUTE RDS EON PTY TP TA NEWS SW SP A R C L PRO LOGIC S LFE DIGITAL AUTO SOUND STEREO FM AM MHz kHz 3 DOWN MIX S DIRECT MONITOR DSP MEMO ST TUNED AUTO TI VOL B CLIP MUTE RDS EON PTY TP TA NEWS SW SP A R C L PRO LOGIC S LFE DIGITAL AUTO SOUND STEREO FM AM MHz kHz 3 DOWN MIX S DIRECT MONITOR DSP MEMO ST TUNED AUTO TI VOL B CLIP MUTE RDS EON PTY TP TA NEWS SW SP A R C L PRO LOGIC ...

Страница 35: ...e tuner or DSS receiver go to step 2 When you operate the CD player Cassette deck MD player or Tuner with system control connection go to step 3 To return to the receiver operation mode press the RECEIVER key Press the source POWER key Input Component Maker Code Key DVD DVD player KENWOOD 5115 DVD 1 Registering setup codes for other components Find the setup code of the component to be registered ...

Страница 36: ...6 0115 0129 0168 MITSUBISHI 0104 0105 0117 0124 0172 0198 MARANTZ 0117 MAGNASONIC 0178 MEMOREX 0178 NATIONAL 0101 0102 0151 0100 NEC 0105 0104 ORION 0128 PANASONIC 0101 0102 0193 0194 0100 0151 PRISM 0101 PROSCAN 0101 0103 0104 0121 0122 0185 PHILCO 0104 0115 PROSCAN 0104 0112 0118 PIONEER 0107 0118 PHILIPS 0115 QUASAR 0101 0103 RCA 0104 0112 0119 0121 0122 0130 0131 0132 0161 0162 0163 0169 0186 ...

Страница 37: ...0514 0515 0516 0541 0542 0543 MITSUBISHI 0519 0520 0525 0526 0548 0549 0550 NEI 0515 0516 0540 NOKIA 0512 NORMENDE 0544 0545 OCEANIC 0546 0547 ORION 0508 0509 0510 0511 0512 0513 0514 0515 0516 PANASONIC 0529 0530 0551 0552 0553 0554 PHILIPS 0515 0516 0517 0518 0521 PHONOLA 0515 0516 RADIOLA 0515 0516 ROADSTAR 0533 0534 SABA 0544 0545 SAMSUNG 0515 0516 0521 0533 0534 0541 0542 0543 0557 SANYO 0523...

Страница 38: ...X 3133 OAK 3102 3137 3139 PULSAR 3105 PHILIPS 3106 3107 3128 3129 3130 3131 3150 PANASONIC 3109 3110 3114 3151 PIONEER 3101 3116 PULSAR 3132 PUSER 3132 REALISTIC 3132 REMBRANT 3105 3132 3137 3138 RCA 3115 REGAL 3118 3112 3140 3141 3142 3145 3149 REGENCY 3134 SLMARK 3101 3105 SAMSUNG 3105 SPRUCER 3105 3110 STARGATE 3105 S A 3111 3112 3132 TOSHIBA 3104 3146 TELEVIEW 3101 3105 TOCOM 3135 3136 3147 TE...

Страница 39: ...PIC 1123 1124 OPTIMUS 1106 1121 1128 1135 ORION 1120 1126 PANASONIC 1121 1122 1123 1124 PENNEY 1100 1105 1110 1111 1124 1139 1145 PENTAX 1100 1111 1145 PHILCO 1120 1123 1124 1126 1127 1131 1143 PHILIPS 1123 1124 1131 1173 PIONEER 1123 PROSCAN 1100 1101 1102 1123 1124 1131 1133 1145 1146 1174 QUASAR 1121 1122 1123 1124 RADIO SHACK 1105 1109 1124 1127 1133 1136 1140 RCA 1100 1101 1102 1123 1124 1131...

Страница 40: ...2164 MULTITECH 2104 2127 2147 NEC 2110 2111 2134 2139 OLYMPIC 2123 2124 OPTIMUS 2106 2121 2128 2135 ORION 2120 2126 PANASONIC 2121 2122 2123 2124 PENNEY 2100 2105 2110 2111 2124 PENTAX 2100 2111 2145 PHILCO 2120 2123 2124 2126 2127 2131 2143 PHILIPS 2123 2124 2131 2173 PIONEER 2123 PROSCAN 2100 2101 2102 2123 2124 2131 2133 2145 2146 2174 QUASAR 2121 2122 2123 2124 RADIO SHACK 2105 2109 2124 2127 ...

Страница 41: ...526 1527 MATSUI 1500 1501 1521 1524 1525 METZ 1538 MITSUBISHI 1526 1527 1534 1535 1549 NEC 1502 1503 1506 1534 1535 NOKIA 1505 1506 1507 1508 1509 1536 1542 1543 NORDMENDE 1532 1533 1534 1535 OKANO 1522 1523 ORION 1521 1524 1525 PHILIPS 1536 1549 1550 1551 1552 PANASONIC 1538 1546 1547 PHONOLA 1549 ROADSTAR 1500 1501 1519 1520 1542 1543 RFT 1550 SABA 1534 1535 SALORA 1505 1506 1509 1526 1527 SAMSU...

Страница 42: ...526 2527 MATSUI 2500 2501 2521 2524 2525 METZ 2538 MITSUBISHI 2526 2527 2534 2535 2549 NEC 2502 2503 2506 2534 2535 NOKIA 2505 2506 2507 2508 2509 2536 2542 2543 NORDMENDE 2532 2533 2534 2535 OKANO 2522 2523 ORION 2521 2524 2525 PHILIPS 2536 2549 2550 2551 2552 PANASONIC 2538 2546 2547 PHONOLA 2549 ROADSTAR 2500 2501 2519 2520 2542 2543 RFT 2550 SABA 2534 2535 SALORA 2505 2506 2509 2526 2527 SAMSU...

Страница 43: ... THOMSON 5101 TECHNICS 5100 TOSHIBA 5103 KONKA 5119 WAVE 5122 YAMAHA 5100 ZENITH 5107 5112 DVD Setup Codes RC R0714 R0715 Maker No No No No DISH NETWORK Echostar 4105 4115 4116 ECHOSTAR 4105 EXPRESS VU 4105 4115 G E 4106 G I 4108 GRADIENTE 4114 HITACHI 4111 4112 4103 HNS Hughes 4103 MAGNAVOX 4101 4102 PANASONIC 4104 PHILIPS 4101 4102 PROSCAN 4106 4109 4110 4113 PRIMESTAR 4108 STAR CHOICE 4103 4108...

Страница 44: ...only operate some of the functions available on a given models 2 The charts below show the typical functions available for each component Some manufacturers use different key combinations to perform similar functions For that reason we have programmed extra functions on some of the unused number keys to help you control your equipment The setup code for each component must be entered beforehand Ca...

Страница 45: ...NU MULTI CONTROL MULTI CONTROL ENTER OSD CH RECEIVER THX RDS DISP PTY POWER TV VCR1 VCR2 DVD 2 Play 6 Play Pause 7 Stop 1 Rewind Fast forward REMOTE CONTROL UNIT RC R0714 1 2 3 POWER POWER 4 5 6 7 8 9 0 10 BASS BOOST DIMMER TUNING REC M BAND AUTO A B 100 INPUT SEL TV SEL DVD TITLE RETURN DISCSEL DISCSKIP AV AUX TUNER CD DVD MD TAPE PHONO VIDEO1 VIDEO2 VIDEO3 DVD LISTEN M SOUND THX MUTE RECEIVER VO...

Страница 46: ...SD CH RECEIVER TV VCR1 VCR2 DVD 7 Stop 6 Play Pause Skip forward 4 Skip backward 1 Search 100 100 Numeric keys REMOTE CONTROL UNIT RC R0714 1 2 3 POWER POWER 4 5 6 7 8 9 0 10 BASS BOOST DIMMER TUNING REC M BAND AUTO A B 100 INPUT SEL TV SEL DVD TITLE RETURN DISCSEL DISCSKIP AV AUX TUNER CD DVD MD TAPE PHONO VIDEO1 VIDEO2 VIDEO3 DVD LISTEN M SOUND THX MUTE RECEIVER VOLUME SOURCE VOLUME SET UP P CAL...

Страница 47: ... SET UP P CALL P CALL MENU MULTI CONTROL MULTI CONTROL ENTER OSD CH RECEIVER TV VCR1 VCR2 DVD INPUT SEL Input Selector 7 Stop 6 Play Pause ENTER Enter Numeric keys CH fi Channel Fast forward 1 Rewind REMOTE CONTROL UNIT RC R0714 1 2 3 POWER POWER 4 5 6 7 8 9 0 10 BASS BOOST DIMMER TUNING REC M BAND AUTO A B 100 INPUT SEL TV SEL DVD TITLE RETURN DISCSEL DISCSKIP AV AUX TUNER CD DVD MD TAPE PHONO VI...

Страница 48: ...OWER 4 5 6 7 8 9 0 10 BASS BOOST DIMMER TUNING REC M BAND AUTO A B 100 INPUT SEL TV SEL DVD TITLE RETURN DISCSEL DISCSKIP AV AUX TUNER CD DVD MD TAPE PHONO VIDEO1 VIDEO2 VIDEO3 DVD LISTEN M SOUND MUTE RECEIVER VOLUME SOURCE VOLUME SET UP P CALL P CALL MENU MULTI CONTROL MULTI CONTROL ENTER OSD CH RECEIVER TV VCR1 VCR2 DVD INPUT SEL Input Selector 7 Stop 6 Play Pause ENTER Enter Numeric keys CH fi ...

Страница 49: ...ferring to Connecting the speakers Select a surround mode Adjust the speaker levels using the test tone Insert the audio cord plugs securely into the PHONO jacks Connect the grounding wire to the GND terminal on the rear panel Set the input mode to digital manual before starting playback of the Dolby Digital source 8 Press the INPUT MODE key to select to digital auto mode 8 Copy guarded video soft...

Страница 50: ...t to the operation mode for the component you wish to control The microprocessor of the remote control mal functions Remedy Turn the subwoofer ON Press the source keys or source POWER keys to select the appropriate operation mode Replace with new batteries Operate the remote control unit within the controllable range Connect properly referring to Setting up the system 8 Place software in the sourc...

Страница 51: ...8 V 500 Ω Tone control BASS 10 dB at 70 Hz TREBLE 10 dB at 10 kHz DIGITAL AUDIO section Sampling frequency 32 kHz 44 1 kHz 48 kHz 96kHz Input level impedance wave length Optical 15 dBm 21 dBm 660 nm 30nm Coaxial 0 5 Vp p 75 Ω VIDEO section VIDEO inputs outputs VIDEO composite 1 Vp p 75 Ω S VIDEO luminance signal 1 Vp p 75 Ω chrominance signal 0 286 Vp p 75 Ω COMPONENT VIDEO luminance signal 1 Vp p...

Страница 52: ...he unit in the spaces designated on the warranty card and in the space provided below Refer to the model and serial numbers whenever you call upon your dealer for information or service on this product Model __________________ Serial Number ________________________ ...

Отзывы: