background image

contents

safety warnings .................................................................................................................. 5
unpacking ............................................................................................................................ 8

location ............................................................................................................................ 9

product overview .............................................................................................................. 13

front view ....................................................................................................................... 13
rear view ........................................................................................................................ 13
upper basket .................................................................................................................. 13
lower basket .................................................................................................................. 13
cutlery basket ................................................................................................................ 13
internal view .................................................................................................................. 13
control panel ﹠ display window ..................................................................................... 14

before operating ............................................................................................................... 15

opening the door ........................................................................................................... 15
closing the door ............................................................................................................. 15
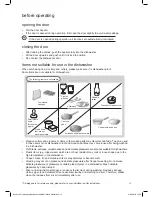
items not suitable for use in the dishwasher ................................................................. 15

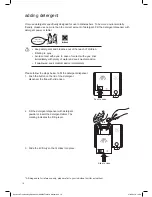
adding detergent .............................................................................................................. 16
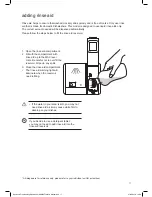
adding rinse aid ................................................................................................................ 17

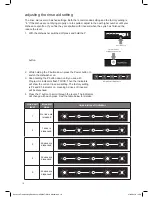
adjusting the rinse aid setting ........................................................................................ 18
testing your water hardness .......................................................................................... 19
adjusting salt consumption ............................................................................................ 20

adding salt ......................................................................................................................... 21
loading the dishwasher .................................................................................................... 22

before loading the dishwasher ...................................................................................... 22
upper basket .................................................................................................................. 23
adjusting the upper basket ............................................................................................ 23
lhinged cup rack ............................................................................................................ 24
Loading the Upper Basket for 12 Place Settings ........................................................... 24
Loading the Lower Basket for 12 Place Settings ........................................................... 25
Loading the Cutlery Basket ........................................................................................... 25

wash cycle table ............................................................................................................... 26
using the dishwasher ....................................................................................................... 27
changing the programme ................................................................................................ 27
canceling a programme ................................................................................................... 27
at the end of the programme ........................................................................................... 27
switching the dishwasher off .......................................................................................... 28
unloading the dishwasher ............................................................................................... 28
delay start.......................................................................................................................... 28

Kenwood Freestanding Dishwasher KDW60T18/X18 Manual.indd   3

07/06/2018   15:59

Содержание KDW60T18

Страница 1: ...Freestanding Dishwasher KDW60T18 KDW60X18 installation instructions manual Kenwood Freestanding Dishwasher KDW60T18 X18 Manual indd 1 07 06 2018 15 59 ...

Страница 2: ...Kenwood Freestanding Dishwasher KDW60T18 X18 Manual indd 2 07 06 2018 15 59 ...

Страница 3: ...water hardness 19 adjusting salt consumption 20 adding salt 21 loading the dishwasher 22 before loading the dishwasher 22 upper basket 23 adjusting the upper basket 23 lhinged cup rack 24 Loading the Upper Basket for 12 Place Settings 24 Loading the Lower Basket for 12 Place Settings 25 Loading the Cutlery Basket 25 wash cycle table 26 using the dishwasher 27 changing the programme 27 canceling a ...

Страница 4: ... frost precaution 32 moving the dishwasher 32 maintenance for a prolonged period of non operation 32 hints and tips 33 fault codes 33 technical problems 34 disposal of the dishwasher 36 disposal of packing material 36 product fiche and specifications 37 energy labels 38 Kenwood Freestanding Dishwasher KDW60T18 X18 Manual indd 4 07 06 2018 15 59 ...

Страница 5: ...er Keep mains cable out of reach from children Keep children away from detergents and rinse aids These may cause chemical burns in the mouth throat and eyes or asphyxiation Keep children away from the dishwasher when the door is open Switch off water and power and unplug before fitting or removing tools attachments after use and before cleaning Keep your fingers away from moving parts and fitted a...

Страница 6: ...ts must be loaded in the basket with the sharp points downwards or placed horizontally Do not allow plastic items to come into contact with heating element Check that the detergent receptacle is empty after completion of the wash cycle Do not wash plastic items unless they are marked dishwasher safe or equivalent Use only detergent and rinse aids designed for an automatic dishwasher The mains plug...

Страница 7: ...nce is not in use Capacity 12 place settings Product dimensions 850 mm H x 598 mm W x 598 mm D For supporting and fixing the appliance see the Installation section Earthing Instructions WARNING THIS APPLIANCE MUST BE EARTHED This appliance is equipped with a mains cable having an equipment earthing conductor and an earthing plug The plug must be plugged into an appropriate outlet that is installed...

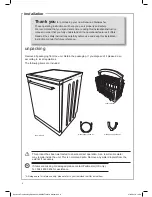
Страница 8: ...will help you use it properly and safely We recommend that you spend some time reading this installation instruction manual in order that you fully understand all the operational features it offers Read all the safety instructions carefully before use and keep this installation instruction manual for future reference If items are missing or damaged please contact Partmaster UK only Tel 0344 800 34...

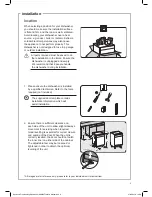
Страница 9: ... there is sufficient clearance on each side of the unit to allow slight sideways movement for servicing when required Good levelling is essential for correct closure and sealing of the door When the unit is correctly levelled the door should not catch the inner liner on either side of the cabinet The adjustable feet may be loosened or tightened in order to obtain the optimum levelling of the unit ...

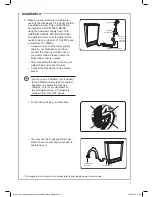
Страница 10: ...d potential damage to the back of the unit All images are for reference only please refer to your individual unit for actual item 4 Position the dishwasher next to a water tap and a drain Ensure the water inlet and drain hoses are not kinked or squashed The unit must not stand on the mains cable Kenwood Freestanding Dishwasher KDW60T18 X18 Manual indd 10 07 06 2018 15 59 ...

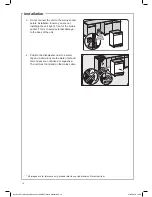
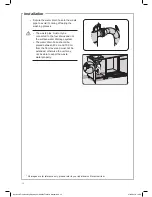
Страница 11: ...turn on your water mains and check for leaks Connect the dishwasher to the mains socket All images are for reference only please refer to your individual unit for actual item Do not bend or kink your drain hose You may use a Y adaptor not included for an additional water feed for another appliance for example a washing machine This is only applicable to the cold water mains A Y adaptor is availabl...

Страница 12: ...ing the washing process The waste pipe must only be connected to the foul drains and not the surface water drainage system The water drain hose should be placed between 40 cm and 100 cm from the floor level and must not be extended otherwise the unit may not be able to expel the waste water properly Kenwood Freestanding Dishwasher KDW60T18 X18 Manual indd 12 07 06 2018 15 59 ...

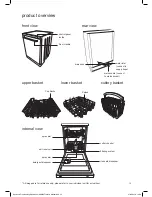
Страница 13: ...ose drain hose mains cable connect to mains socket spray arm rinse aid dispenser spray arm salt reservoir detergent dispenser cutlery basket filtering system All images are for reference only please refer to your individual unit for actual item Spikes Door Handle Cup Racks Kenwood Freestanding Dishwasher KDW60T18 X18 Manual indd 13 07 06 2018 15 59 ...

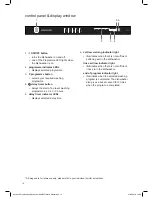
Страница 14: ... panel display window 6 salt low warning indicator light illuminates when there is not sufficient softening salt in the dishwasher rinse aid low indicator light illuminates when there is not sufficient rinse aid in the dishwasher end of program indicator light illuminates when the selected washing program is completed The dishwasher also gives a buzzer sound for 5 times when the program is complet...

Страница 15: ...s have a tendency to discolour during washing Residues like egg white egg yolk and mustard often cause discolouring and staining on silver Therefore please clean the residues from silver immediately after use The following items are not suitable Towels and sponges Small plastic items Milk bottle nipple Plastic items that are not dishwasher safe Cast iron pans Scratched non stick cookware Copper po...

Страница 16: ...gent powder or insert the detergent tablet The marking indicates the filling level Bleach and Countertop detergent Irritant 3 Slide the lid firmly so that it clicks into place Keep detergents and bleaches out of the reach of children Irritating to eyes Avoid contact with eyes In case of contact with eyes rinse immediately with plenty of water and seek medical advice If swallowed seek medical advic...

Страница 17: ... may cause white film to develop on your dishes All images are for reference only please refer to your individual unit for actual item If you decide to use a detergent tablet you may not need to add rinse aid into the rinse aid reservoir 25 15 OR MAX 1 Open the rinse aid compartment 2 Fill with the compartment with rinse aid up to the MAX level mark Be careful not to overfill the reservoir Wipe up...

Страница 18: ...s are dispensed 4 3 doses are dispensed 5 4 doses are dispensed Press and hold Switch on while holding button P down button Switch on while holding button P down 2 While holding the P button down press the Power button to switch the dishwasher on 3 Keep holding the P button down until you see all 5 Programme indicators flash TWICE Then the indicators will show the current rinse aid setting The fac...

Страница 19: ...dness level by using the test strip if available 1 Open the testing strip 2 Run your cold tap for a minute then fill a cup glass with water 3 Dip the testing strip into the water for 1 second 4 Shake off the excess water and wait 1 minute for the result results table Level 1 Level 2 Level 3 Level 4 Level 5 Level 6 No Lime Very low lime content Low lime content Medium lime content Medium High lime ...

Страница 20: ... 32 50 56 90 40 63 To adjust your dishwasher for the local water hardness please follow these steps and refer to the table above 1 With the dishwasher switched off press and hold the P button Press and hold Switch on while holding button P down Switch on while holding button P down 2 While holding the P button down press the Power button to switch the dishwasher on 3 Keep holding the P button down...

Страница 21: ...the Rinse programme P5 immediately without any crockery in the dishwasher to remove any traces of salt from the compartment The salt low warning indicator on the control panel will illuminate when the reservoir is running out of salt and requires refilling Once refilled the salt low warning indicator will cease to illuminate within a few days depending on how quickly the salt dissolves All images ...

Страница 22: ...ned Hollow items such as cups glasses pans etc must be placed upside down in the basket Wide based items should be placed at an angle so that water can run off them freely The spray arms must not be blocked by items which are too tall or hang through the baskets If in doubt test for free movement by manually rotating the spray arms Ensure that small items cannot fall through the holders in the bas...

Страница 23: ...et More space can be created for large items on the upper or lower baskets by adjusting the height of the upper basket To adjust the height of the upper basket 1 Push back the rail stops on both sides 2 Slide the basket out from the rails and replace at the desired height 3 Replace the rail stops to their original positions Position of upper basket Maximum plate diameter Top basket Bottom basket U...

Страница 24: ... onto the dishes in the lower basket we recommend that you empty the lower basket first raise upwards clips up onto frame Loading the Upper Basket for 12 Place Settings For optimum loading of crockery in the upper basket please refer to the below table and image Number Item 1 Cups 2 Large serving bowl 3 Medium serving bowl 4 Glasses 5 Saucers 6 Small serving bowl 2 3 4 4 4 4 4 4 4 4 4 4 4 4 5 6 1 ...

Страница 25: ...andards of Performance all cutlery must be loaded according to the instructions in this manual Loading the Lower Basket for 12 Place Settings For optimum loading of crockery in the lower basket please refer to the below table and image Number Item 1 Oval platter 2 Dessert dishes 3 Soup plates 4 Dinner plates 5 Cutlery basket Cutlery Basket Loading the Cutlery Basket To make unloading much easier c...

Страница 26: ...potato and oven dishes fried foods Wash 65 C Warm Rinse Hot Rinse End 25g 50 1 35 12 7 P3 Eco Coffee milk tea cold meats vegetables not dried on Prewash 50 C Wash Hot Rinse Dry End 25g 187 0 90 12 0 P4 Quick Coffee milk tea cold meats vegetables not dried on Wash 40 C Cold Rinse Hot Rinse End 25g 30 0 90 12 4 P5 Prewash Prewash to rinse and loosen residue on soiled dishes A wash programme is neede...

Страница 27: ...e before opening the door fully Check if the unit has dispensed the detergent or detergent tablet This will depend on how long the washing cycle was running for The last selected programme will appear on the display 2 If the detergent dispenser lid is opened we suggest that you allow the wash cycle to finish 3 If the detergent dispenser lid is still closed press and the P button to select another ...

Страница 28: ... are hot Unload the lower basket first followed by the cutlery basket and then the upper basket This will prevent water drops from the upper basket from falling onto the dishes in the lower basket delay start You can set a delay timer on your dishwasher this will start the wash programme 3 6 or 9 hours after setting the timer 1 After selecting your desired programme press the DELAY TIMER button pr...

Страница 29: ...nd the door seal Clean the door seals regularly with a soft damp cloth to remove food deposits When the dishwasher is being loaded food and drink residues may drip onto the sides of the dishwasher door These surfaces are outside the wash cabinet and are not accessed by water from the spray arms Any deposits should be wiped off before the door is closed the control panel If cleaning is required the...

Страница 30: ...t the metal filter and pull out Do not over tighten the filters Put the filters back in sequence securely otherwise coarse debris could get into the system and cause a blockage NEVER use the dishwasher without the filters in place Improper replacement of the filters may reduce the performance level of the appliance and damage dishes and utensils 4 The centre of the filter can be removed by gently ...

Страница 31: ...ower spray arms for clogging If there is any clogging remove the spray arms and clean them under running water 3 The lower spray arm can be removed by pulling it upwards while the upper spray arm nut can be removed by turning the nut anticlockwise 4 Be sure that the nut is perfectly tightened when refitting the upper spray arm Kenwood Freestanding Dishwasher KDW60T18 X18 Manual indd 31 07 06 2018 ...

Страница 32: ...the dishwasher from the mains 2 Disconnect the unit from the water inlet and drain Use a suitable receptacle to catch the water 3 Remove the unit from the current location with the hoses discharged 4 Pull the unit out together with the hoses maintenance for a prolonged period of non operation If you are not going to use the unit for a prolonged period of time you are advised to 1 Disconnect the di...

Страница 33: ...the program cancellation command If the error continues contact your service agent Intended water temperature could not be reached faulty heater Contact your service agent Alarm is active against water overflow Power off your machine and close the tap Contact your service agent Faulty electronic card Contact your service agent Overheating Contact your service agent Faulty heater sensor Contact you...

Страница 34: ...t failure Check water tap Knocking noise in the wash cabinet A spray arms is knocking against an item in a basket Interrupt the programme and rearrange the items which are obstructing the spray arm See the section Loading the dishwasher Dishes incorrectly placed Partial food wastes remain on the dishes Dishes placed incorrectly sprayed water not reaching affected dishes Do not overload baskets Dis...

Страница 35: ...wiped off The glassware is not dishwasher proof The surfaces are affected Wash the non dishwasher proof glassware by hand instead Tea or lipstick stains have not been completely removed The wash temperature of the selected programme was too low Select a programme with a higher wash temperature The bleaching effect of the detergent used is too low Change your detergent Forgot to pre rinse or remove...

Страница 36: ...ler providing this service Disposing of a household appliance separately avoids possible negative consequences for the environment and health deriving from an inappropriate disposal and enables the constituent materials to be recovered to obtain significant savings in energy and resources As a reminder of the need to dispose of household appliances separately the product is marked with a crossed o...

Страница 37: ...d on 280 standard cleaning cycles using cold water fill and the consumption of the low power modes Actual energy consumption will depend on how the appliance is used Water consumption 3360 liters per year based on 280 standard cleaning cycles Actual water consumption will depend on how appliance is used 3 Drying efficiency class A on a scale from G least efficient to A most efficient 4 The Eco is ...

Страница 38: ...38 energy labels Kenwood Freestanding Dishwasher KDW60T18 X18 Manual indd 38 07 06 2018 15 59 ...

Страница 39: ...Kenwood Freestanding Dishwasher KDW60T18 X18 Manual indd 39 07 06 2018 15 59 ...

Страница 40: ... help conserve natural resources and ensure that it is recycled in a manner that protects human health and the environment For more information about where you can drop off your waste for recycling please contact your local authority or where you purchased your product Manufactured for DSG Retail Limited under Licence from Fisher Paykel Appliances Italy SpA DSG Retail Limited is responsible for af...

Отзывы: