background image

oper

ating instr

uctions

GB-27

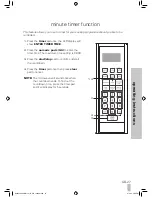
1.

 Press the 

timer

 pad once, the LED display will

show 

ENTER TIMER TIME

.

2.

 Press the 

numeric pads (0-9)

 to enter the

timer time. The maximum time setting is 99:99.

3.

 Press the 

start/stop

 pad to confirm and start

the countdown.

4.

 Press the 

timer

 pad once then press 

clear

pad to cancel.

NOTE: 

The microwave will sound once when 
the countdown ends. To find out the 
countdown time, press the timer pad  
and it will display for 5 seconds.

minute timer function

This feature allows you to set a timer for your cooking programme should you like to be 
reminded.

1, 4

2

3

4

Kenwood K25MW10_IB_GB_100302.indd   27

3/2/10   3:26 PM

Содержание K25MW10

Страница 1: ...ail Limited is responsible for after sales service If you have a query about the product please contact our product support line 0844 561 6263 Currys and 08700 118 117 Pixmania Kenwood K25MW10_IB_GB_100302 indd 1 3 2 10 3 26 PM ...

Страница 2: ...rowave heating categories 13 microwave cooking 19 two stage cooking 20 auto cooking 21 22 auto menu 21 quick start cooking 23 24 defrosting 25 defrost by weight 25 defrost by time 25 querying cooking function 26 to find out the cooking power 26 to find out the time 26 minute timer function 27 cleaning your microwave 28 29 troubleshooting 30 31 questions and answers 30 31 specification 32 Kenwood K...

Страница 3: ...ions care maintenance and troubleshooting steam 14 condensation 14 product overview 14 15 control panel overview 15 checking your microwave 16 clock setting 17 setting the child lock 18 Kenwood K25MW10_IB_GB_100302 indd 3 3 2 10 3 26 PM ...

Страница 4: ...unit mains cable and plug away from water Never exceed the maximum capacities When using an attachment read the safety instructions Take care when lifting this appliance as it is heavy This appliance is not intended for use by persons including children with reduced physical sensory or mental capabilities or lack of experience and knowledge unless they have been given supervision or instruction co...

Страница 5: ...ial use It should never be used for drying clothes or other non food purposes The microwave should not be left unattended when in use The temperature of accessible surfaces may be high when the appliance is operating To prevent high moisture content gathering inside the oven cavity open the door immediately after the cooking function has stopped to allow steam to escape Only use utensils that are ...

Страница 6: ...ST NOT be treated nor used like a toy Take care when cooking food with a high sugar or fat content such as Christmas pudding or fruitcake The sugar or fat can overheat and in some cases catch fire fire In the event of fire Keep the oven door closed Turn off the power Unplug the appliance from the mains power first aid Treat scalding by Quickly placing the scald under cold running water for at leas...

Страница 7: ...of fruit and vegetables such as potatoes Never use scratched cracked or damaged glass in a microwave Damaged glass can explode delayed boiling Liquids heated in a microwave can boil up when removing them from the microwave Take the following precautions Always stir liquids before and after cooking Allow them to stand Use containers that are wider at the top than the bottom preparing food for babie...

Страница 8: ...roper connection of the equipment earthing conductor can result in a risk of electric shock The wires in the cord are coloured as follows Green and Yellow Earth Blue Neutral Brown Live Check with a qualified electrician or service representative if you are in doubt whether the appliance is properly earthed Never modify the plug provided with the appliance If the plug does not fit properly in the o...

Страница 9: ...ece of foil at a time so that you do not get sparks between the separate pieces Follow these guidelines when using foil in your microwave Remove foil lids from containers before using in the microwave Some lids are made of card with a foil covering these should be removed too Use a microwave safe transparent lid if possible Stir food during cooking if the container has a lid or film cover Always u...

Страница 10: ...or your microwave away from heat sources such as radiators or fires and away from cold areas You should allow a 10cm space all around the oven and 30cm above so that warm air can escape from the vents during cooking This microwave is not designed to be built in 3 Plug your microwave into a standard household electrical socket 230 240 volt 13 amp rated Avoid using a socket that also has an adaptor ...

Страница 11: ... on the turntable so that they cook evenly Never stack food in your microwave Turn larger foods such as meat roasts and poultry during cooking so that the top and bottom cook evenly It is also recommended to turn pieces of meat or poultry especially if they contain a bone Meat and poultry which is cooked for 15 minutes or more will brown lightly in its own fat Anything cooked for a shorter time ca...

Страница 12: ...es on the moisture in the food causing lots of tiny vibrations The vibrations get so great that the moisture and the food heats up Fig 1 checking your cooking utensils Most heat resistant non metallic cooking utensils are safe to use in your microwave If you are not sure if you can use a utensil in your microwave follow this simple test 1 Put the utensil into the microwave next to a cup of water u...

Страница 13: ...your microwave oven Check the cooking times for category E on the food s packaging to see how long it should be cooked for Please see below example for reference To microwave Remove outer packaging Pierce film lid SEVERAL TIMES Place on a microwaveable plate Heat on full power Stir or turn halfway through heating Heating Category Wattage IEC 705 B D 650W 750W Full power in minutes 2 2 2 2 Stir Tur...

Страница 14: ... the door condensation As the steam cools you may find the condensation gathers in small pools inside your microwave and on the work surface beneath the door and vents Always dry the microwave after cooking foods with a high moisture content Your microwave is designed to let steam escape from the vents and around the door without microwave energy escaping Fig 1 There is no danger of microwave ener...

Страница 15: ...t stop the cooking microwave pad Use this pad to select the microwave function clear pad Use this pad to clear all cooking setting defrost by time pad Use this pad to defrost food by time defrost by weight pad Use this pad to defrost food by weight timer pad Use this pad to set the oven timer multi stage cook pad Use this pad to set the multi stage cooking programmes numeric pads 0 9 Use these num...

Страница 16: ... turntable ring whenever you use the microwave Place a cup of water on the glass turntable Make sure the cup is microwave safe it should not have any decorative metal trim 2 Close the oven door 3 Press the clear pad to clear any settings that have already been made Fig 2 4 Press the numeric pads 3 0 and then press start stop pad to start a simple 30 second microwave cooking cycle and that allows y...

Страница 17: ... 9 numeric pads to enter the correct time For example to enter the time 1 30 in the afternoon you need to press 1 3 0 3 Press the clock pad again to complete the clock setting 4 The time 1 30 will illuminate NOTE This is a 12 hour clock When the microwave is connected to the mains the first time or when the power is resumed after a power interruption the LED display will show ENTER CLOCK TIME To r...

Страница 18: ...ease follow the steps below to set the child lock 1 Press the clear pad for 3 seconds and a long tone will sound to indicate the microwave has set the child lock 2 To release the child lock press the clear pad again for 3 seconds and a long tone will sound to indicate that the microwave has released the child lock 1 2 Kenwood K25MW10_IB_GB_100302 indd 18 3 2 10 3 26 PM ...

Страница 19: ...owave pad once and the LED display will show 100 Press numeric pad 8 to change the microwave power level to 80 3 Press the start stop pad to confirm and start cooking 4 Press the start stop pad again to stop cooking and press the clear pad to cancel the setting Power Level Numeric Pads Control Numeric Pads LED Display Microwave Power 1 0 100 100 9 90 90 8 80 80 7 70 70 6 60 60 5 50 50 4 40 40 3 30...

Страница 20: ...k pad and then the numeric pads to enter the time 7 0 0 for second stage cooking The LED display shows 7 00 4 Press the microwave pad once and the LED display will show 100 Press numeric pad 8 to change the microwave power level to 80 5 Press the start stop pad to confirm and start cooking The microwave will sound once to indicate it has started the first stage cooking count down The microwave wil...

Страница 21: ...rt stop pad to confirm and start cooking 4 Press start stop pad once to pause the cooking and press it again to resume the cooking 5 Press the clear pad once to stop the cooking and again to cancel the setting For instance If you want to cook 5lb 04oz of pork using the Auto Menu programme please follow the steps below a Press the auto cook pad to select the Auto Menu programme for pork The LED dis...

Страница 22: ...mum Time Comments 1 Beef 5lb 16 oz 78 00 Make sure food is cooked thoroughly before consuming Additional cooking time may be required for thicker pieces of beef 2 Mutton 5lb 16oz 91 36 Make sure food is cooked thoroughly before consuming Additional cooking time may be required for thicker pieces of mutton 3 Pork 5lb 04oz 99 45 Make sure food is cooked thoroughly before consuming Additional cooking...

Страница 23: ...n to resume the cooking Press the clear pad once to clear all cooking settings For instance If you want to bake 4oz of potatoes please follow the steps below a Press the potato pad once b Press the numeric pad 1 and select the cooking programme for baking 4oz of potatoes The LED display will show the cooking time 3 20 c Press the start stop pad to start cooking quick start cooking This feature all...

Страница 24: ... Once the potatoes are cooked wrap them in aluminium foil for at least 5 minutes to ensure they are cooked thoroughly 2 9 00 3 13 00 4 17 00 Pizza Press once n a Reheat chilled pizza 1 slice of pizza 150g 1 00 This setting is designed for reheating cooked pizza slices not frozen pizza Pizza Press twice n a Reheat chilled pizza whole pizza 5 00 This setting is designed for reheating cooked pizza sl...

Страница 25: ...or whole poultry breast side down Drain liquids during defrosting as the juices from food can get hot and cook the food 4 Press the clear pad once to stop and hold the defrosting Press again to cancel the setting defrost by time 1 Press the defrost by time pad twice and the LED display will show ENTER DEF TIME 2 Press the numeric pads 0 9 to set the defrosting time 3 Press the start stop pad to st...

Страница 26: ...to its original display to find out the time 2 Press the clock pad once and the LED display will show the time while the oven is microwave cooking It will last for 3 seconds and then return to its original display querying the cooking function This feature allows you to check and view the current power time and pre set time of your selected cooking program 1 2 Kenwood K25MW10_IB_GB_100302 indd 26 ...

Страница 27: ...o confirm and start the countdown 4 Press the timer pad once then press clear pad to cancel NOTE The microwave will sound once when the countdown ends To find out the countdown time press the timer pad and it will display for 5 seconds minute timer function This feature allows you to set a timer for your cooking programme should you like to be reminded 1 4 2 3 4 Kenwood K25MW10_IB_GB_100302 indd 2...

Страница 28: ... mains and wait for it On the right hand side wall of the cavity is the wave guide cover It is important that this wave guide cover is kept clean at all times Keep the inside of the door clean with a damp cloth Use warm soapy water for stubborn marks and dry thoroughly The inside of the door has a special coating and must not be cleaned with abrasive pads or cleaning powders Treat the glass turnta...

Страница 29: ...e inside of the oven If grease is left to accumulate it can smoke and even catch fire Keep the front of the oven clean so that the door can close properly Be careful not to spill water into the vents a build up of stubborn marks that can be difficult to clean to cool down completely before cleaning microwaves are passed through this to enable your food to cook Wipe it with mild detergent and water...

Страница 30: ...s you cook the centre of the food just right without the outside being overcooked Q Why does my oven sometimes take longer to cook than it says in the recipe A First check that the oven was set just as the recipe said Cooking times and heat settings are suggestions to help prevent overcooking but differences in the weight size shape and starting temperature of food will all affect how long it take...

Страница 31: ... Q There are sparks inside the oven when I use the microwave Will this cause any damage A Yes Make sure that you are not using any metal utensils and that your containers don t have a metal trim You must not use metal in your microwave except foil when you cook Q Light is showing through the vents and door Does this mean the microwave energy can escape A No It is normal for the light to be visible...

Страница 32: ...e consequences for the environment and health deriving from an inappropriate disposal and enables the constituent materials to be recovered to obtain significant savings in energy and resources As a reminder of the need to dispose of household appliances separately the product is marked with a crossed out wheeled dustbin Visit Partmaster co uk today for the easiest way to buy electrical spares and...

Отзывы: