background image

9

DVR-6300 (EN/K,P,E,X)

Preparations

1

2

3

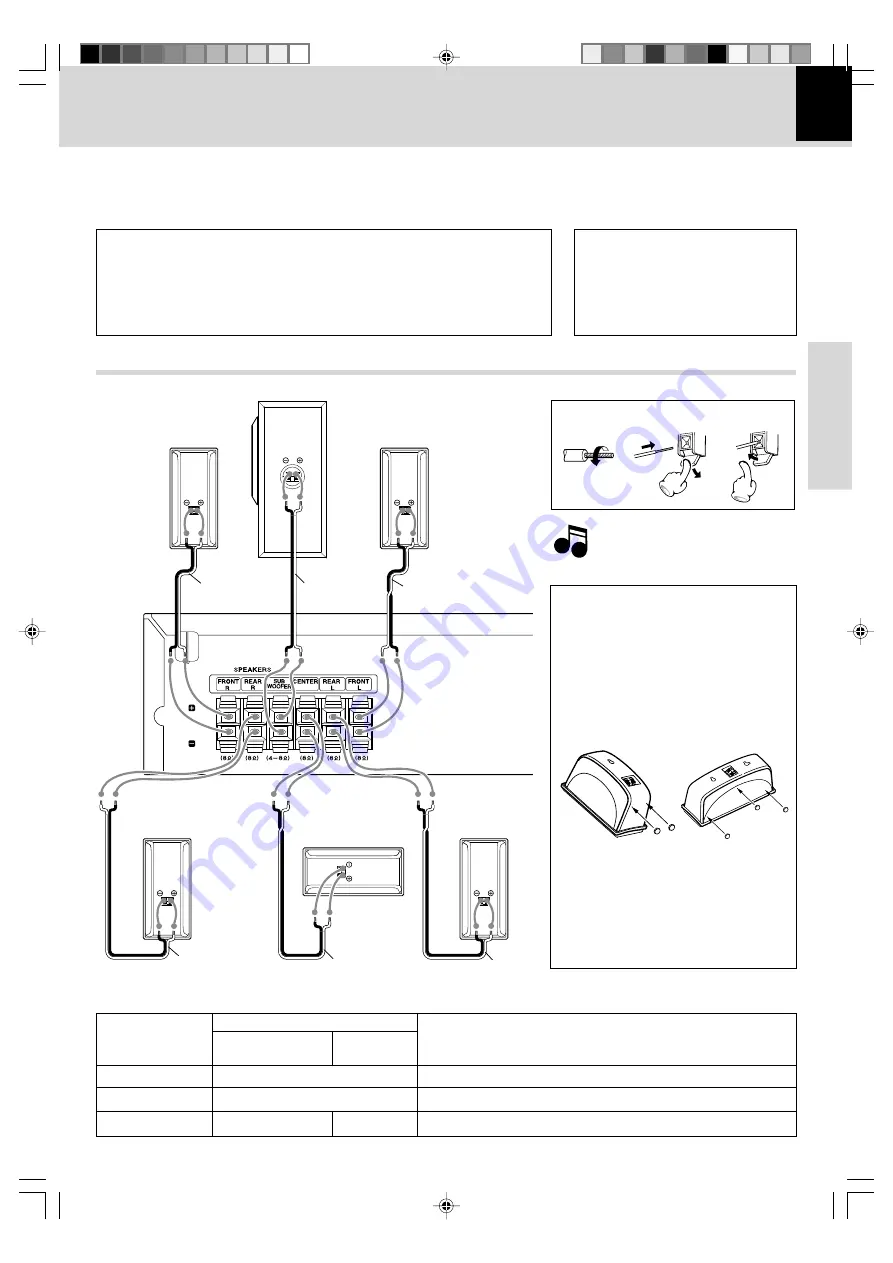
System Connections

Caution:

Do not plug in the power lead until all connec-
tions are completed.

Make connections as shown below.
When connecting the related system components, refer also
to the instruction manuals of the related components.

Caution

Be sure to adhere followings. Or proper ventilation will be blocked causing damage or
fire hazard.

÷

Do not place any objects impairing heat radiation onto the top of unit.

÷

Leave a space around the unit (from the largest outside dimension including pro-
jection) equal or greater than, shown below.

Top panel : 50 cm          Side panel : 10 cm           Back panel : 10 cm

Malfunction of microcomputer

If operation is not possible or erroneous
display appears even though all connec-
tions have been made properly, reset the
microcomputer referring to “

In case of

difficulty

”.

e

Loudspeakers

Front
speaker L

Subwoofer

Rear
speaker L

Front
speaker R

Rear
speaker R

Center speaker

Excessive insertion of the cable
can cause defective contact.

Note

Note

Speaker model name

Speaker system name

System model name

Front L, R, Center

Subwoofer

Remark

Rear L, R

DVT-6300

KSW-6300

DVT-7300

KSW-7300

Refer to instruction manual  for speaker stand in speaker part.

DVT-8300

KS-908HT

SW-18HT

Refer to each instruction manual for speaker system in speaker part.

Red

Purple

White

Gray

Green

Blue

Subwoofer

Attach four cushions to the base of the
subwoofer, one at each corner.

Attaching the cushions
(For DVT-6300 and DVT-7300)

Attach cushions to the base of the speaker as
shown below. The cushions prevent the
speaker from sliding, and dampen its vibra-
tions.

Front speakers,
Surround speakers

Center speaker

*5476/09-14/EN

04.7.27, 2:05 PM

9

Содержание DVT-6300

Страница 1: ...E THEATER SYSTEM INSTRUCTION MANUAL B60 5476 08 00 K P E X OC 04 02 This instruction manual is for some models Model availability and features functions may differ depending on the country and sales area 5476 01 08 EN 04 7 27 2 05 PM 1 ...

Страница 2: ...PORTANT OPERATING AND MAINTENANCE SERVICING IN STRUCTIONS IN THE LITERATURE ACCOMPANYING THE APPLIANCE Units are designed for operation as follows Safetyprecautions WARNING TO PREVENT FIRE OR ELECTRIC SHOCK DO NOT EXPOSE THIS APPLIANCE TO RAIN OR MOISTURE Beforeapplyingpower Introduction Caution Read this page carefully to ensure safe operation The marking of products using lasers For countries ot...

Страница 3: ...equipment off and on the user is encouraged to try to correct the interference by one or more of the following mea sures Reorient or relocate the receiving antenna Increase the separation between the equipment and receiver Connect the equipment into an outlet on a circuit different from that to which the receiver is connected Consult the dealer or an experienced radio TV technician for help CAUTIO...

Страница 4: ...ations one by one presetting 26 Using RDS function for Europe only 27 Playback of disc 29 Basic play 29 Disc playback features 30 Various playback functions 32 Select Audio Language 32 Select the Audio channel 32 Select Subtitle Language 32 Using Marker 32 Select Camera angle 33 Title Menu Disc Menu 33 To use the Disc Menu 33 Repeat play 34 A B Repeat play 34 Zoom function 34 3D Surround 35 Time S...

Страница 5: ... only 12cm 8cm 12cm One side only Max 74 min In case of an SVCD the possible play back time becomes shorter Indicates the region code where the disc can be played Number of voice languages recorded with the audio function The number in the icon indicates the number of voice languages Max 8 languages Number of subtitle languages recorded with the subtitle function The number in the icon indicates t...

Страница 6: ...Even when a DVD VIDEO disc does not carry any indication of the region code it may sometimes unable to be played on this player due to certain restrictions Regioncodesintheworld The DVD players are given a region code according to the country or area it is marketed as shown in the follow ing map Professional use disc Air Line cabin service Restrictions due to difference between discs Inhibition ic...

Страница 7: ...ording to the TV type Please confirm the type of your TV Check the video format of the TV to be used Checking the Video Format When the video formats are different Try playing the disc If the video formats of the disc and TV do not match the played video may be black and white or become as shown below Top and bottom areas are dark Top and bottom edges are not displayed Picture turbulence due to sy...

Страница 8: ...WER ON OFF switch to OFF Maintenance of the unit Do not use contact cleaners because it could cause a malfunction Be specially careful not to use contact cleaners containing oil for they may deform the plastic component During playback the disc rotates at high speed in the player Therefore to avoid danger never use a cracked or deformed disc or a disc repaired with tape or adhesive agent Please do...

Страница 9: ...ll connec tions have been made properly reset the microcomputer referring to In case of difficulty e Loudspeakers Front speaker L Subwoofer Rear speaker L Front speaker R Rear speaker R Center speaker Excessive insertion of the cable can cause defective contact Note Note Speaker model name Speaker system name System model name Front L R Center Subwoofer Remark Rear L R DVT 6300 KSW 6300 DVT 7300 K...

Страница 10: ...se only For stable signal reception werecommendusinganout door antenna Remove the indoor antenna if you con nect one outdoors 1 Connect to the antenna terminal 2 Locate the position providing good reception condition 3 Fix the antenna FM outdoor antenna commercially available Lead the 75 Ω coaxial cable connected to the FM outdoor antenna into the room and con nect it to the FM 75 Ω terminal Black...

Страница 11: ...tput of equipment connected toVIDEO1 or VIDEO2 is put out as a composite signal Connect only one of the Compos ite videocord theS videocordorthe Component video cord for U S A and Canada Composite Video cord SCART cable Commercially available S Video cord Commercially available TV Connect only one of the Compos ite videocord theS videocordorthe SCART cable The S Video output terminal of this unit ...

Страница 12: ...d be taken by the consumer if the analog outputs are connected directly to an amplification system To enjoy DTS Digital Surround playback an external 5 1 channel DTS Digital Surround decoder system must be connected to the digital output S P DIF AES EBU or TosLink of the CD LD or DVD player This unit is equipped with DTS Digital Surround decoder System Connections VCR or DVD recorder Satellite tun...

Страница 13: ... indicator 1 2 2 3 4 5 6 7 8 9 0 Output channel Indicates Display 1 STANDBY indicator 2 POWER on off ON STANDBY key For U S A AND Canada 2 ON STANDBY key For other countries 3 Remote sensor 4 Disc tray ª 5 OPEN CLOSE 0 key ª 6 SKIP 4 4 4 4 4 TUNING keys º 7 STOP 7 MEMORY key 8 PAUSE 8 ST MONO key ª 9 PLAY 3 INPUT SELECTOR key ª 0 VOLUME CONTROL knob PHONES jack Controlsandindicators Standby mode W...

Страница 14: ...mote control key When pressing more than one remote control keys successively press the keys securely by leaving an interval of 1 second or more between pressing of keys Operating range approx Remote sensor 1 The provided batteries are intended for use in operation checking and their service life may be short 2 When the remote controllable distance becomes short replace both of the batteries with ...

Страница 15: ...ther things For details on each Setup menu item see pages 16 to 18 To display and exit the Menu PressSETUPkey todisplaythemenu Asecondpress of SETUP key will take you back to initial screen To go to the next level Press the Cursor right 3 key on the remote To go back to the previous level Press the Cursor left 2 key on the remote General Operation 1 Press SETUP key The Setup menu appears 2 UsetheC...

Страница 16: ... thereby prevent ing your children from being able to view material you believe is unsuitable 1 Select Rating on the setup menu then press the Cursor right 3 key 2 When you have not entered a password Enter a 4 digit password using the numeric keys to create a personal 4 digit security password then press ENTER key Enter the 4 digit password again and press ENTER key to verify When you have alread...

Страница 17: ... country dependent 1 Select Country Code on the setup menu then press the Cursor right 3 2 Follow step 2 of Rating on page 16 3 Select the first character using the Cursor up down 5 keys 4 Shift the cursor using the Cursor right 3 key and select the second character using the Cur sor up down 5 keys 5 Press ENTER to confirm your country code se lection 5 1SpeakerSetup Select speaker settings includ...

Страница 18: ...yed the contents will be played Returning When several menus scenes can be selected in each level screen switching is possible with the keys NEXT and 4 PREV Others The DRC Vocal and PBC settings can be changed Press the Cursor up down 5 keys to select the desireditemandpressENTERkey Thesettingofthe selected item is changed between On and Off Dynamic Range Control DRC With the DVD format you can he...

Страница 19: ... 8378 Sindhi 8368 Language Code Language Code Singhalese 8373 Slovak 8375 Slovenian 8376 Somali 8379 Spanish 6983 Sudanese 8385 Swahili 8387 Swedish 8386 Tagalog 8476 Tajik 8471 Tamil 8465 Tatar 8484 Telugu 8469 Thai 8472 Tibetan 6679 Tigrinya 8473 Tonga 8479 Turkish 8482 Turkmen 8475 Twi 8487 Ukrainian 8575 Urdu 8582 Uzbek 8590 Vietnamese 8673 Volapük 8679 Welsh 6789 Wolof 8779 Xhosa 8872 Yiddish...

Страница 20: ...eotelevisionshowsandallprogramsencodedinDolbySurround Theresultisenhanced soundfield directionality that approaches the quality of discrete 5 1 channel sound MUSIC mode The Music mode is for use with any stereo music recordings MATRIX mode TheMatrixmodeisthesameastheMusicmodeexceptthatthedirectionalenhancementlogicisturnedoff Itmaybeused to enhance mono signals by making them seem larger The Matri...

Страница 21: ...ually Setting up LISTEN mode Each press switches the modes as shown below Display OSD 1 PRO LOGIC PROL Dolby Pro Logic 2 MOVIE MOVIE Dolby Pro Logic II Movie 3 MUSIC MUSIC Dolby Pro Logic II Music 4 MATRIX MTRX Dolby Pro Logic II Matrix 5 3D SURR 3D SUR 3D Surround 6 BYPASS BYPASS 1 Press the LISTEN MODE key At the time of PCM or DOLBY DIGITAL 2 ch source REMOTE 5476 20 22 EN 04 7 27 2 05 PM 21 ...

Страница 22: ...ed speaker 4 AdjustoptionsbyusingCursor 5 2 3 keys on the remote Speaker selection Select a speaker that you want to adjust Front speakers Left Front speakers Right Cen tre Speaker Rear speakers Left Rear speakers Right or Subwoofer Certain speaker settings are prohibited by the Dolby Digital licensing agreement Volume PresstheCursorleft right 2 3 keysontheremote to adjust the output level of the ...

Страница 23: ...s viewed The last scene remains in memory even if you remove the disc from the player or switch off the player If you load a disc that has the scene memorized the scene is automatically recalled If you don t want to use the Last Scene Memory press the STOP key during stop This player does not memorize the scene of a disc if you switch off the player before commencing to play the disc Example On Sc...

Страница 24: ...tal audio input 6 TV AUDIO for Europe input from SCART cable 7 FM frequency display 8 AM frequency display REMOTE Turn on the POWER The power will be switched on and the respective operation will be performed also when the 0 0 0 0 0 key on the main unit is pressed during STANDBY mode WhenadiscissetinthedisctrayandtheCD DVDkeyispressed disc playback will start automatically Normally VOL MAX is disp...

Страница 25: ...ning REMOTE MAIN UNIT Each time a key is pressed the frequency is changed by one step Use the manual tuning mode when re ception is noisy due to weak reception Press the TUNING 4 keys on the main unit for more than 2 sec onds to receive the next tuned sta tion automatically Press the PRESET 5 keys on the re mote control to select a preset station In case of input with the numeric keys Example To s...

Страница 26: ...t a station auto tuning or manual tuning 1 Storingthebroadcaststations one by onepresetting Press the 7 MEMORY key on the main unit 2 MAIN UNIT Select the desired preset number 3 MAIN UNIT Press the 7 MEMORY key on the main unit 4 MAIN UNIT Repeat steps 1 to 4 to preset other sta tions Blinks Please perform the next operation while the indicator is blinking 5476 23 28 EN 04 7 27 2 05 PM 26 ...

Страница 27: ...de as follows 1 PS NAME display 2 Current FM frequency display 3 PTY display 4 RT display 5 CT display PS NAME If the PS information is being received the PS name BBC AFO NDR etc is shown on the display If the PS information is not received the original FM fre quency is shown Even though no RDS key is pressed the reception of PS information ensues the PS name is displayed RT display Text data acco...

Страница 28: ...MENT Station Alarm Test Message TEST Emergency Broadcast Information ALARM 1 Program Type Name Receiver Display PTY function The PTY information is composed of an identification sym bol which helps the FM radio to recognize the program type of each FM station The 31 PTY modes are shown in the display by pressing the PTY key Using the PTY search function Select the FM band 1 Press the PTY key 2 The...

Страница 29: ...o select specific menu you want to play by using Cursor keys MAIN UNIT MAIN UNIT REMOTE MAIN UNIT REMOTE When the 3 key is pressed while a tray is open the tray closes automatically and then playback begins When a menu screen is recorded on the DVD disc the menu screen will be displayed when the TOP MENU key or MENU key on the remote is pressed At the menu screen the menu can be selected by pressi...

Страница 30: ...onds after the start of chapter or track playback playback starts from the start of the preceding chapter or track Searching Press the 3 key at any time to resume normal playback At the time of DVD playback 1 FF 2 X key or FR 2 X 4 key 2 FF 4 X key or FR 4 X 4 key 3 FF 16 X key or FR 16 X 4key 4 FF 100X key or FR 100X 4key 4 To skip backward To skip forward 4 To search backward FR To search forwar...

Страница 31: ...ame advance During playback press the 8 pause key Each time you press the key the picture advances one frame Press the 3 key to resume normal playback REMOTE At the time of DVD playback 1 Press ON SCREEN key 2 Press the Cursor up down 5 keys on the re mote to select the title or chapter icon 3 Press the Cursor right 3 key or numeric keys Example To select track No 23 23 Numeric keys REMOTE At the ...

Страница 32: ...ey switches the mode 1 LEFT 2 RIGHT 3 STER STEREO You can choose to play back only the right or the left channel of audio recorded on the disc or you can select stereo playback The language and digital audio output is switched each time the AUDIO key is pressed The language is switched each time the SUB TITLE key is pressed Using Marker Themarker featureletsyoumarkapointonthediscthat you can go to...

Страница 33: ...use the Title Menu 1 Press the TOP MENU key on the remote If the current title has a menu the menu will appear on the screen Otherwise the disc menu may appear The menu can list camera angles audio language and subtitle options and chapters for the title 2 Press the numeric keys or the Cursor keys 5 2 3 on the remote to select an option then press ENTER key To remove the title menu press TOP MENU ...

Страница 34: ... you want to choose a scene sound as the beginning point 2 Press the A B key again to choose a scene sound as the end point To cancel repeat playback press the REPEAT key and select OFF P B C on mode of VCD the Repeat play function does not work A BRepeatplay MP3 WMA Repeat play At the time of CD VCD playback 1 TRACK 2 ALL 3 OFF Repeat off A display appears A B display appears and the repeat seque...

Страница 35: ...s pressCLEARtoremove the numbers you entered Then input the correct num bers appears The display is switched off when no operation is per formed for about 10 seconds The time search box shows the elapsed playing time 4 Press ENTER to confirm Playback starts from the selected time Time clock icon Once you insert an audio CD a menu appears on the TV screen 1 Press the Cursor up down 5 keys on the re...

Страница 36: ...7 key is pressed To restart program play press the PLAY key Press P MODE key to exit the Program edit mode 3 Select specific track by press Cursor up down 5 keys 4 Press ENTRE key to register selected value onto Program list To repeat program play During program playback press the REPEAT key on the remote Each press the key switches the mode 1 TRACK repeats the current track 2 ALL repeats all the ...

Страница 37: ...ck that you wish to delete from the Program list 2 Press CLEAR key Delete the complete Program list 1 Select Clear All icon then press ENTER key P B C on mode of VCD the Program play function does not work The complete program for the disc is deleted The programs are also cleared when the disc is removed 5476 36 37 EN 04 7 27 2 06 PM 37 ...

Страница 38: ...effects Never add the jpg extension log to any files other than JPEG files If the jpg extension log is added to any files other than JPEG the unit will not operate normally Confirming media and files Check to ascertain that MP3 WMA files can be played back correctly on the personal computer in use prior to saving them onto the media Check to ensure that the saved file can be played back normally I...

Страница 39: ...page Press MENU to move to the previous page WhenJPEGfilesaredisplayed thedisplayisswitchedau tomaticallyfromonefiletothenext SlideShow Change the Slide speed The MP3 WMA JPEG choice menu appears on the TV screen 2 Press Cursor up down 5 keys on the re mote to select MP3 WMA or JPEG then press the ENTER 4 Press Cursor up down 5 keys on the re mote to select desired file then press the PLAY key or ...

Страница 40: ...or up down 5 keys on the remote to select the option you want to use then press ENTER key Toflippicture only for JPEG files Press the Cursor up down 5 keys on the remote to flip the picture horizontally or a verti cally 2 Press Cursor 2 3 5 keys on the remote to highlight the speed icon Fast Normal Slow II Off MAIN UNIT REMOTE 1 During playback press the 4 or key for more than 2 seconds 2 Press an...

Страница 41: ...ct Clear All icon then press ENTER key The complete program for the disc is deleted Delete the complete Program list The programs are also cleared when the disc is removed 1 Insert a disc and close the tray 2 Press P MODE key to enter the Program edit mode 5 You can select maximum 30 values by repeating step 3 4 6 Press Cursor right 3 key The programmed track you selected last is highlighted on th...

Страница 42: ...he SLEEP indicator and sleep time appears in the dis play window Each time you press SLEEP key the setting changes in the following order YoucancheckthetimeremainingbeforetheDVD CD receiver turns off PressSLEEPkey Theremainingtimeappearsinthedisplay window Sleep Timer The display brightness of the main unit can be changed Press the DIMMER key to dim or bright DIMMER function 5476 38 42 EN 04 7 27 ...

Страница 43: ...nd with the LISTEN MODE key The speaker cords are disconnected TheMUTEkeyofremotecontrolunitisswitched ON The headphone plug is inserted into the jack The speaker cords are disconnected The antennas have not been connected A proper broadcasting band has not been se lected The frequency of the station to be received is not tuned Car ignition noise Influence of an electric appliance A TV set is inst...

Страница 44: ...c being played does not contain the recording of subtitles Press the SUBTITLE key to switch on the subtitle mode The voice or subtitle language cannot be changed when the DVD disc being played does not contain the recording of more than one voice or subtitle language The viewing angle cannot be changed when the DVD disc being played does not contain the recording of more than one angle More than o...

Страница 45: ...guage Select at the menu screen of the disc Select disc menu language Menu playback is available only with VCD discs recorded with P B C Playback will not start even after a title is se lected The parental level cannot be changed The voice or subtitle language selected in the initial setting is not played Menu screen messages are not shown in the desired language A VCD cannot be played using menus...

Страница 46: ... U S A and Canada NTSC Video output format for Europe and Australia PAL NTSC Video section input level impedance VIDEO input VIDEO 1 VIDEO 2 Composite 1 Vp p 75 Ω Output level impedance VIDEO output MONITOR OUT VIDEO 1 Composite 1 Vp p 75 Ω S video output MONITOR OUT Y signal 1 Vp p 75 Ω C signal NTSC 0 286 Vp p 75 Ω PAL for Europe and Australia 0 300 Vp p 75 Ω Component video output MONITOR OUT f...

Страница 47: ...e 2 Impedance 8 Ω Power Handling Capacity DVR 6300 60 W Dimensions W 210 mm 8 1 4 H 80 mm 3 1 8 D 98 mm 3 7 8 Weight net 0 8 kg 1 8 lb Surround Enclosure Bass Refrex Speaker configuration 50 mm 2 cone type Impedance 8 Ω Power Handling Capacity DVR 6300 60 W Dimensions W 80 mm 3 1 8 H 160 mm 6 5 16 D 98 mm 3 7 8 Weight net 0 4 kg 0 9 lb 1 piece Subwoofer Enclosure Bass reflex type Speaker configura...

Страница 48: ...k of the unit in the spaces designated on the warranty card and in the space provided below Refer to the model and serial numbers whenever you call upon your dealer for information or service on this product Model Serial Number 5476 43 48 EN 04 7 27 2 06 PM 48 ...

Отзывы: