background image

Quick Connect Guide Step 2: Video Components

DVT-505

(Speaker Quick-Connect Guide on other side)

If you have any questions about your new system, please contact our Customer Service Department at (800) KENWOOD, or visit our Web site at www.kenwoodusa.com

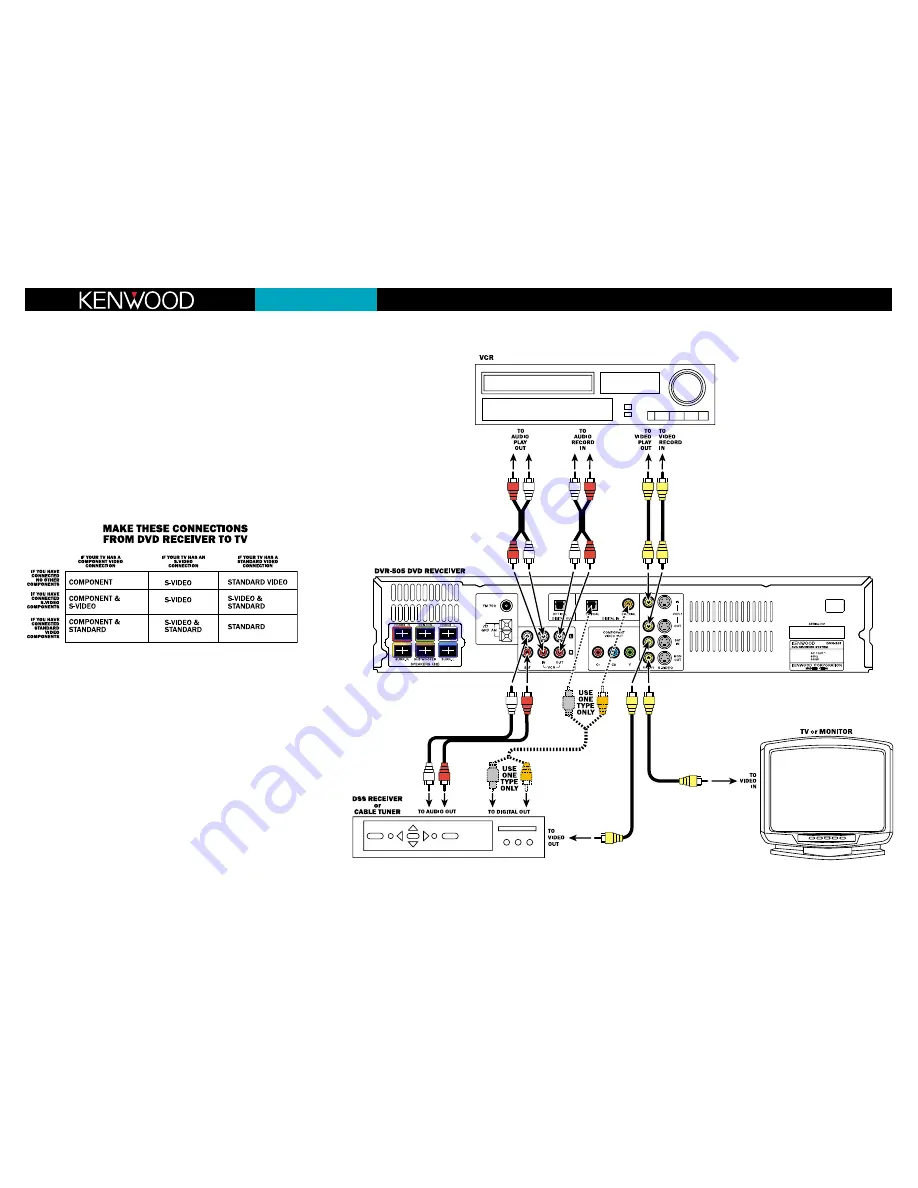
Connecting your video components to the receiver

Your new DVT-505 system has several different video connection options, which allow you get the best video
picture with whatever TV or monitor you are using.

Connecting your TV

Connect your TV to the DVD receiver as shown in the main diagram, using the supplied cable.

Connecting your VCR and DSS receiver or cable TV tuner   

Connect your VCR and DSS receiver or cable TV tuner to the DVD receiver as shown in the main diagram, using
cables supplied with the VCR and DSS receiver.

Digital Connection

If your DSS receiver has a digital output, you can connect it to one of the DVD receiver’s digital inputs, using the
cable supplied with the DSS receiver or cable tuner. This will allow you to enjoy the full benefit of the 5.1-chan-
nel digital soundtracks that are broadcast on some satellite programs.

Note: Only connect one type of digital cable to the DVD receiver. Connecting both types will mute
the digital input.

Optional Video Connections

This Quick-Start Guide shows the basic video connections. For more information about using S-Video or
Component Video connections for improved video quality, refer to the DVD receiver’s instruction manual.

To get the best video quality from all your video sources, use the chart below to deter-

mine what connections you need to make between the DVD receiver and your TV:

Note: Since the Component Video output only functions with the DVD receiver’s built-in DVD player, if you have
connected any other video components to the DVD receiver you will also need to connect the DVD receiver to
the TV using the same type(s) of connections used for the connected components.

Содержание DVR-505

Страница 1: ...KENWOOD DVD RECEIVER DVR 505 DVR 7000 INSTRUCTION MANUAL KENWOOD CORPORATION DIGITAL SURROUND B DIGITAL AUDIO 860 5149 08 00 K P T M X Y OC Oil07 55191870 ...

Страница 2: ...f a three pin plug Europe and U K Other countries AC IIO 120 220 240 AC 230V only V switchable For other countries AC voltage selection This unit operates on 11O l 20 or 220 240 volts AC The AC voltage selector switch on the rear panel is set to the voltage that prevails in the area to which the unit is shipped Before connecting the power cord to your AC outlet make sure that the setting position ...

Страница 3: ...features 26 Using the On screenbanner display 27 Selecting a Dtle 28 Selecting a Chapteror Track 28 Changingthe Audio Language 29 Changingthe Subtitle Language 29 Changingthe Cameraangle 30 Using IntroScan function 30 Using Bookmarks 31 Repeatplay 32 A B Repeatplay 32 Randomplay 33 Programplay 34 Menu playback 36 Hierarchical structure of VCDmenus 36 Examples of operation keys and indications used...

Страница 4: ...ly for regions where use is necessary Speaker model names System DVR 505 Front speakers and surround speakers KS 305DV Left speaker right speaker Subwoofer SW l 5DV 1 center speaker and surround speakers 1 DVR 7000 1 KSW 7000 Left speaker right speaker center speaker surround speakers and subwoofer I The space between radio channels has been set to the one that prevails in the area to which the sy...

Страница 5: ...s appliance should not be placed In a burlt In installatron such as a bookcase or rack unless proper ventilatron IS provided or the manufacturer s instructrons have been adhered to Water and moisture The applrance should not be used near water for example near a bathtub washbowl kitchen sink laundry tub In a wet basement or near a swrmmrng pool etc 6 7 8 9 10 DVR 505 DVR 7000 EN Temperature The ap...

Страница 6: ... surges and burlt up static charges Article 810 of the National Electrical Code ANSI NFPA 70 provides information with respect to proper grounding of the mast and supporting structure grounding of the lead in wrre to an antenna discharge unit size of grounding conductors location of antenna discharge unit connection to grounding electrodes and requirements for the grounding electrode See Figure L ...

Страница 7: ...tion in a fol lowing circumstance When thus unit is carned from a place to another across a large difference in temperature when the humidity Inthe room where this unit is installed Increases etc Noterelatedto transportationandmovement Before transporting or moving this unit carry out the following operations 0 Remove the disc from the unit Q Press the F II key Wait a few seconds and turn the unit...

Страница 8: ...ng to laser product safety 1 KENWOOD CORPORATION 2967 3 ISHIKAWA CHO I HACHIOJI SHI I TOKYO JAPAN I I KENWOOD CORP CERTIFIES THIS EQUIPMENT CONFORMS TO I DHHS REGULATIONS NO 21 CFR I 1040 10 CHAPTER 1 SUBCHAPTER J J L______ _ _ __ 2 Location Back Panel _ _ _ I CAUTION LASER RADIATION WHEN OPEN I I DO NOT STARE INTO BEAM L Location Laser Pick up Unit Cover inside this product For the U S A IFCCWARN...

Страница 9: ...scs l DVD RIDVD RAMIDVD RW discs l VSD discs l CDV discs only the audio part can be reproduced l CD ROM discs except MP3 IS0 9660 level 1 format disc l CD G CD EGKD EXTRA discs only the audio can be reproduced l Photo CD discs never attempt to play them l S VCD discs Icon Description 0 ALL lndrcates the regron code where the drsc can be played Number of voice languages recorded with the audio func...

Страница 10: ...yback and switch the screen display formats of this unrt and the TV to another format This will improve the played picture qualrty When your TVis switchable between PAL NTSC When your TVis compatible only with the PALformat II SI With certain discs the playback pic ture may have black spaces above and below it as shown on the rrght This is because the disc has been recorded in the NTSC format The ...

Страница 11: ...V Playable Disc Formats format District 0 District 8 l District Q 2 District 0 3 District 0 District O 1 District 0 2 District 0 District 0 NTSC only NTSC NTSC PAL NTSC NTSC NTSC NTSC PAL PAL PAL NTSC NTSC NTSC PAL PAL PAL only NTSC NTSC PAL NTSC NTSC NTSC NTSC PAL PAL PAL NTSC NTSC NTSC PAL PAL NTSClPAL switchable NTSC NTSC PAL NTSC NTSC NTSC NTSC PAL PAL PAL NTSC NTSC NTSC PAL PAL Normal video m...

Страница 12: ...puter If operation is not possible or erroneous display appears even though all connec trons have been made properly reset the microcomputer referrrng to In case of Speaker terminal J White tube Excessive insertion of the cable can cause defective contact I The figure shows an example for the speakers for DVR 505 I Front IUouer side mark Surround speaker R Subwoofer Front speaker L Connect the spe...

Страница 13: ... best receotion 9 a i White FM indoor antenna connection The accessory antenna is for temporary indoor use only For stable signal reception we recommend using an out door antenna Remove the indoor antenna if you con nect one outdoors 0 Connect to the antenna terminal 0 Locate the position providing good reception condition FM outdoor antenna commercially available Lead the 75 A coaxial cable conne...

Страница 14: ...terminal S Video cord COMPONENT connection corresponds only to some areas When the TV has a COMPONENT terminal the DVD image will be played back with higher prcture quality in case of COMPONENT connection Connect the S video or the COMPOSITE video cable also in this case For U K only If your TV set has a SCART terminal connect the accessory SCART plug to the SCART terminal of the TV and connect th...

Страница 15: ... DVR 505 DVR 7000 EN Analog recording of DTS encoded discs is not possible I DIGITAL OUT signal is PCM format _ 0 Audio cords 1 I I 00 Video game machine OPTICAL cable 1 Camcorder ...

Страница 16: ...ht surround speaker 0 STANDBY indicator x 0 POWER switch m AV AUX VIDEO jack AVAUX AUDIO jacks LISTEN MODE indicators 0 DTS indicator Q DOLBY DIGITAL Indicator 0 PRO LOGIC indicator Q DSP indicator CS 5 1 indicator 0 BAND key 0 M HI Skip keys AV AUX S VIDEO lack AV AUX OPTICAL input jack Q PHONES Jack Door 0 111 PLAY PAUSE key n STOP key 0 INPUT key VOLUME CONTROL knob r EJECT key Disc tray STANDB...

Страница 17: ...ER key E 0 DEVICE Power key 0 TV INPUT key 1 LSTN MODE LISTEN MODE key Q g SOUND SETUP key J a INPUT MODE RANDOM key a VOLUME keys a PTY for U K only MENU key m m RDS forU K only ONSCREEN key m a SLOW JUMP key m STEP key g B BOOST key m CINE EQ key m Depending on the area the AUTO MONO kev is marked as MONO Loading batteries 0 Remove the cover 0 Insert batteries 0 Close the cover Operation Insert ...

Страница 18: ...ed during STANDBY mode l WhenadiscissetinthedlsctrayandtheDVDCDkeyispressed disc playback will start automatically In case of operation with the remote control unit first select the input or device to be operated wit the INPUT SELECTOR keys etc and then perform the desired operation The present mode of the remote control unit may not coincide with the equipment to be operated a The input mode can ...

Страница 19: ...Press the LSTNMODEkey LSTNMODE IDPress the SOUNDkey Operation is not possible with DOLBY DIGITAL and DTS source ElSelect treble level To increase _ b A To decrease Each press switches the B BOOST on or off r 0 B BOOST lit 0 B BOOST goes off TRBL is displayed ii _ _ _ _ waa TREBLECONTROL Normal music CD VCD and tuner only Set to STEREO mode The TREBLE CONTROL can be adjusted only STEREO mode Each p...

Страница 20: ... 1 DSP modes 8 STADIUM 1DISCO STEREO Lit Q DSP ii s m ii v i w ___a _ _a n Selecting the CINE EQ CINEMA EQUALIZER This function provides for better playback of movies etc f37EKiF Press the CINE EQkey Each press switches the mode c 83 CINE EQ 2 OFF Selecting the NIGHT MID NIGHT mode Dolby Digital only Any time you don t want to experience the loud and soft volume extremes of recorded sound for exam...

Страница 21: ... pressed In AUTO mode a station will be tuned in automatically and tuning will stop Stereo reception will be made automatically when a stereo broadcast with suffi clent slgnal strength ISreceived q I Select a station l CALL preset call AUTO auto tuning TUNE TV VOLUME PCALL i TH Mi PAGE Press the 1 I keys to select a preset station Press the TUNE key to receive the next tuned station automatically ...

Страница 22: ... ENTER key aSelect the desired preset number WALL THUM PAGE q 1 Press the ENTER key Repeat steps 0 to q to preset other sta tions Presetting can be done with mixing of FM and AM stations Example 01 FM 90 00 02 AM 531 03 FM 88 00 Blinks Please perform the next operation while the indicator is blinking In case of Input with the number keys a preset number will be decided ...

Страница 23: ...rom the FM frequency Usina RDSDisolav function q Select the FM broadcast station m TUNElTVVOLUME P CALL THUM PAGE or q Press the RDSkey Each press switches the display mode as follows 1 PS NAME display 2 PTY display 3 RT display 4 CT display 5 Current FM frequency display PS NAME l If the PS information is being received the PS name BBC AFO NDR etc is shown on the display l If the PS information i...

Страница 24: ... to cancel 1PTYfound 1 PS display 1PTYnotfound1 After display of NO PTY return is made to the nor mal display RADIO BAND key PTY key RDSProgram types Program Type Name Receiver Display News NEWS Current Affairs AFFAIRS Information sport Education INFO SPORT EDUCATE Drama Culture Science Varied Pop Music Rock Music Easy Listening Music Light Classical Music Serious Classical Music Other Music Weath...

Страница 25: ...ctive DVDs a Disc Menu appears on the screen Then press ENTERto select specific menu you want to play by using Cursor keys When a menu screen is recorded on the disc the menu screen will be displayed OP MEmo c when the TOP MENU key ISpressed At the menu screen the menu can be se pa GUIDE lected by pressing the Cursor keys l When the PLAY PAUSEkey on the main unit ISpressed whrle an input other tha...

Страница 26: ...DVD playback only l Press the PLAY key at any time to resume normal playback Playback from desired track STEP freezeframe and frame advance l Select the desired track No l Press the numeric keys as shown below Example To select track No 23 q q l When a number exceeding the largest track No on the CD being played is specified a question mark Tr will be disolaved l Each time you press the 44 H keys ...

Страница 27: ...DICATOR Time lndlcator contents Switch the CD time indicator as follows 0 Select the time information with the cursor key 0 Each time the ENTER key is pressed the time indicator changes as follows r Track Elapsed elapsed time of the track being played Track Remain rematntng time of the track being played Disc Elapsed elapsed time of the disc being played Disc Remain remaining time of the disc bein...

Страница 28: ... use digital technology a title can be divided into individual chapters similar to tracks on a CD You can skip a specific chapter by using the Chapter section in the Banner Display ODuring playback press the ON SCREEN key on the remote Press the Cursor left right 4 keys until the CHAPTER or TRACK icon is highlighted 0 Press the ENTER key CM or Tr appears 0 Use the numeric keys to enter the chapter...

Страница 29: ... seconds During playback press the ON SCREEN key on the remote 0 Press the Cursor left right 4 keys until the SUBTITLE icon is high lighted m 0 Press the ENTER key Displayed whe SUBTITLE is 01 0 Select the subtitle language with press the ENTER key 0 Press the S TITLE key to subtitle Oh or OFF STITLE l The menu is switched off when no operation i performed for about 5 seconds 1 The language featur...

Страница 30: ...rformed for about 5 seconds DVR 505 DVR 7000 EN During playback press the ON During playback press the ON SCREEN key on the remote SCREEN key on the remote 3 b P 0 Press the Cursor left right 4 keys 0 Press the Cursor left right 4 keys until the Intro an icon is highlighted until the Intro an icon is highlighted Press the ENTER key l The first 10 seconds of each track play l After Intro Scan goes ...

Страница 31: ...he disc changes or when the power is turned off Ls3 Not3 l If all 9 bookmarks are in use you can still mark new scenes but the previous bookmarks will be erased l Depending on the disc the Bookmark function may not work l P B C on mode of VCD the Bookmark function may not work ODuring playback press the ON SCREEN key on the remote c p b Press the Cursor left right 4 kevs until the BOOKMARK icon is...

Страница 32: ...t Display 0 To cancel repeat playback press the REPEAT key and select Repeat off 0 The menu is switched off when no operation is performed for about 5 seconds a Notd a Note 0 P B C on mode of VCD the Repeat play function P B C on mode of VCD the A B Repeat play function may not work may not work i DVR 505 DVR 7000 EN The A B repeat function lets you mark a segment to repeat between the beginning A...

Страница 33: ... Play display appears when random is off The menu is switched off when no operation is performed for about 5 seconds DVR 505 DVR 7000 EN l When the RANDOM key is pressed during playback the tracks of the disc being played will be selected in random order for playback l After all tracks of a disc have been played in random order playback will stop Random mode will be cancelled l When playing a DVD ...

Страница 34: ... keys O 9 0 Press the ENTER key Select Add icon on the screen to register selected value onto Playlist then press the ENTER key You can select maximum 32 val ues by repeating step 0 OPress the PLAY key to start play back An example of DVD program edit menu Selected icon An icon which can be selected An icon which presently can not be selected PROGRAM EDIT Pww I l When you don t add values onto Pla...

Страница 35: ...l be in serted before above the selected column I Ilelete Program krring stop mode press the P MODE key on the remote 0 UsetheCursor up down A v keys to select the column to be deleted from the Playlist The color of the column where the Cursor is located Q Press the Cursor left 4 key use the Cursor up down keys to move the Cursor to the Delete icon and press the ENTER key Or press the clear v Sele...

Страница 36: ...NEXT c ti PREV m NEXT HI NEXT m PREV m PREV First level menu Second level Isubmenu Third level scenes When an item is selected on the menu screen with the key or the numeric keys advance is made to the next lower menu level When the advance destination is the scene to be played the contents will be played Each time the RETURN key is pressed return is made to the next higher menu When several menus...

Страница 37: ...b L _ G gG w _ _ b Pressthe TOP MENU key on the remote control unit oFor the track numbers refer to the disc jacket or other material l P B C off mode Without using menu playback function P B C off mode GoeT Off Toreturn to menu playback Press the TOP MENU key again P B C on mode Lit ...

Страница 38: ...and fifes Checktoascertain that MP3filescan be played backcorrectlyon the personal computer in use priorto saving them onto the media Check to ensure that the saved file can be played back normally It is not possible to confirm that files can be played back correctly while they are being saved onto the media Whensaving files onto media Ensure that the session is closed or finalized when data has b...

Страница 39: ...ill be played back in the sequence in which they were recorded written Playback Press 111 key When you insert the MP3 media playback will start automatically I Folder icon ALL CLEAR icon Return folder icon To stop playback Files Program window Note Folder names and file names are displayed up to 8 characters When folder names and file names are recorded with more than 8 characters the names will b...

Страница 40: ...iles exit in the selected folder Selects the folders to be played back directly During stop mode press Cursor up down A V keys on the re mote to select the folder then press the ENTER key g Gab G P n 0 Press Cursor up down WV keys on the remote to select the upper folder icon then press PLAY key l Playback will start from selected folder l Files in the next folder will be played back when no files...

Страница 41: ... l The selected file go to program window 0 You can select maximum 130 val ues by repeating step 0 0 Press PLAY key to start program playback l Program playback will play back repeatedly Delete Program 0 During stop mode press Cursor left right 4 keys on the remote to select the ALL CLEAR icon then press the ENTER key l The program deletes l You can delete file one by one by selecting in Program w...

Страница 42: ...or so on the label its viewing cannot be restricted unless the restriction level is recorded in the disc itself The password for rating setting change cancellation etc is set This sets the screen size 4 3 or 16 9 aspect ratio according to the connected TV 4 x 3 letterbox Choose this setting if you would prefer to see movies in their original aspect ratio You will see the entire frame of the movie ...

Страница 43: ...rst digit by Press Cursor up down A V keys or numeric keys on the remote and repeat other 3 code with same way 83 Press the ENTER key on OK icon DVD menu language code list m l Press PLAY key to resume normal playback The display shows an example for some areas Press Cursor up down A V keys on the remote to select specific Subtitle language then press the ENTER key CJ Toselect other language SSele...

Страница 44: ...has been set the screen for change of the en tered password will be displayed In that case enter the password f m The display shows an example for some areas 0 Press Cursor up down A T keys on the remote to highlight rated lia titles then press the ENTER key l Press PLAY key to resume normal playback Playback of a disc When the settings for Rating Parental Lock and Password see page 45 have been m...

Страница 45: ...down A V keys or numeric keys on the remote to enter password OPress ENTER key to finish pass word input Confirm Password display appears below Enter Pass word displav 0 Press Cursor up down A V keys or numeric keys on the remote to enter again password that you entered 0 Pressthe ENTER key on OK icon l Press PLAY key to resume normal playback ...

Страница 46: ... Q Press Cursor up down A V keys to select Change Password then press ENTER key 0 Press Cursor up down A V keys or numeric keys on the remote to enter password Press ENTER key to finish pass word input Confirm Password display appears below Enter Pass word display 0 Press Cursor up down A T keys or numeric keys on the remote to enter again password that you entered Press the ENTER key on OK icon l...

Страница 47: ...TER key on OK icon 0 Press Cursor up down A V keys to select Clear Password then press ENTER key l Press PLAY key to resume normal playback DVR 505 DVR 7000 EN1 0 Press Cursor up down A V keys on the remote to select TV Aspect on the set up menu display then press the ENTER key TV Aspect menu appears Press Cursor up down A V keys on the remote to select TV Aspect menu then press the ENTER key l Pr...

Страница 48: ...TS sound 0 DSP DigitalSignal Processing DSPallows you to create your own custom surround sound environments and use them with any source except Dolby Digital and DTS You can select the ambience of an ARENA JAZZ CLUB THEATER STADIUM or DISCO to your taste 0 CS5 1 ch The Circle Surround System was developed to provide the highest level of sonic performance available in a Matrix system Audio for musi...

Страница 49: ...er Systems Inc US Pat No 5 451 942 and other worldwide patents issues and pending DTS and DTS Digital Surround are trademarks of Digital Theater Systems Inc 0 1996 Digital Theater Systems Inc All rights reserved Sound Retrieval System manufactured under licence from SRS Labs Inc SOUND RETRIEVAL SYSTEM and the SRS Symbol SW are trademarks of SRS Labs Inc Purchase of this product does not convey the...

Страница 50: ...set as follows to match your listening environment ipeaker level setting 0 Press SETUP key for more than 2 seconds 0 Press the TRIM A V keys to con trol the speaker level D After all speakers have been adjusted operate the Delay time setting IQ If you want to quit at this time press the ENTER key The test tone is played back from the Left Front speaker Adjust the VOLUME CONTROL so that it is sligh...

Страница 51: ... distance 0 Press SETUP key 0 Press the TRIM A V keys to se lect the speaker distance _ Y 2 How to set the delay time Delay time setting sets the delay time converted to the distance from the speaker to the listening position The front speakers L R can be adjusted between 40 feet 12 m and 3 feet 0 9 m The range which can be set for the center speaker C and the surround speakers LS RS duffers accor...

Страница 52: ...e switch is pressed I LS ch Left surround speaker RS ch Right surround speaker SW Subwoofer The speaker level can be changed in the range from 10 dB to I0 dB The input mode can be switched with SAT and AV AUX For listening to SAT input with high sound quality con nect the digital output of your satellite tuner with co axial or optical cable and change the input mode as fol lows 0 Select the SAT or...

Страница 53: ...rk as it is The LED on the remote control unit lights Refer to the code table and enter the 4 digit setup code while the LED on the remote control unit is lit ml l The LED goes out when the code is not correct or not recognized l When the setup code has been recognized the LED flashes 3 times and setup is completed Press one of devises key for operate Press DEVICE I O key to de vise power on DEVIC...

Страница 54: ...0052 0279 0297 ICE 0232 0279 0386 ICES 0233 IMPERIAL 0262 0385 0433 INDIANA 0052 INGELEN 0178 INN0 HIT 0087 ___ INTERFUNK INTERFUNK 0052 0178 0262 0376 0052 0178 0262 0376 ITT 0178 0376 0563 JVC 0068 0109 0386 KAISUI 0024 0231 0232 0233 0297 KAPSCH 0178 0221 KATHREIN 0571 KENDO 0052 KENWOOD 0328 KINGSLEY 0231 KNEISSEL 0450 KORPEL 0052 KORTING 0102 KOYODA 0024 LEYCO 0052 0087 0279 0309 LIESENK TTER...

Страница 55: ...2 0335 TEXET 0231 0233 THOMSON 0124 0302 0358 0364 0414 THORN 0050 0052 0087 0358 WESTINGHOUSE YOKO 0052 0232 0279 ZANUSSI 0221 DAEWOO 0035 0293 DANSAI 0087 DE GRAAF 0057 0181 DECCA 0015 0096 DENON 0057 DUAL 0056 DUMONT 0015 0096 0119 ELCATECH 0087 ESC 0255 0293 FERGUSON 0056 0335 0336 FIDELITY 0015 DVR 505 DVR 7000 EN 1 BRAND Setup codes I M ELECTRONIC 0015 MANESTH 0060 0087 MARANTZ 0021 0096 I N...

Страница 56: ...OKAN 0087 YOKO 0035 0255 CABLE SATELLITE continued BRAND Setup codes BIRGMINGHAM 0291 CABL BRITISH TELECOM 0018 0120 DECSAT 0438 JERROLD 0018 0291 PVP STEREO VISUA 0018 SCIENTIFIC ATLAN 0023 0292 UNITED CABLE 0018 WESTMINSTER 0120 SATELLITE FINLUX 0123 0359 0470 FREECOM 0436 FUBA 0384 0411 0436 GALAXIS 0303 c 0ODING 0586 GRUNDIG 0188 0586 0765 G SAT 0198 I JTERVISION 0607 T m 71 II _ JVC 0530 0586...

Страница 57: ...71 0193 MAGNAVOX 0045 0069 0194 MAJESTIC 0031 EGATRON 0160 0193 NEC 0034 0045 0071 NIKKO 0045 0107 0193 NTC 0107 ONWA 0195 OPTIMUS 0169 0181 0265 OPTONICA 0108 0180 ORION 0194 0251 0478 PANASONIC 0034 0036 0045 0062 0066 0071 0075 0171 0193 1362 PHILCO 0034 0045 0069 0160 0478 PHILIPS 0069 PILOT 0034 0045 PIONEER 0181 PORTLAND 0034 0107 PRISM 0066 PROSCAN 0062 PROTON 0193 0481 PULSAR 0032 0034 QUA...

Страница 58: ... HARWOOD 0083 0087 HEADQUARTER 0061 HI Q 0062 HITACHI 0015 0056 0057 0097 HUGHES NETWORK 0057 SYSTEMS JENSEN 0056 JVC 0023 0056 0082 KEC 0052 0293 KENWOOD 0053 0056 0082 KLH 0087 KODAK 0050 0052 LG GOLDSTAR 0052 0053 LLYOD S 0015 LOGIK 0087 I XI 0052 MAGGIN 0255 MAGNASONIC 0293 MAGNAVOX 0015 0050 0054 0096 MARANTZ 0050 0096 MARTA 0052 BRAND Setup codes MATSUSHITA 0050 0177 MEI 0050 MEMOREX 0015 00...

Страница 59: ... 0055 GE 0247 GEMINI 0030 GENERAL 0026 0291 0491 INSTRUMENTS HITACHI 0026 JASCO 0030 JERROLD 0018 0026 0027 0029 Ei SCIENTIFIC ATLANTA 0023 0292 0492 0892 SIGNATURE 0026 SL MARX 0055 SPRUCER 0036 STARCOM 0030 0055 STARQUEST 0030 TELEVIEW 0055 TIMELESS 0433 TOCOM 0027 0028 TOSHIBA 0015 TUSA 0030 TV86 0078 UNIVERSAL 0093 0206 VIDEOWAY 0265 VIEWSTAR 0078 0304 ZENITH 0015 0540 0914 SATELLITE BRAND Set...

Страница 60: ...ring from the indication TV INPUT TV VCT D M THUMB Operation keys differing from the indication TV INPUT INPUT 0 M PAGE I Q 13 VOLUME I TV Operation keys differing from the indication TV INPUT TV VCT STOP MUTE D a FF REW Q 3 VOLUME I Operation keys differing from the indication TV INPUT INPUT ...

Страница 61: ...75 Kazakh 7576 Greenlandic 7577 Cambodian 7578 Kannada 7579 Korean 7583 Kashmiri 7585 Kurdish 7589 Kirghiz 7665 Latin 7678 Lingala 7679 Laothian 7684 Lithuanian 7686 Latvian Lettish 7771 Malagasy 7773 Maori 7775 Macedonian 7776 Malayalam 7778 Mongolian 7779 Moldavian 7782 Marathi 7783 Malay 7784 Maltese 7789 Burmese 7865 Nauru 7869 Nepali 7876 Dutch 7879 Nowegian 7982 Oriya 8065 Punjabi DVR 505 DV...

Страница 62: ...ed l The MUTE switch of remote control unit is switched ON The headphone plug IS inserted into the jack l The speaker cords are disconnected l The antennas have not been connected l A proper broadcastrng band has not been selected Thefrequencyof the station to be received is not tuned l Car ignition noise l Influence of an electric appliance l A TV set is installed near the system The frequency of...

Страница 63: ...the optical lens l Trme is required for the unrt to detect the disc type and srze and for the rotatron of the motor to stabrlrze This ISnot a malfunction The video format of the disc being played does not match that of the connected TV monrtor The VCD drsc being played IS not compat ible wrth P B C The DVD drsc berng played does not contain the recording of subtrtles The subtitle mode IS set to of...

Страница 64: ...played does not contarn the recording of more than one angle a More than one vrewrng angle may be re corded only rn limited sectrons rn a disc Play a different disc Check the viewing restrictron level Paren a tal level settrng Setthein tralsetuptothefactorysetupwrth the following procedure SetthePOWERswrtchtoONtsettoStandby mode Then press the DVD CD key cursor b key 4 key v key A key on the remot...

Страница 65: ...0 W for other countries Dimensions W 440 mm 17 5 16 H 93 mm 3 11 16 D 410 mm 16 118 Weight net 8 5 kg DVR 505 DVR 7000 EN KS 305DV Speakers Front Center for USA and Canada Enclosure Acoustic Air Suspension type Magnetically shielded Speaker configuration Woofer 100 mm 4 cone type Tweeter 25 mm I cone type Impedance 6 R Maximum input power 40 W Front speakers 30 W Centre speaker Dimensions W 128 mm...

Страница 66: ...MEMO ...

Страница 67: ... DVR 505 D 7000 EN MEMO ...

Страница 68: ...mber found on the back of the wt In the spaces designated on the warranty card and in the space provided below Re fer to the model and serial numbers whenever you call upon your dealer for information or service on this product Model Serial Number ...

Страница 69: ...eakers Balancing the Speakers Your DVT 505 DVD receiver comes with the speaker volume and distance set tings pre balanced If you have positioned the speakers as shown in the diagram your system will create a spacious surround sound environment right out of the box with no further adjustment required If your room is arranged differently than shown in the diagram or if you simply want to fine tune y...

Страница 70: ...ect it to one of the DVD receiver s digital inputs using the cable supplied with the DSS receiver or cable tuner This will allow you to enjoy the full benefit of the 5 1 chan nel digital soundtracks that are broadcast on some satellite programs Note Only connect one type of digital cable to the DVD receiver Connecting both types will mute the digital input Optional Video Connections This Quick Sta...

Отзывы: