16
Using the Driving
Support function
CAUTION
• The driving support function is for
providing driving support to drivers
and not for preventing accidents.
Furthermore, it does not provide
notifications of all hazards.
• Please observe the traffic rules to ensure
safe driving by paying attention to the
distance to the vehicle in front, your
surroundings and driving conditions,
and applying the brakes when necessary.
Furthermore, operation is not completely
guaranteed even when the device is used
correctly as described in the instruction
manual. Please note that JVC KENWOOD
bears no responsibility whatsoever for any
losses incurred as a result.
• Due to the specifications of the device, a
warning sound is also played when you
change lanes on roads because the lane
departure warning function is not linked
to the turn signals.
• The driving support function may not
operate correctly in the following cases.
–
Location where GPS signals cannot be
received correctly, such as in tunnels
or where there are many tall buildings
–
When lanes cannot be correctly
recognized as a result of deterioration
of the road surface, reflection during
rain, etc.
–
When the vehicle in front cannot be
recognized as a vehicle due to its
shape or paint color, changes in the
amount of light, etc.
–
Changes due to weather (rain, snow,
heavy fog, etc.), time of day (early
hours of the morning, evening, night,
etc.), light from behind, and traffic
conditions (traffic jams, pedestrians,
etc.)
Adjusting the Settings to
Match the Vehicle
Before using the driving support function, set
the mounting height of the device from the
road surface and adjust the horizon and engine
hood front edge position settings to match the
vehicle.
• Park the vehicle on a place with good
visibility, and adjust the angle and
orientation of the camera. If the camera
is deviated from the correct position,
the driving support function will not
work properly. After completion of the
adjustment, secure the camera firmly.
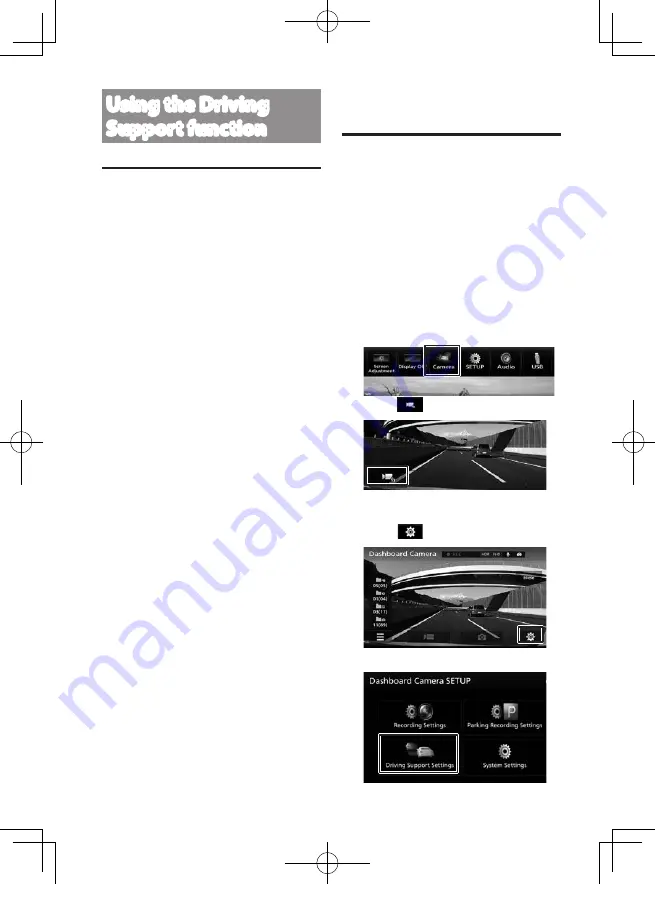
1.
Press the
[MENU]
button.
2.
Touch [Camera].
3.
Touch
.
Displays the operating buttons on the
screen.
4.
Touch
.
5.
Touch [Driving Support Settings] .
DRV-N520W_EN301.indd 16
2017/03/08 14:05
Содержание DRV-N520
Страница 44: ...44 DRV N520W_EN301 indd 44 2017 03 08 14 0 ...
Страница 45: ...45 DRV N520W_EN301 indd 45 2017 03 08 14 0 ...
Страница 48: ...DRV N520W_EN301 indd 48 2017 03 08 14 0 ...


