background image

20

Return to the Top page

Basic Operations

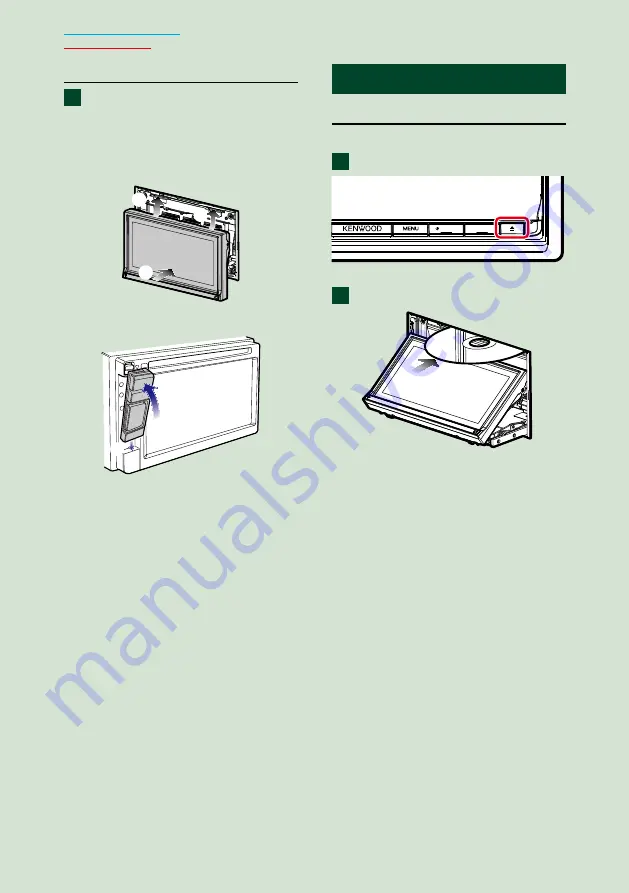
Attaching the front panel

Hold the panel securely so as not 

to drop it accidentally, and fit it 

onto the attaching plate until it is 

firmly locked.

DNN9250DAB/ DNR8025BT

1

1

2

DNN6250DAB

1

2


ñ

H

ow to Play Media

Music CD and disc media

DNN9250DAB/ DNR8025BT

Press the <

G

> button.

HOME

6

The panel opens.

Insert the disc into the slot.

The panel closes automatically.
The unit loads the disc and playback 

starts.


ö

To eject the disc:

Press the <

G

> button.

1

1

2

Содержание DNN6250DAB

Страница 1: ...AVIGATION SYSTEM DNN9250DAB DNN6250DAB CONNECTED MONITOR WITH DVD RECEIVER DNR8025BT INSTRUCTION MANUAL Before reading this manual click the button below to check the latest edition and the modified pages http manual kenwood com edition im383 Check the latest edition ...

Страница 2: ...NECTED NAVIGATION SYSTEM In this manual you will learn various convenient functions of the system Click the icon of the media you want to play With one click you can jump to the section of each media iPod USB SD VCD DVDVIDEO Music CD Disc Media BT Audio Apps Radio DAB WirelessLink Storage ...

Страница 3: ...her Widget_____________________ 44 Weather Application_________________ 45 Today Widget_______________________ 47 SNS Widget_________________________ 47 RSS Widget_________________________ 48 Schedule Application_________________ 48 Facebook SNS Application ____________ 51 Twitter SNS Application ______________ 52 E mail SNS Application ______________ 54 RSS Application_____________________ 56 Now...

Страница 4: ... DNN9250DAB DNR8025BT 123 Camera Control_____________________ 123 Switching the View Camera____________ 123 Setting Up 124 Monitor Screen Setup________________ 124 System Setup_______________________ 125 Display Setup_______________________ 128 Navigation Setup DNN9250DAB DNN6250DAB _________ 130 Camera Setup_______________________ 131 Software Information_________________ 132 AV Input Setup______...

Страница 5: ... directly to the unit may affect its mechanical parts Wiping the faceplate with a hard cloth or using a volatile liquid such as thinner or alcohol may scratch the surface or erase screened print Ñ ÑLens fogging When you turn on the car heater in cold weather dew or condensation may form on the lens in the disc player of the unit Called lens fogging this condensation on the lens may not allow discs...

Страница 6: ...in this unit by yourself and confirm that the data has been deleted We shall not be liable for any damage caused by leakage of undeleted data 1 Press the HOME button DNN9250DAB DNR8025BT HOME 6 DNN6250DAB 2 Press the MENU button DNN9250DAB DNR8025BT HOME 6 DNN6250DAB 3 Touch Setting 4 Touch Backup Reset 5 Touch Factory data reset 6 Enter owner password Touch Rest 7 Touch ERASE ...

Страница 7: ...ion Indicates the name of panel buttons Indicates the name of touch keys Operation title Introduces the function NOTE Introduces some tips notes etc Return to the Top page CD Audio and Visual Files iPod Apps Operation 30 Search Operation You can search music video or picture files by the following operations NOTE If you use a remote controller you can jump directly to the desired track file with e...

Страница 8: ...7 Return to the Top page How To Read This Manual ...

Страница 9: ...to Speech TTS Notes You can use following feature for 2 years after registration of the owner account To use it continuously a usage fee is required For details see web site of Route Collector http www route collector com Weather by INRIX Traffic by INRIX Dynamic Parking by INRIX Fuel Prices by INRIX Real Time Traffic Camera by INRIX Movie Show Times by WWM TTS by Nuance STT by Nuance To use the f...

Страница 10: ...alog Radio Navigation Wi Fi access point Connect to Internet using the tethering function of your smartphone or an Internet device P 34 Wi Fi 11n g b 4G 3G LTE or EDGE HOME 6 Wi Fi hotspot This unit becomes the Wi Fi access point and you can enjoy music and video in a smartphone Wi Fi connected by Kenwood Wireless Link P 36 ...

Страница 11: ...ations For this reason they may be different from the actual panels How to insert an SD Card DNN9250DAB 1 Press 8 G button for 1 second The panel fully opens 2 Hold the SD card as the illustration in the right and insert it into the slot until it clicks V To eject the card Push the card until it clicks and then remove your finger from the card The card pops up so that you can pull it out with your...

Страница 12: ...NU Displays the option menu screen Pressing for 1 second switches AV out sources 6 HOME Displays the Home screen P 23 Pressing for 1 second turns the power off When the power off turns the power on 7 6 Back Return to the previously viewed screen Pressing for 1 second displays the Hands Free screen P 116 8 G Eject Ejects the disc When the panel is opened pressing closes the panel and pressing for 1...

Страница 13: ...SD Card 1 Slide the 4 Release key upward to detach the part of the front panel 2 Hold the microSD card with the label side facing left and the notched section up and insert it into the slot until it clicks V To eject the card Push the card until it clicks and then remove your finger from the card The card pops up so that you can pull it out with your fingers NOTE When detaching a part of the front...

Страница 14: ...ndicator flashes when the vehicle ignition is off P 126 4 Release key Detaches the part of front panel 5 HOME Displays the Home screen P 23 Pressing for 1 second turns the power off When the power off turns the power on 6 MENU Displays the option menu screen Pressing for 1 second switches AV out sources 7 S R Vol Adjusts volume 8 6 Back Return to the previously viewed screen Pressing for 1 second ...

Страница 15: ...ress the HOME button HOME 6 The unit is turned on ö ö To turn off the navigation system Press the HOME button for 1 second DNN6250DAB Press the HOME button The unit is turned on ö ö To turn off the unit Press the HOME button for 1 second If it is your first time turning the unit on after installation it will be necessary to perform Initial setup P 16 1 1 ...

Страница 16: ...istered Enter the password When you selected Administrator or Guest you do not need to enter a password Auto Login Checking this checkbox allows you to log in to the system automatically from the next time Touch Login NOTE If you forgot your password create your new password on the Route Collector site http www route collector com 1 2 3 ...

Страница 17: ...igure settings for connection to Wi Fi 1 Touch WiFi Setup 2 Slide Wi Fi to ON 3 Select the Wi Fi access point to register from the list 4 Enter the Password 5 Touch Connect 6 After setting press the 6 button For details on operation see Wi Fi Setup P 34 Date Setup Set the date and time 1 Touch Date Setup 2 Touch Select time zone 3 Select a time zone 4 After setting press the 6 button For details o...

Страница 18: ... Touch Enter Language Select the language used for the control screen and setting items Default is American English en 1 Touch SET 2 Touch C or D to select the desired language 3 Touch Enter For details on operation see Language setup P 126 Angle DNN9250DAB DNR8025BT only Adjust the position of the monitor Default is 0 1 Touch SET 2 Touch desired angle number and For details on operation see Monit...

Страница 19: ...n 3 If you want to change color touch SET of Panel Color Coordinate 4 Touch your desired color and For details on operation see Panel color coordinate P 129 Camera Set the parameters for the camera 1 Touch SET 2 Set each item and touch For details on operation see Camera Setup P 131 DEMO Set the demonstration mode Default is ON 1 Touch ON or OFF Touch Finish NOTE These settings can be set from the...

Страница 20: ... the front panel is released Remove the panel before this happens ö ö After detaching Put the panel in the protective bag supplied with the unit NOTE When detaching a part of the front panel detach it toward the front side as shown in the diagram above If it is detached upward the front panel will be broken To prevent deterioration do not touch the terminals of the unit and faceplate with your fin...

Страница 21: ...he attaching plate until it is firmly locked DNN9250DAB DNR8025BT 1 1 2 DNN6250DAB 1 2 ññHow to Play Media Music CD and disc media DNN9250DAB DNR8025BT Press the G button HOME 6 The panel opens Insert the disc into the slot The panel closes automatically The unit loads the disc and playback starts ö ö To eject the disc Press the G button 1 1 2 ...

Страница 22: ... device with the USB cable The unit reads the device and playback starts ö ö To disconnect the device Touch G on the screen and disconnect the device from the cable iPod Connect the iPod NOTE For the details of the necessary cable and adapter to connect with iPod iPhone refer to Music Video Basic Operation P 72 The unit reads the iPod and playback starts ö ö To disconnect the iPod iPhone connected...

Страница 23: ...ove Push the SD card until it clicks and then remove your finger from the card The card pops up so that you can pull it out with your fingers DNN6250DAB Detach the front panel 1 2 Hold the microSD card with the label facing up and the notched section right and insert it into the slot until it clicks The unit loads the card and playback starts ö ö To remove Push the microSD card until it clicks and...

Страница 24: ...el Weather widget Displays the weather forecast for the selected region Network widget Displays the schedule SNS or RSS 2 Media panel Now playing Displays the title of the song being played or the name of the station you are listening to and allows you to perform simple operations Media widget Displays the Summary board that shows the songs you marked with Like and the playback history and the Pho...

Страница 25: ...ce list All apps list You can scroll the list screen by flicking the screen up down Home Returns to the Source launcher panel or the Network contents panel From All source list you can perform the following functions Function Icon Operation Switch the audio source etc Touch the icon of the desired source Switch the video source etc Touch the icon of the desired video source Display navigation scre...

Страница 26: ...on to an empty space Media panel 2 1 1 Now playing widget Displays the title of the song being played or the name of the station you are listening to and allows you to perform simple operations See Now playing Widget P 58 2 Media widget Touching allows you to switch among Summary Board and photo frame See Summary Board Widget P 60 Photo Frame Widget P 61 Service panel 2 1 1 Weather widget DNN9250D...

Страница 27: ...26 Return to the Top page Basic Operations Change the skin for home screen You can select a home screen skin from 3 types Press the MENU button Touch Theme Select a skin Touch OK 1 2 3 4 ...

Страница 28: ...en Displays the control screen of current source Icon feature differs depending on the source List screen There are some common function keys in the list screens of most sources Scroll Touch to scroll through texts on the display etc Touch keys with various functions are displayed here Displayed keys differ depending on the current audio source status etc For examples of functions of each key refe...

Страница 29: ...28 Return to the Top page Basic Operations Flick scrolling You can scroll the list screen by flicking the screen up down or right left ...

Страница 30: ...tails on the navigation function please refer to the Navigation Instruction Manual Display the navigation screen DNN9250DAB Press the NAV button HOME 6 The navigation screen appears DNN6250DAB Press the HOME button Select the Source launcher panel Touch NAV The navigation screen appears 1 1 2 3 ...

Страница 31: ...uching this area displays the audio screen Displays the navigation and control keys of the current source Displays the navigation and current video playback display NOTE The screen switches between playback screen and camera view each time the viewing area is touched Touching the source icon in the bottom of the screen displays the full audio screen Streaming Video and AUPEO just plays music You c...

Страница 32: ...ss the MENU button in the navigation screen or source control screen Touch Triplog On Touch Yes When the Trip log is active appears in the status bar NOTE You must have a connection with the internet using Wi Fi You can use the Trip log function when you have logged in the system as Owner or User Where To function You can set the destination of the navigation easily by setting the destination of t...

Страница 33: ... panel Touch Touch SNS Touch mail Touch Touch The address for setting the meeting point is added in the text part Enter the address subject etc to complete the mail and send it Your family or friend will enter the meeting point Check the address in the mail register as the meeting point and press Send You will be notified by the icon on the status bar when they enter the meeting point Drag the sta...

Страница 34: ... also be used for secondary purposes at your sole option and responsibility In any event we cannot accept any responsibility for any results of your use of the function for whatever purpose Should you select to use this option please activate the function through the procedures set forth in the left column Log in to Route Collector site by the owner account http www route collector com Set to ON t...

Страница 35: ...Make preparations for using the Wi Fi access point for Internet connection through use of the tethering function of the smartphone Set to OFF the Wi Fi Hotspot in Wi Fi Hotspot Setup P 36 1 Press the HOME button to display the Home screen Note To display the Network contents panel Press the HOME button again 2 Press the MENU button 3 Touch Setting 4 Slide Wi Fi to ON 5 Touch Wi Fi 6 Select the Wi ...

Страница 36: ...Setup Register the Wi Fi access point manually 1 Touch ADD NETWORK 2 Enter the SSID code 3 Select the security 4 Enter the security code 5 Touch SAVE Confirm the MAC address 1 Press the MENU button 2 Touch Advanced 3 Press the 6 button ...

Страница 37: ...he Internet via Wi Fi Set to OFF the Wi Fi in Wi Fi Setup P 34 1 Press the HOME button to display the Home screen Note To display the Network contents panel Press the HOME button again 2 Press the MENU button 3 Touch Setting 4 Touch Portable hotspot 5 Touch Configure Wi Fi hotspot 6 Enter the SSID code Select the security Enter the password When you check Show password the password that you set is...

Страница 38: ...37 Return to the Top page Network Setup ...

Страница 39: ...te Setup 1 Press the HOME button to display the Home screen Note To display the Network contents panel Press the HOME button again 2 Press the MENU button 3 Touch Setting 4 Touch Date time 5 Set each item as follows 6 Press the 6 button ñ ñ Clock and Date Setup ...

Страница 40: ...up Adjust the date and time manually 1 Touch Automatic date time to remove the check 2 Touch Select time zone 3 Select a time zone 4 Touch Set date 5 Adjust the date 6 Touch Set 7 Touch Set time 8 Adjust the time 9 Touch Set 10Press the 6 button ...

Страница 41: ...the functions related to mail social media and Route Collector site You can register up to 4 user accounts Ñ ÑAccount registration procedure 1 Create an account in the Route Collector site Create an account refering to Create User Account P 40 or the Route Collector site http www route collector com 2 Register the account in this unit To register an Owner account refer to Set Owner Account P 41 To...

Страница 42: ... can register an owner account for the person who manages this system Preparation You must have a connection with the internet using Wi Fi See Wi Fi Setup P 34 First create an account in the Route Collector site See Create User Account P 40 If you have not created an owner account log in to the system as Administrator If you have created an owner account log in to the system after account resettin...

Страница 43: ... a user account when you have logged in the Owner 1 Press the HOME button to display the Home screen 2 Press the MENU button 3 Touch Account 4 Touch Set Account 5 Enter account information Enter the information registered in the Route Collector site 6 Touch OK Switch the User Login You can switch to a different account from the one currently logged in 1 Press the HOME button to display the Home sc...

Страница 44: ...count 5 Select an account 6 Touch OK Confirmation screen appears 7 Touch Yes Reset Owner Account You can delete previously registered owner and user accounts Preparation You can set a user account when you have logged in the Owner 1 Press the HOME button to display the Home screen 2 Press the MENU button 3 Touch Account 4 Touch Reset Account 5 Enter the owner account s password 6 Touch OK Confirma...

Страница 45: ... the HOME button 2 Flick the screen left or right to select the Service panel 2 3 1 1 Time Date Displays the current time and date 2 Weather information Displays the weather forecast for the selected region Touching this starts the weather application 3 City information Displays the selected region Touching this displays a region selection screen See City select P 44 Ñ ÑCity select 1 Touch City na...

Страница 46: ...n as follows 2 1 1 City list Displays a region list Touching this displays the selected region 2 Reads information again Adds a region Terminates the application Weather information Displays the today s weather forecast and the weather forecast for the next 6 days Ñ ÑMenu 1 Press the MENU button Delete Deletes a region from the City list See Delete City P 46 Setting Allows you to set the informati...

Страница 47: ...MENU button 2 Touch Delete in the Menu 3 Delete the region 4 Touch Yes 5 Touch 6 Ñ ÑWeather setup Performs setup when using Weather Application 1 Press the MENU button 2 Touch Setting in the Menu 3 Select an option as follows Show temperature Select a temperature scale Update interval Set an information update interval 4 Touch 6 ...

Страница 48: ...schedule in an auditory fashion SNS Widget You can use Facebook Twitter Gmail and email IMAP Preparation To use each service the email Google Facebook Twitter or email account is required You can use a user account when you have logged in the Owner or User 1 Press the HOME button 2 Flick the screen left or right to select the Service panel 3 Touch 4 Select the SNS Widget 1 2 3 1 Starts the SNS app...

Страница 49: ...ayed at the top sliding the list allows you to update the information Reads out the RSS contents in an auditory fashion Schedule Application You can edit schedules on the internet In addition you can also synchronize the schedule with Google Calendar Preparation You must have a connection with the internet using Wi Fi See Wi Fi Setup P 34 To use Google Calendar a Google account is required You can...

Страница 50: ... this displays the date of the schedule to be displayed 3 Add a schedule Displays the today s schedule Reads out all schedules by voice Terminates the application Schedule list Displays a schedule Touching this displays details of the schedule Reads out the content of the schedule in an auditory fashion 6 Detailed schedule view Text to speech Reads out the content of the schedule by voice Ñ ÑMenu ...

Страница 51: ...r schedule Enter an event name date and time description etc 3 Add an event Synchronizes the schedule with Google Calendar if used Ñ ÑNotification Displays a notification icon in the status bar when the set time is reached 1 Drag the status bar downward 2 Touch 3 Touch the subject to display details The Schedule application starts to display details ...

Страница 52: ... Phone and Password 8 Touch Log in Ñ ÑOperation 1 Press the HOME button 2 Flick the screen left or right to select the Network contents panel 3 Touch 4 Touch SNS 5 Touch Facebook 6 Perform desired operation as follows 1 2 1 Create a new article Posting the current place Reads out all articles by voice Terminates the application 2 Article list Displays an article or message Touching this displays d...

Страница 53: ...now appears speak the comment Post Posts the article 2 Post photo Returns to previous screen 3 Select a fixed phrase Twitter SNS Application Displays the screen for using Twitter Preparation You must have a connection with the internet using Wi Fi See Wi Fi Setup P 34 To use a Twitter service the corresponding account is required You can use a user account when you have logged in the Owner or User...

Страница 54: ...information Reads out the article by voice 7 Detailed article or message view 2 1 1 Create a reply Create a ReTweet Adds to Favorites 2 Delete the Tweet Reads the content of the comment by voice Returns to previous screen Ñ ÑMenu 1 Press the MENU button Article list view Setting Set an update interval Sign out Logs out from the current account Ñ ÑAdd to post Create an article to be posted to the S...

Страница 55: ... 6 Touch Sign in 7 Touch Gmail 8 Enter the Email and Password 9 Touch Next NOTE You can register Email IMAP Select Other in step 7 and enter necessary data according to the displayed messages Ñ ÑOperation 1 Press the HOME button 2 Flick the screen left or right to select the Network contents panel 3 Touch 4 Touch SNS 5 Touch mail 6 Perform desired operation as follows 1 2 1 Create a new article Re...

Страница 56: ...t Register a new account Delete account Delete a registered account Select the account to delete by putting a checkmark and then touch OK Ñ ÑAdd to post Create an article to be posted to the SNS service of the selected category 1 Touch in the SNS application 2 Create an article to post 2 1 3 1 Sends the mail Stores the mail temporarily Deletes the mail Enters the address of the meeting point for C...

Страница 57: ...es by voice Terminates the application 2 Category Select the RSS feed to be displayed 3 Article list Display the article Touching this displays details While the latest information is displayed at the top sliding the list down updates the information Reads out the article by voice 6 Detailed article view 2 2 1 1 Registers the RSS feed in the bookmark of the Route Collector site You can read it lat...

Страница 58: ...lectable RSS feed you need to edit it in the Route Collector site See www route collector com Ñ ÑDelete RSS feed Delete an RSS feed 1 Press the MENU button 2 Touch Delete 3 Touch Yes to confirm Ñ ÑRSS setup Performs setup when using RSS Application 1 Press the MENU button 2 Touch Setting in the Menu 3 Select an option as follows Update interval Set the information update interval ...

Страница 59: ... are listening to P 59 2 Album art Touching Album art displays the Source control screen 3 Information display Displays the information title etc about the song being played 4 Allow you to stop playback temporarily and select songs Radio source such as Radio 4 3 2 1 1 I m listening You can post the information about the song you are listening to on twitter Fecebook See Posting the information abou...

Страница 60: ...1 2 3 1 Enter the information you want to post Enter a comment using the voice recognition function When Speak now is displayed pronounce the comment Post Posts the information 2 Fixed phrase Select the information about the song you are listening to and a fixed phrase 3 Select the service on which you want to post the information Select the service and then touch OK Returns to previous screen Ñ Ñ...

Страница 61: ...ormation about the played content is displayed See Trip log function P 31 1 Press the HOME button 2 Flick the screen left or right to select the Media panel 3 Touch 4 Select the Summary Board Widget 5 Touch desired item 1 2 YouTube app starts and plays the song 1 Update the history information Switches to Photo frame 2 Category Select the service category Displays the playback history of YouTube D...

Страница 62: ...o Frame Widget 2 1 1 Edit Edit the photo to be displayed 2 Picture Sliding the photo vertically scrolls through photos Switches to Summary Board Ñ ÑSelect the photo you want to display 1 Touch 2 1 1 Displays the screen for selecting the photo to be added Ends editing and returns to the Photo frame screen 2 Thumbnail Touch and hold the photo When the photo shaking drag the photo to change the order...

Страница 63: ...e and play it 1 Touch 2 Select whether you search for the song by artist name or album name 3 Enter the Artist or Album Enter the keyword using the voice recognition function When Speak now is displayed pronounce the keyword You can use a user account when you have logged in the Owner or User 4 Select a Source The source changes and playback starts ...

Страница 64: ...63 Return to the Top page Widget and Application Operation ...

Страница 65: ...hapter number display Track Scene VCD track or scene number display Scene is displayed only when PBC is on D B F I etc Current play mode display The meanings of each icon are as follows D play B fast forward A fast backward F search up E search down I stop IR resume stop H pause slow playback slow reverse playback Touch this area to display the disc lable name 2 Multi function key Touch to switch ...

Страница 66: ...P play time display and R disc remaining time For confirmation of current playing position See the bar in center DVD only The bar does not appear while the remaining time is being displayed 6 Movie display area Touch to display Video screen 7 Searching area Touch to search the next previous content Scrolling from center of display to left or right performs fast backward or fast forward Each time y...

Страница 67: ...he functions of each key are as follows E F Searches the previous next content DH Plays or pauses or DVD only Plays in slow motion forward or backward I Stops playback When touched twice the disc is played from the beginning when you play it the next time PBC VCD only Turn PBC on or off ...

Страница 68: ...Displays the previous menu Touch Return Enters selected item Touch Enter Enables direct operation Touch Highlight to enter the highlight control mode See Highlight control P 67 Moves the cursor Touch R S C D These keys may not function depending on the disc Ñ ÑHighlight control Highlight control lets you control the DVD menu by touching the menu key directly on the screen 1 Touch Highlight in the ...

Страница 69: ...e is switched Controls zoom ratio Touch Zoom For details see step2 in Zoom Control for DVD and VCD P 68 Switches the picture angle Touch Angle Each time you touch this key picture angle is switched Exits menu control Touch Exit Displays the Menu Control 1 screen Touch Previous Zoom Control for DVD and VCD You can enlarge Playback screen for DVD and VCD 1 For VCD touch illustrated area during playb...

Страница 70: ...h Source Source SETUP Menu screen appears 4 Touch DVD SETUP in the list DVD SETUP screen appears 5 Set each item as follows Menu Subtitle Audio Language See Language setup P 70 Dynamic Range Control Set the dynamic range Wide The dynamic range is wide Normal The dynamic range is normal Dialog Default Makes the total sound volume larger than other modes This is effective only when you are using Dol...

Страница 71: ...guage used in the menu subtitle and voice You cannot setup these items during DVD playback 1 Touch SET of the desired item Menu Language Subtitle Language Audio Language Language Set screen appears 2 Enter the desired language code and touch Enter For language code refer to DVD Language Codes P 158 Sets the entered language and returns to the DVD SETUP screen NOTE To cancel the setup and return to...

Страница 72: ...loaded disc If a disc has no parental lock anybody can play it even though you have set the parental lock Ñ ÑDisc setup Performs setup when using disc media 1 Touch SET of DISC SETUP DISC SETUP screen appears 2 Select an option as follows CD Read Sets the motion of this unit when a music CD is played 1 Default Automatically recognizes and plays an audio file disc a DVD or a music CD 2 Forcibly pla...

Страница 73: ...ning to USB Cable accessory of the iPod iPhone Bluetooth profile SPP iPod connection setup HDMI BT B To listen music with Lightning connector device Lightning to USB Cable accessory of the iPod iPhone iPod connection setup USB 1Wire C To listen music and watch video with 30 pin connector device analog KCA iP202 iPod connection setup USB AV IN D To listen music with 30 pin connector device KCA iP10...

Страница 74: ...t etc D B F I etc Current play mode display The meanings of each icon are as follows D play B fast forward A fast backward F search up E search down I stop IR resume stop H pause 2 Movie display area Control switching area Touch to switch between the Simple Control and List Control screen Only for Music file Touch to display Video screen Only for Video file 3 Multi function key Touch to switch the...

Страница 75: ... only 9 9 10 11 12 9 Searching file area disc media only Touch to search the next previous file Scrolling from center of display to left or right performs fast backward or fast forward Each time you touch each area the speed changes standard 2 times 3 times To stop fast backward forward touch center of the display 10Menu display area disc media only Touch to display the Control screen For details ...

Страница 76: ...usic file Touch to display Video screen Only for Video file 3 Multi function key Touch to switch the multi function menu For details on the menu see Multi function menu P 76 4 Multi function menu Various functions can be performed by using keys in this area For details on the keys see Multi function menu P 76 5 Sub function key Touch to display Sub function menu 7 in this table 6 Content list Disp...

Страница 77: ...play the Movie control screen For details see Movie Control P 82 11Key display area Video file only Touch to display the last control screen 12Screen setup display area Touch and hold to display the screen control screen See Monitor Screen Setup P 124 Ñ ÑMulti function menu Music CD iPod Disc media USB device and SD card The following functions can be performed by using keys in this area Only for ...

Страница 78: ...nd SD card Searches track from the album artwork list For details on search operation see Search from album artwork P 80 A B Only for music CD and disc media Fast forward or fast backward Only for iPod USB device and SD card Plays the previous or next album in Favorite list P 81 or For confirmation of play time During music CD playback you can also confirm disc remaining time by touching time disp...

Страница 79: ...t and folder list by touching For disc media you cannot display the list during random play and stop Ñ ÑOther search There are other search methods in order to narrow search for a song This function is not available when music CD is the current source 1 Touch in the control screen The search type screen appears 2 Touch desired search method USB device and SD card iPod The list sorted in the way yo...

Страница 80: ...e desired link from the left part of the screen You can select from artist album genre and composer The link list corresponding to your selection appears NOTE The list is sorted by the way you selected Artist Displays the album list of the artist Album Displays all tunes of the current album Genre Displays the artists list in which artists belong to the same genre Composer Displays the album list ...

Страница 81: ...ÑSearch from album artwork Only for iPod USB device and SD card You can search music files by selecting the album artwork 1 Touch Sub function menu appears 2 Touch Favorite screen appears 3 Touch desired artwork in the upper line NOTE The key in the upper side of the screen functions differently depending on the status When Load Albums appears You have not yet loaded any artwork Touch the key to s...

Страница 82: ...lbum already registered to the favorite list Up to 10 albums can be registered to the list 2 Touch the desired artwork in the favorite list The selected album is played and the control screen appears NOTE The favorite list is played to the right starting with the selected album To delete the album from the favorite list touch and drag it to the upper line You can change the playing order of the fa...

Страница 83: ...t the movie playback 1 In the playback screen touch illustrated area Movie control screen appears 2 Touch Disc CTRL Disc media only Movie Control screen appears 3 Perform desired operation as follows Changes subtitle language Touch Subtitle Changes audio language Touch Audio Exits the menu Touch Exit ...

Страница 84: ...he screen left or right to select the Source launcher panel 3 Touch 4 Touch APPS NOTE When you turn on the power and select apps as the source the caution for the operation watching video and listening music appears With your acceptance you can control apps listen to music and watch video from apps when you are driving 1 2 1 2 3 3 1 D H iPod only L Plays or pauses 2 E F Searches the previous next ...

Страница 85: ...tup P 84 iPod setup P 84 Apps setup P 86 DivX VOD P 88 Ñ ÑUSB setup 1 Set each item as follows On Screen USB Set how information from a USB device or SD is displayed Auto Default Information appears for 5 seconds when updated OFF Does not display any information Ñ ÑiPod setup 1 Set each item as follows AudioBook Speed Set the audio book playback speed Select from Slow Normal default and Fast Wide ...

Страница 86: ...SB AV IN Select when connecting with KCA iP202 USB 1Wire Select when connecting with KCA iP102 or Lightning to USB Cable HDMI BT Select when connecting with KCA HD100 and Lightning Digital AV Adapter Bluetooth Select when connecting via Bluetooth only 11Touch Next Confirmation screen appears 12Touch Done 13Touch 6 NOTE For the details of the necessary cable and adapter to connect with iPod iPhone ...

Страница 87: ...of the information from APP when it cuts in the music you are listening to This item can be set when in STANDBY source Application link setup 1 Press the HOME button twice to the Source launcher panel 2 Touch 3 Touch STANDBY 4 Touch 5 Touch SETUP 6 Touch Source 7 Touch APPS SETUP 8 Touch SET on APP Settings in the APPS SETUP screen Application link setup screen appears 9 Touch CHANGE 10Select the ...

Страница 88: ...onnecting via Bluetooth only 13Touch Next Confirmation screen appears 14Touch Done NOTE For the details of the necessary cable and adapter to connect with iPod iPhone and Android device refer to Music Video Basic Operation P 72 When you select HDMI BT HDMI MHL BT or Bluetooth in step 12 Bluetooth device selection screen will appear Select the device to be connected If a connectable Bluetooth devic...

Страница 89: ...er you touch the key a confirmation message appears Follow the message and complete the operation NOTE DivX R Registration Code is disabled when a DVD is being played When downloading a DivX VOD file controlled by DRM register the code appeared on the screen Otherwise the file may not be able to play with this unit Remaining number of viewing is displayed when playing a DivX VOD file with the view...

Страница 90: ...89 Return to the Top page CD Audio and Visual Files iPod Apps Operation ...

Страница 91: ...udio file MP3 mp3 AAC LC m4a aac WMA wma WAV wav FLAC flac Copyrighted content cannot be played Music Basic Operation The music files uploaded to Dropbox can be played Preparation To play the files uploaded to Dropbox setting is required See Starting procedure P 90 1 Press the HOME button 2 Flick the screen left or right to select the Source launcher panel 3 Touch 4 Touch Storage L Plays or pauses...

Страница 92: ...e file random random off For confirmation of play time Status bar in center For confirmation of current playing position You can drag the circle left or right to change the playing position Category search You can search music files by the following operations 1 Touch in the control screen The search type screen appears 2 Touch the desired category from the left part of the screen 3 The list is so...

Страница 93: ...pot Setup P 36 HOME 6 DNN HOME 6 DNN Wi Fi Wi Fi Wi Fi access point Wireless Link Media Server function Plays the content stored in the USB memory or SD card connected to this unit via another network media player client device We confirmed normal operation using the following network media players software Windows Media Player 12 Media Player function Plays the content stored in another media ser...

Страница 94: ...onnect from the client device Operate the client device to connect to the server Server name DNN9250DAB DNN6250DAB or DNR8025BT Media Player function Plays the content stored in another media server device via this unit 1 Press the HOME button 2 Flick the screen left or right to select the Source launcher panel 3 Touch 4 Touch Wireless Link 5 Connect to the media server A list of detected media se...

Страница 95: ...g position You can drag the circle left or right to change the playing position Touch to display Sub function menu Touch and hold to switch between the file list and the current file information Media Controller function Allows you to handle the content stored in another media server device via this unit and play them on another network media player client device 1 Press the HOME button 2 Flick th...

Страница 96: ...ller through this unit 1 Press the HOME button 2 Flick the screen left or right to select the Source launcher panel 3 Touch 4 Touch Wireless Link 5 Touch DMR The Rendering function is turned on 6 Establish connection from the media controller Operate the media controller to connect to this unit This unit DNN9250DAB DNN6250DAB or DNR8025BT ...

Страница 97: ...rmation FM1 etc Band display MHz kHz Frequency display Preset Preset number Touch to switch between the Simple Control and List Control screen 3 Multi function key Touch to switch the multi function menu For details on the menu see Multi function menu P 97 4 Preset key Multi function menu Recalls the memorized station or channel When touched for 2 seconds stores the current receiving station or ch...

Страница 98: ...u The functions of each key are as follows P1 P6 Select the preset station Touch for 2 seconds to store the current station into the preset memory Displays the list of preset stations or services For details see Selecting Operation P 100 TI FM Tuner only Sets the traffic information mode on For details see Traffic Information P 102 SEEK Switches the seek mode in the following sequence AUTO1 AUTO2 ...

Страница 99: ... displayed if available from current content Touch to switch between the Control and Information screen 3 Multi function key Touch to switch the multi function menu For details on the menu see Multi function menu P 99 4 Preset key Multi function menu Recalls the memorized station or channel When touched for 2 seconds stores the current receiving station or channel in memory When switched various f...

Страница 100: ...ctions of each key are as follows Switches the preset number P1 P5 P6 P10 P11 P15 Select the preset channel Touch for 2 seconds to store the current station into the preset memory SEEK Switches the seek mode in the following sequence AUTO1 AUTO2 MANUAL AUTO1 Tunes in a ensemble with good reception automatically AUTO2 Tunes in ensemble in memory one after another MANUAL Switches to the next ensembl...

Страница 101: ...ry starts Ñ ÑManual memory You can store the current receiving station or channel in memory 1 Select a station or channel you wish to store in memory 2 Touch P 1 6 1 15 in which you want to store the station for 2 seconds until a beep sounds Selecting Operation Ñ ÑPreset select You can list and select memorized station or channel Selecting from the multi function menu 1 Touch the desired number fr...

Страница 102: ...reen appears 3 Select a program type from the list 4 Touch Search You can search a station of the selected program type Ñ ÑList select You can select an ensemble from a list of memorized ensembles or select a service from a list of all services received 1 Touch in the control screen The multi function menu appears 2 Touch in the multi function menu The list type screen appears 3 Touch Preset List ...

Страница 103: ...he Traffic Information screen appear automatically The volume setting during reception of traffic information is automatically stored The next time the traffic information is received this unit recalls the volume setting automatically Replay Digital Radio only You can replay the last 30 minutes of current station 1 Touch in the sub function menu Multi function menu L Plays or pauses E F Forward ba...

Страница 104: ...ws bulletin interrupt time Default is OFF AF When station reception is poor automatically switches to the station that is broadcasting the same program over the same Radio Data System network Default is ON Regional Sets whether to switch to the station only in the specific region using the AF control Default is ON Auto TP Seek When traffic information station reception is poor automatically search...

Страница 105: ...of the service being provided by Digital Radio becomes poor automatically switches to Radio Data System PTY Watch If the service of the set program type begins with the ensemble being received switches from any source to Digital Radio for service reception Announcement Select Switches to the set Announcement service For details see Announcement setup P 105 Seamless Band Prevents audio break when s...

Страница 106: ...uncement to receive it 1 Touch SET of Announcement Select in the DAB SETUP screen The Announcement Select screen appears 2 Touch each Announcement list and set on or off NOTE The volume setting during reception of Announcement service is automatically stored The next time the Announcement service is received this unit recalls the volume setting automatically ...

Страница 107: ...pplied remote control through the remote sensor on the front panel of this unit Control screen 1 1 Control switching area Touch to display TV screen TV screen 2 2 3 4 5 2 Switching channel area Touch to switch the channel 3 Menu display area Touch to display the Menu control screen 4 Key display area Touch to display the control screen 5 Screen setup display area Touch and hold to display the scre...

Страница 108: ...107 Return to the Top page Radio and TV Tuner Operation ...

Страница 109: ...iated by the keyword Category Serach Searches for videos by the category My YouTube When you log in to YouTube you can use the following Favorite Videos Playlists Recommeds Upload Lists Channel Feed Note The video playback which uses the internet browser is not guaranteed Ñ ÑKeyword Search 1 Touch Keyword Search 2 Perform desired operation as follows 1 2 1 Enter a Keyword for search Enter a keywor...

Страница 110: ...firmation of current playing position You can drag the circle left or right to change the playing position Ñ ÑMy YouTube By logging into YouTube you can use My Favorites and My Videos 1 Press the MENU button 2 Touch Sign in 3 Enter the Email address and Password 4 Touch Sign in 5 Touch My YouTube 6 Select a category Ñ ÑMenu 1 Press the MENU button Sign in Log into the YouTube service Now you can u...

Страница 111: ... You need to connect to Internet using Wi Fi See Wi Fi Setup P 34 1 Press the HOME button 2 Flick the screen left or right to select the Network contents panel 3 Touch 4 Touch Aupeo 5 Select a genre Ñ ÑLog in By registering an account you can listen to your favorite songs 1 Touch log in 2 Enter the User Name and Password 3 Touch log in ...

Страница 112: ...ect a sub genre Mood Music matching your mood Select a new genre FEATURED Select a Featured Stations GENRE STATIONS Select a Genre Stations ARTIST STATIONS Create a station of your type by searching stations by the artist name Favorites Edit the titles registered in Loves and Bans You can use this button only when you have logged in to this service Ñ ÑEditing Favorites You can edit the titles regi...

Страница 113: ...ied for compatibility access the following URL http www kenwood com cs ce bt The units supporting the Bluetooth function have been certified for conformity with the Bluetooth Standard following the procedure prescribed by Bluetooth SIG However it may be impossible for such units to communicate with your smartphone cell phone depending on its type Registering and Connecting Bluetooth Unit It is nec...

Страница 114: ...n on this unit or iOS smartphone registers the smartphone as a Bluetooth device 2 Select the Bluetooth unit to register from the list NOTE If the Bluetooth unit cannot be searched in step 1 you can search it again by touching Search in above screen Touch Cancel to cancel searching for the Bluetooth unit 3 Enter PIN code form the cell phone Ñ ÑConnecting the Bluetooth unit 1 Touch the name of devic...

Страница 115: ...code in your smartphone cell phone PIN code is set to 0000 as the default SSP Secure Simple Pairing of Bluetooth 2 1 or later 1 Search the unit DNN from your smartphone cell phone 2 Confirm the request both on the smartphone cell phone and the unit Ñ ÑChange the PIN code 1 Touch PIN Code Set PIN Code Set screen appears 2 Input the PIN code 3 Touch Enter ...

Страница 116: ...revious next content D Plays H Pauses I Stops playback 3 Control switching area Touch to switch between the Simple Control and List Control screen 4 Content information Displays the information of the current content These items appear only when the audio player which supports AVRCP profile is connected NOTE If the operation keys do not appear operate from the player Depending on your smartphone c...

Страница 117: ...ding on the type of your cell phone the following restrictions are placed The phonebook data cannot be downloaded normally Characters in the phonebook are garbled To cancel downloading the phonebook data operate the cell phone 2 Select a dialing method See the following table for each method Call by entering a phone number 1Touch 2Enter a phone number with number keys 3Touch Call using call record...

Страница 118: ...ns become ineffective if touched The status icons such as battery and antenna displayed may differ from those displayed on the cell phone Setting the cell phone in the private mode can disable the hands free function Ñ ÑVoice Recognition You can access the voice recognition function of the smartphone cell phone connected to this unit You can search a phone number in the smartphone cell phone phone...

Страница 119: ...utput between phone and speaker Sending DTMF tone signal Touch DTMF to display the tone input screen You can send tones by touching desired keys on the screen Call waiting You can answer a second call while talking with the first caller by placing the first call on hold and switching to the second call You can switch back and forth between first and second caller as well To answer the second call ...

Страница 120: ... whether you search by Phonebook name or Phone number 3 Enter the Phonebook name or Phone number Enter the keyword using the voice recognition function When Speak now is displayed pronounce the keyword You can use a user account when you have logged in the Owner or User 4 Touch TEL When searched by Phonebook name 5 Touch Û When searched by Phonebook number The unit make a call ...

Страница 121: ...stem automatically answers a call OFF Default Automatic response is not available 0 99 Set ringing time interval second Auto Pairing When set to ON the Apple Auto Pairing function is turned on to automatically register the iPod touch or iPhone connected to this unit ON Default Uses Apple Auto Pairing function OFF Not uses Apple Auto Pairing function Call Beep Select whether or not to beep upon rec...

Страница 122: ...hone Level Adjust the sensitivity of the telephone microphone Default is 3 Noise Reduction Level Reduces the noises generated by surrounding environment without changing the microphone volume Use this setting when the voice of caller is not clear Default is 10 Restore Resets the settings to the default settings 1 Either the time interval for automatic answer set on this unit or the time interval s...

Страница 123: ...oice control mode The buttons enclosed in a green square support the voice control 2 Speak the command Ex Speak TUNER The screen has changed to the TUNER Control screen You will hear a beep again 3 Repeat the same procedure as step 2 For information on the voice commands refer to Voice command table separate volume 4 Press the Push To Talk switch to end the voice control mode Ñ ÑDisplaying Voice C...

Страница 124: ...lows 1 2 3 1 Guideline Pressing each time turns on or off the guideline display alternately 2 Angle Pressing each time changes camera angles in the following order Super wide view Wide view Overhead view Wide view Top view Corner view 3 Clearing the Camera View display Switching the View Camera Switching between the front view camera and the rear view camera 1 Press the NAV APPS button for 1 secon...

Страница 125: ...nd buttons do not dim SYNC Default Turns the dimmer function on or off when the vehicle light control switch is turned on or off NAV SYNC Turns the dimmer function on or off according to the Navigation Day Night display setting DNN9250DAB DNN6250DAB Mode Playback screen only Select screen mode Full Full picture mode Just Justify picture mode Zoom Zoom picture mode Normal Normal picture mode NOTE A...

Страница 126: ...rom Auto Once OFF Auto Default Scrolls the text automatically Once Allows you to scroll the text only once automatically when updated OFF Does not scroll the text automatically NAV Key Longer than 1 Second APPS Key Longer than 1 Second DNN9250DAB DNR8025BT You can set the operation performed when the NAV APPS key is pressed for 1 second Select from V OFF CAM V OFF Default Turn the display off CAM ...

Страница 127: ...ed for Text to Speech TTS 3 Touch Enter NOTE To cancel the language setup touch Cancel Ñ ÑTouch panel adjustment DNN6250DAB 1 Touch Touch in the System Menu screen Touch Panel Adjustment screen appears 2 Follow the instruction on the screen and touch the center of each NOTE To cancel the touch panel adjustment touch Cancel To reset to the initial status touch Reset Ñ ÑSecurity setup A red indicato...

Страница 128: ...nstruction on the screen Lock Unlock Locks or unlocks the AV IN SETUP and Audio SETUP settings Yes Memorizes or recalls the settings No Cancels the function or memorization The SETUP Menu screen appears again When Lock is selected you cannot change the AV IN SETUP and Audio SETUP settings Also the locked key mark is displayed under each setting icon in the setup menu 3 Follow the instruction on th...

Страница 129: ...onitor angle P 128 Adjust panel color P 129 Ñ ÑMonitor angle control DNN9250DAB DNR8025BT You can adjust the angle of the monitor 1 Touch Angle in the Display Menu screen Angle setup screen appears 2 Select a number below an angle that will best suit your monitor viewing Default is 0 NOTE You can store the current monitor angle as the angle during power off Touch Memory when the desired angle is s...

Страница 130: ...Panel Color Scan is set to off Touch Initialize to reset the settings to the default settings 3 Touch the desired color Registering original color You can register your original color 1 Touch Adjust in the Panel Color Coordinate screen Panel Color RGB Coordinate screen appears 2 Use C and D to adjust each color value 3 Touch the desired preset key for 2 seconds Panel color scan You can set the pan...

Страница 131: ...errupt Speaker Select speaker s used for voice guidance of the navigation system Front L Uses the front left side speaker for voice guidance Front R Uses the front right side speaker for voice guidance Front All Default Uses both front speakers for voice guidance NAV Voice Volume Adjust the volume for voice guidance of the navigation system Default is 20 NAV Mute Mutes the volume of rear speakers ...

Страница 132: ...ssing the NAV 4 APPS 4 button for 1 second R CAM Settings 2 DNN9250DAB DNR8025BT Adjust the CMOS 3xx series with ID 1 set For details see the instruction manual of your camera Front Camera 1 DNN9250DAB DNR8025BT Select the type of front camera to use CMOS 310 When the CMOS 3xx series with ID 2 set is connected Other When the other camera is connected OFF Default When the front camera is not used F...

Страница 133: ...oftware see the relevant update procedure manual which comes with the software Notify the update When the program is updated you will be notified by the icon on the status bar Preparation You need to connect to Internet Minor update If it is the minor update you can update the program via the Internet 1 Drag the status bar downward 2 Touch Download to start download Touch Detail to display details...

Страница 134: ... operations by touching the screen of this unit OFF Default Set to OFF when not connecting the 3rd party TV tuner AV IN1 Name AV IN2 Name Set a name to be displayed when you select a system that is connected via the AV INPUT port Default is VIDEO AV Output Interface Setup You can select an AV source to be output at the AV OUTPUT port Default is VIDEO1 1 Touch on any screen 2 Touch SETUP SETUP Menu...

Страница 135: ...ars See the following section for each setting Setting audio P 134 Controlling audio P 137 Controlling equalizer P 138 Controlling sound effect P 140 Performing zone control P 139 Set listening position P 142 Setting Audio 1 Touch on any screen 2 Touch Audio Audio screen appears 3 Touch Audio SETUP Audio SETUP screen appears See the following section for each setting Set up speakers P 135 Set up y...

Страница 136: ...he tweeter when you are selecting front speakers None Small Middle Large X over Displays the speaker crossover setup screen You can adjust the crossover setup that was set automatically when you selected the speaker type For details see Crossover network setup P 136 3 Select a speaker size using C and D The speaker size is different depending on the speaker type and the unit Front OEM 8 cm 10 cm 1...

Страница 137: ...oofer is selected on Speaker Select screen Slope 3 Set a crossover slope 1 Only when Tweeter is set to Small Middle Large in Speaker Setup 2 Only when Subwoofer is set to a mode other than None in Speaker Setup 3 Only when LPF FREQ HPF FREQ is set to a mode other than Through in X over Ñ ÑCar type setup You can setup the car type and speaker network etc 1 Touch Car Type in the Audio SETUP screen C...

Страница 138: ... Fader Balance Adjust the volume balance around the touched area C and D adjust the right and left volume balance R and S adjust the front and rear volume balance Volume Offset Finely adjust the volume of the current source to minimize the difference in volume between different sources Subwoofer Level Adjust the subwoofer volume This setting is not available when subwoofer is set to None See Speak...

Страница 139: ... The Graphic Equalizer cannot be set when you select iPod in the Equalizer screen 1 Touch EQ in the Equalizer screen 2 Touch the screen and set the Graphic Equalizer as desired DNN9250DAB DNR8025BT DNN6250DAB Gain level light green boxed area Adjust the gain level by touching the each frequency bar Touching C D R and S can also adjust the level Use C and D to select a frequency and R and S to set ...

Страница 140: ...trol Zone Control screen appears 4 Touch Dual Zone 5 Set each source as follows D Front Source Rear Source Select the audio source for each S R Rear VOL Adjust the rear channel volume Single Zone Touch to turn off the dual zone function NOTE When the rear speaker sound is switched the audio source that is output at the AV OUTPUT terminal is also switched to the same source When the dual zone funct...

Страница 141: ...screen appears See the following section for each setting Set space enhancer P 140 Set Drive Equalizer Drive Equalizer P 141 Set up elevation P 141 Set up realizer or supreme P 141 Ñ ÑSpace Enhancer DNN9250DAB DNR8025BT 1 Touch Space Enhancer in the Sound Effect screen Space Enhancer screen appears 2 Touch Small Large or OFF Each setting value indicates the soundscape level ...

Страница 142: ...tually 1 Touch Elevation in the Sound Effect screen Elevation screen appears 2 Select Elevation level from High Low and OFF Ñ ÑRealizer and Supreme DNN9250DAB DNR8025BT You can restore the sound lost due to audio compression to a realistic sound 1 Touch the screen in the Sound Effect screen Realizer Realizer is sound enhancement and boosting low frequencies bass boost Select the level from OFF Lev...

Страница 143: ...4 Select listening position from Front R Right front Front L Left front Front All All front and All using C and D Ñ ÑPosition DTA Control You can fine adjust your listening position 1 In Position screen touch Adjust 2 Select the speaker you wish to adjust by touching speaker icon 3 Set DTA as follows C D Adjust the settings of the DTA position Gain Touch to adjust the gain of each speaker Initiali...

Страница 144: ...mputed and set 1 Determine the center of the currently set listening position as the reference point 2 Measure the distances from the reference point to the speakers 3 Calculate the differences between the distance of the furthest speaker and other speakers 4 Input the differences calculated in step 3 for individual speakers 5 Adjust gain for individual speakers A sound image will be shifted to th...

Страница 145: ...ion or excessive heat generation may result Do not recharge short break up or heat the battery or place it in an open fire Such actions may cause the battery to leak fluid If spilled fluid comes in contact with your eyes or on clothing immediately rinse with water and consult a physician Place the battery out of reach of children In the unlikely event that a child swallows the battery immediately ...

Страница 146: ...th entering the number corresponding to the content NOTE This operation cannot be performed for USB device and iPod 1 Press the BS button several times until the desired content appears The available contents are different depending on the source DVD Title number Chapter number Play time Item number You may not be able to use this function with some discs or scenes VCD 1 X and 2 X PBC OFF Track nu...

Страница 147: ...d by pressing twice NAV Displays Main menu 4 OUT IN NAV Zooms in or out the navigation map 5 POSITION AUD DVD Pauses the track or file and resumes playing by pressing twice During radio source in AUD mode switches the seek mode NAV Displays the current position 6 Cursor Key DVD Moves the cursor in the DVD menu NAV Moves the cursor or scrolls the map 7 ENTER DVD Performs the selected function NAV R...

Страница 148: ...direct search mode see Direct search mode P 145 DVD Press 1 2 to fast forward backward Switches the fast forward backward speed each time you press this key Press 4 5 to slow forward backward Switches the slow playback speed each time you press this key DVD only 15 DVD Clears the number 16 BS AUD DVD Switches to the direct search mode For details on the direct search mode see Direct search mode P ...

Страница 149: ...bled Set the dual zone function to on See Zone Control P 139 Cannot set up the equalizer Cannot set up the crossover network The dual zone function is enabled Set the dual zone function to off See Zone Control P 139 DSP Select is set to Bypass Set DSP Select to Through See DSP select P 137 Ñ ÑAbout audio operations Problem Reason Solution Radio reception is poor The car antenna is not extended Pul...

Страница 150: ...speaker cord has shorted or it has come in contact with the car chassis Wire or insulate the speaker cord as appropriate and then press the Reset button P 151 Hot Error When the internal temperature of this unit rises to 60 C or more the protection circuit is activated and you may not be able to operate the unit Use the unit again after reducing the temperature of the unit Mecha Error The disc pla...

Страница 151: ...nd Files P 152 and try another USB device USB Device Error The connected USB device is rated a current capacity higher than the allowable limit Check the USB device Some trouble may have occurred to the connected USB device Change the source to any source other than USB Remove the USB device Authorization Error Connection to the iPod has failed Remove the iPod and then reconnect it The unit does n...

Страница 152: ... unit returns to factory settings HOME 6 NOTE Disconnect the USB device before pressing the Reset button Pressing the Reset button with the USB device connected can damage the data stored in the USB device For how to disconnect the USB device see How to Play Media P 20 When the unit is turned on after resetting the Initial SETUP screen appears See Initial setup P 16 ...

Страница 153: ...CD Music CD 1 v CD TEXT CD ROM v MP3 WMA AAC MPEG1 MPEG2 DivX playback Multisession is supported Packet write is not supported CD R v CD RW v DTS CD Video CD VCD v Super video CD Photo CD CD EXTRA r Only music CD session can be played HDCD v CCCD Others Dualdisc Super audio CD r Only CD layer can be played 1 Incompatible with 8 cm 3 inch discs v Playback is possible r Playback is partly possible P...

Страница 154: ...he first setout is played WMA and AAC of which is covered with DRM cannot be played Although the audio files are complied with the standards listed above the play may be impossible depending on the types or conditions of media or device An online manual about audio files is posted on the site www kenwood com cs ce audiofile On this online manual detailed information and notes which are not written...

Страница 155: ...to indicate that you cannot operate the iPod Ñ ÑUsable USB device You can use a mass storage class USB device on this unit The word USB device appearing in this manual indicates a flash memory device and digital audio players can be recognized as mass storage ö öAbout file system The file system should be the one of the following FAT16 FAT32 NOTE When the USB device is connected to this unit it ca...

Страница 156: ...e title repeat function is on ö öVCD 1chLL 2chLL Identifies the left audio output of channel 1 or 2 1chLR 2chLR Identifies the monaural audio output of channel 1 or 2 1chRR 2chRR Identifies the right audio output of channel 1 or 2 1chST 2chST Identifies the stereo audio output of channel 1 or 2 LL Identifies the left audio output LR Identifies the monaural audio output RR Identifies the right audi...

Страница 157: ...TO2 MANUAL Seek mode is set to MANUAL MC Receiving service is displayed White Primary Component is received Orange Secondary Component is received ö öTuner AUTO1 Seek mode is set to AUTO1 AUTO2 Seek mode is set to AUTO2 MONO The forced monaural function is on AF The AF search function is on EON The Radio Data System station is sending EON Lo S The Local Seek function is on NEWS News bulletin inter...

Страница 158: ... 9 is displayed on a standard TV set screen 4 3 with a black band at both the top and bottom of the screen letter box ö öOperation regulatory marks With this DVD some functions of this unit such as the play function may be restricted depending on the location where the DVD is playing In this case the following marks will appear on the screen For more information refer to the disc manual Prohibitio...

Страница 159: ...Cambodian kn Kannada ko Korean ks Kashmiri ku Kurdish ky Kirghiz la Latin lb Luxembourgish ln Lingala lo Laotian lt Lithuanian lv Latvian Lettish mg Malagasy mi Maori mk Macedonian ml Malayalam mn Mongolian mo Moldavian mr Marathi ms Malay mt Maltese my Burmese na Nauru ne Nepali nl Dutch no Norwegian oc Occitan om Afan Oromo or Oriya pa Punjabi pl Polish ps Pashto Pushto pt Portuguese qu Quechua ...

Страница 160: ... 20 000 Hz 44 1 kHz 20 20 000 Hz Total Harmonic Distortion DNN9250DAB 0 008 1 kHz DNN6250DAB DNR8025BT 0 01 1 kHz S N Ratio dB 90 dB DVD Video 96 kHz Dynamic Range 91 dB DVD Video 96 kHz Disc Format DVD Video VIDEO CD CD DA Sampling Frequency 44 1 48 96 kHz Quantifying Bit Number 16 20 24 bit ö öUSB interface section USB Standard USB 2 0 Full High speed File System FAT 16 32 Maximum Power Supply C...

Страница 161: ...ile A2DP Advanced Audio Distribution Profile AVRCP Audio Video Remote Control Profile PBAP Phonebook Access Profile GAP Generic Access Profile Multi Profile support ö öHDMI MHL section HDMI HDMI Type A MHL Supported Version MHL 2 MHL Maximum Power Supply Current DC 5 V 900 mA ö öDSP section Graphics equalizer DNN9250DAB DNR8025BT Band 13 Band Frequency BAND1 13 62 5 100 160 250 400 630 1k 1 6k 2 5...

Страница 162: ... 928 239 200 MHz Sensitivity 100 dBm S N Ratio dB 90 dB ö öDigital Antenna Connector section DNN9250DAB DNN6250DAB Connector type SMB Output Voltage 11 16V 14 4 V Maximum Current 100 mA ö öVideo section Color System of External Video Input NTSC PAL External Video Input Level RCA jacks 1 Vp p 75 Ω External Audio Max Input Level RCA jacks 2 V 25 kΩ Video Input Level RCA jacks 1 Vp p 75 Ω Video Outpu...

Страница 163: ...er trademarks and trade names are those of their respective owners The AAC logo is a trademark of Dolby Laboratories Microsoft and Windows Media are either registered trademarks or trademarks of Microsoft Corporation in the United States and or other countries Made for iPod and Made for iPhone mean that an electronic accessory has been designed to connect specifically to iPod or iPhone respectivel...

Страница 164: ... menu Go to vod divx com for more information on how to complete your registration DivX DivX Certified and associated logos are trademarks of Rovi Corporation or its subsidiaries and are used under license The aptX software is copyright CSR plc or its group companies All rights reserved The aptX mark and the aptX logo are trade marks of CSR plc or one of its group companies and may be registered i...

Страница 165: ...s contributors may be used to endorse or promote products derived from this software without specific prior written permission THIS SOFTWARE IS PROVIDED BY THE COPYRIGHT HOLDERS AND ONTRIBUTORS AS IS AND ANY EXPRESS OR IMPLIED WARRANTIES INCLUDING BUT NOT LIMITED TO THE IMPLIED WARRANTIES OF MERCHANTABILITY AND FITNESS FOR A PARTICULAR PURPOSE ARE DISCLAIMED IN NO EVENT SHALL THE FOUNDATION OR CON...

Страница 166: ...165 Return to the Top page Appendix ...

Страница 167: ...act your local authority for details in locating a recycle facility nearest to you Proper recycling and waste disposal will help conserve resources whilst preventing detrimental effects on our health and the environment Notice The sign Pb below the symbol for batteries indicates that this battery contains lead חשמלי ציוד של לאשפה השלכה בדבר מידע למדינות רלוונטי סוללות וכן ישן ואלקטרוני מופרדת אשפה...

Страница 168: ...6250DAB DNR8025BT stär l överensstämelse med de väsentliga egenskapskrav och övriga relevanta bestämmelser som framgår av direktiv 1999 5 EG Suomi JVC KENWOOD vakuuttaa täten että DNN9250DAB DNN6250DAB DNR8025BT tyyppinen laite on direktiivin 1999 5 EY oleellisten vaatimusten ja sitä koskevien direktiivin muiden ehtojen mukainen Slovensko S tem JVC KENWOOD izjavlja da je ta DNN9250DAB DNN6250DAB D...

Страница 169: ......

Страница 170: ......

Страница 171: ...h Switches to Phone Search Phone Search Phone Search Phone Search Phone Search Displays OEM Features screen 2 OEM OEM OEM OEM Displays the view from the FrontView camera Front camera Front camera Caméra avant Frontkamera Displays the view from the RearView camera Rear camera Rear camera Caméra arrière Rückfahrkamera Displays Current Source Control screen Control screen Control screen Écran de comm...

Страница 172: ...StreamingVideo Apps Apps Apps HDMI HDMI HDMI MHL MHL MHL AV uit AV out salida AV Handsfree Vivavoce Manos libres Media Search Media Search Media Search Phone Search Phone Search Phone Search OEM OEM OEM Vooruitzicht camera Telecamera frontale Cámara delantera Camera achter Retrocamera Cámara trasera Scherm besturen Scherm di controllo Pantalla de control Omlaag zoeken Ricerca giù Buscar anterior O...

Отзывы: