background image

In this space below, record the date of purchase, model and
serial number of your product.  You will find the model and
serial number printed on an identification plate.  This serial
plate is located on the right side of the oven front frame in
the Storage or Warmer Drawer compartment. 

See bottom

of this page

 for the serial plate location.

Model No. _____________________________________

Serial No. _____________________________________

Date of Purchase ________________________________

Save these instructions and your sales receipt for future
reference.

Table of Contents

Free-Standing Range Warranty ........................................... 2
Product Record ................................................................... 2

IMPORTANT SAFETY INSTRUCTIONS

.......................... 3-5

Protection Agreements ........................................................ 6
Range Features .................................................................. 7
Before Setting Oven Controls .............................................. 8
Setting Surface Controls ..................................................... 9
Oven Control Functions ..................................................... 10
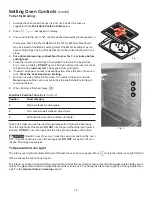
Setting Oven Controls .................................................. 11-15
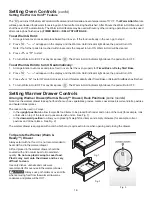
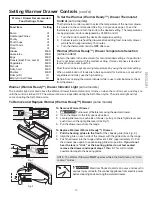
Setting Warmer Drawer Controls .................................. 15-16
Select Self Cleaning ..................................................... 17-18
General Care & Cleaning .............................................. 19-21
Adjusting Your Oven Temperature ...................................... 21
Before You Make a Service Call ................................... 22-23
Sears Service ...................................................... Back Page

Product Record

790.

Serial Plate Location

You will find the model and serial number printed on the serial plate.
The serial plate is located on the right side of the oven front frame in
the Storage or Warmer Drawer compartment.

Please see the illustration for exact location.

Remeber to record the serial number for future reference (See top of
page under Product Record).

Serial plate location; Open the Storage Drawer
(some models) or Warmer Drawer (some models

).

2

One Year Limited Warranty

When installed, operated and maintained according to all instructions supplied with the product, if this appliance fails due to
a defect in material and workmanship within one year from the date of purchase, call 

1-800-4-MY-HOME®

 to arrange for free

repair. If this appliance is ever used for other than private family purposes, this warranty applies for only 90 days from the date of
purchase.

This warranty covers only defects in material and workmanship.


Sears will NOT pay for:

1. Cracks in a ceramic glass cooktop that are not a result of thermal shock.
2. Stains and scratches on a ceramic glass cooktop resulting from failure to maintain it properly according to all instructions

supplied with the product.

3. Expendable items that can wear out from normal use, including but not limited to filters, belts, light bulbs, and bags.
4. A service technician to instruct the user in correct product installation, operation or maintenance.
5. A service technician to clean or maintain this product.
6. Damage to or failure of this product if it is not installed, operated or maintained according to all instructions supplied with the

product.

7. Damage to or failure of this product resulting from accident, abuse, misuse or use for other than its intended purpose.
8. Damage to or failure of this product caused by the use of detergents, cleaners, chemicals or utensils other than those recom-

mended in all instructions supplied with the product.

9. Damage to or failure of parts or systems resulting from unauthorized modifications made to this product.

Disclaimer of implied warranties; limitation of remedies

Customer’s sole and exclusive remedy under this limited warranty shall be product repair as provided herein. Implied warranties,
including warranties of merchantability or fitness for a particular purpose, are limited to one year or the shortest period allowed by
law. Sears shall not be liable for incidental or consequential damages. Some states and provinces do not allow the exclusion or
limitation of incidental or consequential damages, or limitation on the duration of implied warranties of merchantability or fitness, so
these exclusions or limitations may not apply to you.

This warranty applies only while this appliance is used in the United States or Canada.
This warranty gives you specific legal rights, and you may also have other rights which vary from state to state.

Sears, Roebuck and Co., Hoffman Estates, IL 60179
Sears Canada Inc., Toronto, Ontario, Canada M5B 2B8

Содержание 790. 7744*

Страница 1: ...16544103 rev A 0811 www sears com Sears Roebuck and Co Hoffman Estates IL 60179 U S A Models Modelos 790 Gas Range Use Care Guide Estufa a gas Guía para el uso y cuidado 7744 7745 7746 7747 7748 color number número de color ...

Страница 2: ...This warranty covers only defects in material and workmanship Sears will NOT pay for 1 Cracks in a ceramic glass cooktop that are not a result of thermal shock 2 Stains and scratches on a ceramic glass cooktop resulting from failure to maintain it properly according to all instructions supplied with the product 3 Expendable items that can wear out from normal use including but not limited to filte...

Страница 3: ... children to climb or play around the range The weight of a child on an open door may cause the range to tip resulting in serious burns or other injury Do not use the oven or warmer drawer if equipped for storage Do not store items of interest to children in the cabinets above a range or on the backguard of a range Children climbing on the range to reach items could be seriously injured Storage in...

Страница 4: ...ire with a pan lid or use baking soda a dry chemical or foam type extinguisher When heating fat or grease watch it closely Fat or grease may catch fire if allowed to become too hot Use Only Dry Potholders Moist or damp potholders on hot surfaces may result in burns from steam Do not let potholders touch hot heating burners Do not use a towel or other bulky cloth instead of a potholder DoNotHeatUno...

Страница 5: ...nding prong from this plug For personal safety the range must be properly grounded For maximum safety the power cord must be plugged into an electrical outlet that is correctly polarized and properly grounded If a 2 prong wall receptacle is the only available outlet it is the personal responsibility of the consumer to have it replaced with a properly grounded 3 prong wall receptacle installed by a...

Страница 6: ... El acuerdo incluye lo siguiente Piezas y mano de obra necesarias para contribuir a mantener el funcionamiento adecuado de los productos utilizados en condiciones normales de uso no sólo en caso de defectos de los productos Nuestra cobertura va mucho más allá que la garantía del producto No se aplican deducibles ni exclusiones por fallas del funcionamiento es decir verdadera protección Servicio té...

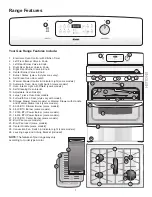
Страница 7: ... Rack s 14 Large 1 piece Oven Door Handle 15 Full width Oven Door style vary with model 16 Storage Drawer some models or Warmer Drawer with Handle and Warmer Drawer rack some models 17 5 000 BTU Simmer Burner some models 18 9 500 BTU Burner some models 19 12 000 BTU Power Burner some models 20 14 200 BTU Power Burner some models 21 9 500 BTU Center Burner some models 22 Broil Pan some models 23 Br...

Страница 8: ... rack place cookware on oven rack position 3 or 4 Refer to Fig s 2 4 Types of Oven Racks Your range may be equipped with one or more of the oven rack types shown Flat Rack Handle Rack or Stepdown Rack Flat Oven Rack Handle Oven Rack Oven Vent Location The oven vent is located below the backguard See Fig 1 When the oven is on warm air is released through this vent This venting is necessary for prop...

Страница 9: ...ur risk of being burned by the flame These settings are based on using medium weight metal or aluminum pans with lids Settings may vary when using othertypesofpans Thecoloroftheflameisthekeytoproperburneradjustment Agoodflameisclear blueandhardlyvisible in a well lighted room Each cone of flame should be steady and sharp Adjust or clean burner if flame is yellow orange Setting Surface Controls You...

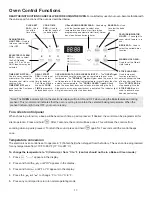
Страница 10: ... the time of day and minute timer Press STOP CLEAR to stop cooking Also the STOP CLEAR pad is used to activate oven door lockout setting For a silent control panel When choosing a function a beep will be heard each time a pad is pressed If desired the control can be programmed for silent operation Press and hold After 7 seconds the control will beep once This will block the controls from sounding ...

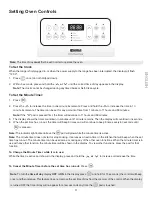
Страница 11: ...te increments The timer can be set for any amount of time from 1 minute to 11 hours and 59 minutes Note If the pad is pressed first the timer will advance to 11 hours and 59 minutes 3 The display shows the timer countdown in minutes until 1 minute remains Then the display will countdown in seconds 4 When the set time has run out the timer will beep 3 times and will continue to beep 3 times every 6...

Страница 12: ...n be programmed to override this feature for continuous baking To set control for continuous baking 1 Press and hold down for 5 seconds until tone is heard hr will appear in display for continuous cooking The current time of day will return to the display 2 To cancel the Continuous Bake function press and hold for 5 seconds until tone is heard 12hr will appear in display indicating that the contro...

Страница 13: ...esired baking time appears in the display 7 The oven will turn ON and begin heating To Program Oven for a Delayed Start Time and to Shut Off Automatically Delayed Start Bake 1 Be sure that the clock shows the correct time of day 2 Place the food in the oven 3 Press appears in the display 4 Within 5 seconds press the or The display will show 350 F 177 C By holding the or the temperature can then be...

Страница 14: ...for LO broil Most foods may be broiled at the HI broil setting Select the LO broil setting to avoid excess browning or drying of foods that should be cooked to the well done stage 4 For optimum browning preheat broil burner for 3 4 minutes before adding food 5 Place the insert on the broil pan then place the food on the insert See Fig 1 some models DO NOT use the broil pan without the insert or co...

Страница 15: ... circulate the oven s heat uniformly and continuouslyaroundtheoven Thisimprovedheatdistributionallowsforfast even cooking and browning results It also gives better baking results when using two racks at the same time See Fig 1 Heatedairflowsaroundthefoodfromallsides sealinginjuicesandflavors Meats cooked using the Convection feature are juicer Poultry is crisp on the outside while staying tender a...

Страница 16: ...eight food items and empty dishware for example rolls or pastries and dinner plates See Fig 2 To set Warm Hold 1 Arrange interior oven racks and place baked food in oven If the food is already in the oven go to step 2 2 Press will appear in the display and the Warm Hold indicator light above the pad will turn ON Note If no further pads are touched within 6 seconds the request to turn ON Warm Hold ...

Страница 17: ...e column for recommended settings If a particular food is not listed start with the medium setting If more crispness is desired remove the lid or aluminum foil Most foods can be kept at serving temperatures by using the medium setting When a combination of foods are to be kept warm for instance a meat with 2 vegetables and rolls use the high setting Refrain from opening the warmer drawer while in ...

Страница 18: ...en not to rub damage or remove the gasket DO NOT use any cleaning materials on the oven door gasket Doing so could cause damage Remove the broiler pan and insert all utensils and any aluminum foil These items cannot withstand high cleaning temperatures Oven racks do not have to be removed If they are not removed during the Self Clean cycle their color will turn slightly blue and the finish will be...

Страница 19: ... in the display 5 Press the or once 3 00 appears in the display for a 3 hour cycle To change to a 2 hour cycle press 2 00 appears in the display or to select a 4 hour cycle press 4 00 appears in the display As soon as the controls are set the motor driven lock will begin to close automatically and the LOCK indicator light will flash DO NOT open the oven door while the light is flashing it takes ab...

Страница 20: ...se and wipe dry with a clean cloth Remove all cleaners or the porcelain may become damaged during furture heating DO NOT use spray oven cleaners on the range top Clean with hot soapy water and a dishcloth Rinse with clean water and a cloth Do not use cleaners with high concentrations of chlorides or chlorines Do not use harsh scrubbing cleaners Only use kitchen cleaners that are especially made fo...

Страница 21: ...nto the oven frame on both left and right oven door hinges See Fig 2 to the locked position 5 Close the oven door Special Door Care Instructions Most oven doors contain glass that can break Read the following recommendations 1 Do not close the oven door until all the oven racks are fully in place 2 Do not hit the glass with pots pans or any other object 3 Scratching hitting jarring or stressing th...

Страница 22: ...pill with an absorbent cloth Rinse with a clean damp cloth and wipe dry To Remove and Replace the Surface Burner Caps and Surface Burner Heads Remove in the following order 1st surface burner grate 2nd surface burner cap 3rd surface burner head and 4th surface burner drip pan if equipped Reverse the procedure above to replace the surface burner cap surface burner head and surface burner drip pans ...

Страница 23: ...ed from outlet electric ignition models only Be sure cord is securely plugged into the outlet Electrical power outage electric ignition models only Burners can be lit manually See Setting Surface Controls Burner ports are clogged With the burner off clean ports by using a small gauge wire or needle Moisture is present after cleaning Lightly fan the flame and allow burner to operate until flame is ...

Страница 24: ...s recommended temperature or baking time If you feel the oven is cooking too hot or cool see Adjusting Your Oven Temperature Controls are not set properly Follow instructions in Self Cleaning section Self cleaning cycle was interrupted Stop time must be set 2 to 4 hours past the start time Follow steps under Stopping or Interrupting a Self Clean Cycle under Self Cleaning Failure to clean bottom fr...

Страница 25: ...25 ENGLISH ...

Страница 26: ...26 ...

Отзывы: