background image

16

 Electrical Shock Hazard can

occur and result in serious injury or death.
Disconnect appliance from electric power before
cleaning and servicing the warmer drawer.

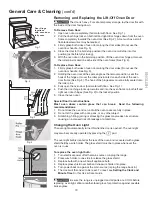
To Remove Warmer Drawer:

1.

 Turn power off before removing the warmer drawer.

2.

Open the drawer to the fully opened position.

3.

Locate glide lever on each side of drawer, pull up on the left glide
lever and push down on the right glide lever (See Fig.1).

5.

Pull the drawer away from the range.

To Replace Warmer (Warm & Ready™) Drawer:

1.

Pull the bearing glides to the front

 of the chassis glide

(See Fig. 2).

2.

Align the glide on each side of the drawer with the glide slots on
the range.

3.

Push the drawer into the range until levers “click” (approximately
2”). Pull the drawer open again to seat bearing glides into position.

If you do not hear the levers “click” or the bearing glides do
not feel seated remove the drawer and repeat steps 1 thru 3.

This will minimize possible damage to the bearing glides.

Fig. 1

Fig. 2

Setting Warmer Drawer Controls 

(cont’d)

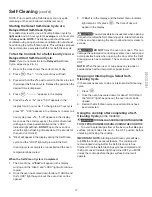
Self-Cleaning

 During the Self-Cleaning cycle, the outside of

the range can become very hot to the touch. 

DO NOT

 leave

small children unattended near the appliance.

  The health of some birds is extremely

sensitive to the fumes given off during the Self-Cleaning
cycle of any range. Move birds to another well-ventilated
room.


DO NOT

 line the oven walls, racks, bottom

or any other part of the range with 

aluminum foil

. Doing so

will destroy heat distribution, produce poor baking results
and cause permanent damage to the oven interior
(aluminum foil will melt to the interior surface of the oven).


 DO NOT

 force the oven door open. This can

damage the automatic door locking system. Use caution
when opening the door after the Self-Cleaning cycle is
completed. The oven may still be VERY HOT.

Self-Cleaning Oven

A Self-Cleaning oven cleans itself with high temperatures
(well above cooking temperatures) which eliminate soils
completely or reduces them to a fine powdered ash you can
wipe away with a damp cloth.

Adhere to the following cleaning precautions:

DO NOT 

use oven cleaners or oven protective coatings

in or around any part of the Self-Cleaning oven.

DO NOT

 clean the oven door gasket. The woven

material of the oven door gasket is essential for a good
seal. Care should be taken not to rub, damage or
remove the gasket.

DO NOT

 use any cleaning materials on the oven door

gasket. Doing so could cause damage.

Remove the broiler pan and insert, all utensils and
any aluminum foil. These items cannot withstand
high cleaning temperatures.

Oven racks should be removed. If they are not removed
during the  Self-Clean cycle their color will turn slightly
blue and the finish will be dull. After the cycle is
complete and the oven has cooled, rub the sides of the
oven racks with wax paper or a cloth containing a small
amount of salad oil (this will make the racks glide
easier into the rack position).

Remove any excessive spillovers

 in the oven cavity

before

 starting the Self-Cleaning cycle. To clean, use

hot, soapy water and a cloth. Large spillovers can
cause heavy smoke or fire when subjected to high

temperatures. 

DO NOT 

allow food spills with a high

sugar or acid content (such as milk, tomatoes,
sauerkraut, fruit juices or pie filling) to remain on the
surface as they may leave a dull spot even after
cleaning.

Clean any soil from the oven frame, the door liner
outside the oven door gasket and the small area at the
front center of the oven bottom. These areas heat
sufficiently to burn soil on. Clean with soap and water.

Содержание 790. 7136

Страница 1: ...LISH p n 316462432 0705 www sears com Sears Roebuck and Co Hoffman Estates IL 60179 U S A Models Modelos 790 Gas Range Use Care Guide Estufa a gas Guía para el uso y cuidado 7136 7137 color number número de color ...

Страница 2: ...te family purposes this warranty applies for only 90 days from the date of purchase This warranty covers only defects in material and workmanship Sears will NOT pay for 1 Expendable items that can wear out from normal use including but not limited to filters belts light bulbs and bags 2 A service technician to instruct the user in correct product installation operation or maintenance 3 A service t...

Страница 3: ...to heat or warm the room Doing so may result in carbon monoxidepoisoning NEVERcoveranyslots holesorpassagesinthe oven bottom or cover an entire rack with materials such as aluminumfoil Doingsoblocksairflowthroughtheovenandmay causecarbonmonoxidepoisoning Aluminumfoilliningsmaytrap heat causing a fire hazard Stepping leaningorsittingonthedoorsor drawers of this range can result in serious injuries ...

Страница 4: ...ce burner pans or oven bottom except as suggested in this manual Improperinstallationoftheselinersmayresultinrisk of electric shock or fire Glazed Cooking Utensils Only certain types of glass glass ceramic ceramic earthenware orotherglazedutensils are suitable for cooktop service without breaking due to sudden change in temperatures Check the manufacturer s recommendations for cooktop use IMPORTAN...

Страница 5: ...ve para prolongar la durabilidad de su nuevo producto El acuerdo incluye lo siguiente Piezas y mano de obra necesarias para contribuir a mantener el funcionamiento adecuado de los productos utilizados en condiciones normales de uso no sólo en caso de defectos de los productos Nuestra cobertura va mucho más allá que la garantía del producto No se aplican deducibles ni exclusiones por fallas del fun...

Страница 6: ...f Cleaning Oven interior 14 Adjustable Oven Racks s 15 Large 1 piece Oven Door Handle 16 Full width Oven Door style vary with model 17 Storage Drawer some models or Warmer Drawer with Handle and Warmer Drawer rack some models 18 5 000 BTU Simmer Burner some models 19 9 500 BTU Center Burner some models 20 12 000 BTU Power Burner some models 21 14 200 BTU Power Burner some models 22 16 200 BTU Powe...

Страница 7: ...ops Lift up front of rack and slide out To replace fit the rack onto the guides on the oven walls Tilt the front of the rack upward and slide the rack back into place Recommended Rack Positions for Broiling Baking Roasting Food Position Broiling hamburgers steaks See Broil Broiling meats chicken or fish See Broil Cookies cakes pies biscuits Muffins 2 or 3 Frozen pies angel food cake 1 or Roasting ...

Страница 8: ...nitors will spark at the same time However only the burner you are turning on will ignite 5 Visually check that the burner has lit 6 Push the control knob in turn counterclockwise to the desired flame size The control knobs do not have to be set at a particular setting Use the guides adjust the flame as needed DO NOT cook with the surface control knob in the LITE position The electronic ignitor wi...

Страница 9: ...so TIMER SET OFF pad is used to set the Continuous Bake feature Note The OVEN indicator light on the electronic display will turn ON and OFF when using the Bake feature and during preheat This is normal and indicates that the oven is cycling to maintain the selected baking temperature When the preheat indicator light turns OFF your oven is ready WARM HOLD PAD Used to set the Warm Hold feature RECI...

Страница 10: ...en if the control is left on for more than 11 hours and 59 minutes The oven can be programmed to override this feature for continuous baking To set control for continuous baking 1 Press and hold down for 5 seconds until tone is heard hr will appear in display for continuous cooking The current time of day will return to the display 2 To cancel the Continuous Bake function press and hold for 5 seco...

Страница 11: ... HR MIN Note During Timed Bake the preheat indicator light will not function Setting Oven Controls cont d To set Control for Oven Lockout feature 1 Press and hold for 3 seconds Loc will appear in display the Door Locked indicator light will flash and the motor driven door lock will begin to close automatically DO NOT open the oven door while the indicator light is flashing Allow about 15 seconds f...

Страница 12: ...or oven light see Changing the Oven Light in the General Care Cleaning section To Set Add 1 Minute Feature The ADD 1 MINUTE pad is used to set additional minutes to the Minute Timer Each time the pad is pressed another minute is added to the Minute Timer if the Minute Timer is already active If the Minute Timer is not active and the pad is pressed the Minute Timer feature will become active and wi...

Страница 13: ... within 10 15 seconds the request for Slow Cook will be clear 3 Press and release the to set the Slow Cook feature with a high setting HI will appear in the display This setting is best for cooking foods from a 4 to 5 hour time period The oven indicator light will turn ON below the time display indicating the oven has turned ON with the settings you choose 4 or press and release the to set the Slo...

Страница 14: ...automatically The oven will remember that it is set for the Sabbath and the food may be safely removed from the oven while still in the Sabbath feature however the oven cannot be turned back on until after the Sabbath After the Sabbath observance turn OFF the Sabbath feature Press and hold both the and pads for at least 3 seconds SAb will disappear from the display and the oven may be used with al...

Страница 15: ... of the rack and a casserole dish under See Fig 1 In the downward position to allow you to place light weight food items and empty dishware for example rolls or pastries and dinner plates See Fig 2 Setting Warmer Drawer Controls Fig 1 Fig 2 Fig 3 2 For best results preheat the drawer before adding food An empty drawer will preheat in approximately 15 minutes 3 Turn the thermostat control to OFF af...

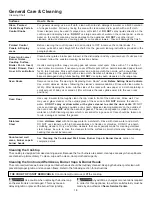
Страница 16: ...locking system Use caution when opening the door after the Self Cleaning cycle is completed The oven may still be VERY HOT Self Cleaning Oven A Self Cleaning oven cleans itself with high temperatures well above cooking temperatures which eliminate soils completely or reduces them to a fine powdered ash you can wipe away with a damp cloth Adhere to the following cleaning precautions DO NOT use oven...

Страница 17: ...open the oven door while the light is flashing it takes about 15 seconds for the oven door to lock 6 CLn will appear in the display during the Self Clean cycle and the LOCK light will glow until the Self Cleaning cycle is complete or cancelled and the oven temperaturehascooled When the Self Clean Cycle is Completed 1 The time of day or End will appear in the display window and the Clean and LOCK l...

Страница 18: ...r difficult spots with an ammonia soaked paper towel for 30 to 40 minutes Rinse with clean water and a damp cloth then scrub with a soap filled scouring pad Rinse wipe dry with a clean cloth Remove all cleaners or the porcelain may become damaged during future heating DO NOT use spray oven cleaners on the range top Glass Painted Plastic Body Parts Control Knobs Painted Control Panels Display areas...

Страница 19: ...nto the oven frame on both left and right oven door hinges See Fig 2 to the locked position 5 Close the oven door Special Door Care Instructions Most oven doors contain glass that can break Read the following recommendations 1 Do not close the oven door until all the oven racks are fully in place 2 Do not hit the glass with pots pans or any other object 3 Scratching hitting jarring or stressing th...

Страница 20: ...up spill with an absorbent cloth Rinse with a clean damp cloth and wipe dry To Remove or Replace the Surface Burner Caps Surface Burner Heads Remove in the following order 1st surface burner grate 2nd surface burner cap 3rd surface burner head and 4th surface burner drip pan if equipped Reverse the procedure above to replace the surface burner cap surface burner head and surface burner drip pans i...

Страница 21: ...logged With the burner OFF use a small gauge wire or needle to clean ports See Cleaning the Contoured Well Areas Burner Cap Burner Head Burner Drip Pans in the General Care Cleaning section for complete cleaning instructions 4 Range power cord is disconnected from outlet electric ignition models only Be sure cord is securely plugged into the outlet 5 Electrical power outage electric ignition model...

Страница 22: ...oning 1 teaspoon salt seasoning 1 tablespoon parsley 6 medium potatoes sliced 1 medium onion sliced Roast Beef with Vegetables 3 to 3 lb sirloin tip roast 2 cups water 4 to 5 medium potatoes quartered 1 lb small carrots 2 large onion quartered 4 garlic cloves cup worstershire sauce salt pepper Center roast in large roasting pan Add water Spread potatoes carrots onions and garlic cloves evenly arou...

Страница 23: ......

Отзывы: