background image

SERVICE TECH. INFORMATION

SECTION 5

22

5A.

TROUBLESHOOTING

MANUAL ADVANCE REGENERATION CHECK

This check verifies proper operation of the valve

motor, brine tank fill, brine draw, regeneration

flow rates, and other controller functions.

Always

make the initial checks, and the manual

initiated diagnostics.

NOTE: 

The face plate display must show a steady

time (not flashing).

1

.

Press the ON/OFFĆHOLD button and


. RECHARGE NOW begins to

flash as the softener enters the fill cycle of

regeneration. Remove the brinewell cover

and, using a flashlight, observe fill water

entering the tank.

A

.

Ifit

does not

enter the tank, look for an obĆ

structed nozzle, venturi, fill flow plug, brine

tubing, or brine valve riser pipe.

CYCLE FLOW RATES (GALLONS PER MIN.)
FILL (flow to salt storage tank)

0.1 (1.1 liters)

BRINING

.16 (.6 liters)

BRINE RINSE

(flow to drain)

.11 (.4 liters)

BACKWASH

(flow to drain)

1.8 (6.8 liters)

FAST RINSE

1.8 (6.8 liters)

2

.

After observing fill, press the ON/OFFĆHOLD

button to move the softener into brining. A

slow flow of water to the drain will begin.

Verify brine draw from the brine tank by

shining a flashlight into the brinewell and

observing a noticeable drop in the liquid level.

NOTE: 

Be sure a salt bridge is not preventing

water with salt contact.

A

.

Ifthe softener does not draw brine:

- nozzle and/or venturi dirty or defective.

- nozzle and venturi not seated properly on

gasket.

- restricted drain (check drain fitting and

hose).

- defective nozzle and venturi seal.

- other inner valve defect (rotor seal, rotor &

disc, wave washer, etc.).

NOTE: 

Ifwater system pressure is low, an

elevated drain hose may cause back pressure,

stopping brine draw.

3

.

Again press ON/OFFĆHOLD to move the

softener into backwash. Look for a fast flow of

water from the drain hose.

A

.

An obstructed flow indicates a plugged top

distributor, backwash flow plug, or drain hose.

4

.

Press ON/OFFĆHOLD to move the softener

into fast rinse. Again look for a fast drain flow.

Allow the softener to rinse for a few minutes to

flush out any brine that may remain in the resin

tank from the brining cycle test.

5

.

To return the softener to service, press

ON/OFFĆHOLD.

BRINE VALVE

FLOAT SETTING

(Distance from top of resin tank, to top of resin bed.)

Содержание 625.3484400

Страница 1: ...It Works Care Of Specifications Repair Parts OWNER S MANUAL MODEL NOS 625 3484400 High Capacity DIR 625 3484500 High Capacity DIR Caution Read and Follow All Safety Rules and Operating Instructions Before First Use of This Product If you have questions when installing operating or main taining your softener and when setting the timer call this toll free number 1 800 426 9345 ...

Страница 2: ...TACT THE NEAREST SEARS SER VICE CENTER THROUGHOUT THE UNITED STATES This warranty applies only while this product is in use in the United States This warranty gives you specific legal rights and you may have other rights which vary from state to state Sears Roebuck and Co D 817 WA Hoffman Estates IL 60179 SEARS INSTALLATION POLICY SEARS INSTALLATION WARRANTY FACTS AND FIGURES TO KEEP Fill in the b...

Страница 3: ...ATE TIMER FEATURES 10 B SOFT WATER SERVICE AND REGENERATION 11 13 SECTION 3 CARE OF YOUR SOFTENER A SALT REFILLING STORAGE TANK SALT BRIDGE 14 B KEEPING THE WATER SOFTENER CLEAN 15 C KEEP THE SOFTENER FROM FREEZING 16 D HELPFUL HINTS CHECKLIST 17 SECTION 4 OTHER THINGS TO KNOW A DIMENSIONS SPECIFICATIONS 18 SECTION 5 SERVICE TECH INFORMATION A TROUBLESHOOTING 19 22 B ROTARY VALVE SERVICE 23 C WATE...

Страница 4: ...er types of iron acids tastes and odors etc It will not purify polluted water or make it safe to drink Protect the softener and piping from freezing Damage from freezing voids the softener warran ty See page 16 CAUTIONS PLEASE READ AND COMPLY WITH THE FOL LOWING GUIDES TO PREVENT DAMAGE TO THE SOFTENER OR OTHER PROPERTY PERSONAL INJURY OR POSSIBLE FATAL SHOCK THIS SOFTENER WORKS ON 24 VOLTS ONLY B...

Страница 5: ...going INTO the softenĆ er valve INLET Trace piping to be sure See pages 10 and 11 Is the plumbing bypass valve or 3 valves set for SERVICE See page 18 Is the valve drain hose connected the right way and without sharp bends or kinks that could stop or reduce water flow See page 16 Is the softener power cable connected to the transformer and is the transformer plugged into 120VĆ60Hz electrical outle...

Страница 6: ... in the face plate display Repeated beeps means the timer will not accept a change from the button you have pressed telling you to use another button For example in setting the hardness step 2 the beeper sounds repeatĆ edly when the display reaches 1 using the DOWN button or the highest hardness setting using the UP button 1 SET PRESENT TIME OF DAY NOTE If the wordsPRESENT TIME do not show in the ...

Страница 7: ... 35 etc Continuous pressure on the UP or DOWN button changes the display twice each second 3 SET RECHARGE REGENERATION TIME Press the SELECT button once to display 2 00 AM flashing and RECHARGE TIME At the 2 00 AM RECHARGE TIME setting the softener begins reĆ generation see pages 11 and 12 at 2 00 AM ending no later than 4 00 AM This is a good time in most households because water is not being use...

Страница 8: ... ounce of common 5 25 household bleach Clorox Linco BoPeep White Sail Eagle etc in the softener brinewell 3 Press the ON OFFĆHOLD button and to start a recharge This first recharge does several things Ċ It draws the bleach into and through the softener to sanitize it Ċ It fills the salt tank to the water level needed Ċ It gets all the air out of the resin tank Ċ It makes the resin bed see page 11 ...

Страница 9: ...ave an additive to help the softener handle iron in the water supply Although this additive may help to keep the softener resin clean it may also release corrosive fumes that will weaken and shorten the life of some softener parts FIG 3 ADD SALT SODIUM INFORMATION Water softeners using sodium chloride for regeneration add sodium to the water Persons who are on sodium restricted diets should consid...

Страница 10: ...e display and the softenĆ er begins regeneration at the next preset recharge time Press and release the ON OFFĆHOLD button once more if you decide to cancel the regeneration and REĆ CHARGE TONIGHT PROGRAM MEMORY If electrical power to the softener goes off the time display is blank but the face plate timer keeps the correct time for about 6 hours When electrical power comes on again you have to re...

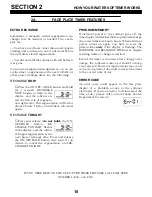
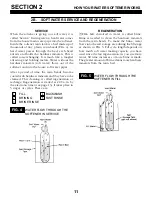
Страница 11: ...become coated with hardness minerals and they have to be cleaned This cleaning is called regeneration or recharge Regeneration is started at 2 00 a m by the electronic timer see page 13 It takes place in 5 stages or cycles These are FILL BRINING BRINE RINSE BACKWASH FAST RINSE 1 2 3 4 5 FIG 4 WATER FLOW THROUGH THE SOFTENER IN SERVICE REGENERATION FILL Salt dissolved in water is called brine Brine...

Страница 12: ... did during brining except the brine flow has stopped Hardness minerals and brine flush from the resin tank to the drain Brining and brine rinse together vary in length of time they take relative to the fill cycle length FIG 6 WATER FLOW THROUGH THE SOFTENER IN BRINING AND BRINE RINSE BACKWASH During backwash water flows UP through the resin tank FIG 7 at a fast rate to flush iron minerals dirt an...

Страница 13: ... the meter it sends electric pulses to the computer The computer changes the pulses to a measure in gallons of water COMPUTER Ċ The computer is part of the circuit board It is programmed to know the softener s capacity how many grains of hardness minerals it will take out of the water before a regeneration is needed When starting the softener page 7 you set it for the grains per gallon gpg hardnes...

Страница 14: ...ne Without brine the resin bed does not regenerate and you will have hard water If the storage tank is full of salt it is hard to tell if you have a salt bridge Salt is loose on top but the bridge is under it The following is the best way to check for a salt bridge Salt should be loose all the way to the bottom of the tank Hold a broom handle or like tool up to the softener as shown in FIG 9 Make ...

Страница 15: ...one grease or Vaseline and place in position Install and tighten the cap by hand only Do not overĆtighten and break the cap or housing FIG 10 CLEANING THE NOZZLE VEN TURI INSTALL WITH NUMBERED SIDE UP CONCAVE SIDE DOWN IRON FROM THE RESIN BED Your water softener takes hardness minerals calcium and magnesium out of the water Also it can control some clear water iron See maximum allowed in the speci...

Страница 16: ...Take off both drain hoses 5 Carefully remove the large holding clips at the softener inlet and outlet see Key No 61 on page 30 Separate the softener from the adaptors or bypass valve 6 Remove the brinewell cover and disconnect the brine valve tubing at the nozzle and venturi assembly see page 23 Lift the brine valve out of the brinewell Tip the brine valve upside down to drain out water FIG 11 DRA...

Страница 17: ... cable leads loose fuse blown circuit breaker popped or circuit switched off Check for loss of power due to any of these and correct With the power back on look at the time display and read PROGRAM MEMORY page 10 Manual bypass valve s in bypass position Look at FIG 12 on page 18 Move the stem in a single valve to service In a 3 valve bypass open the inlet and outlet valves and be sure to fully clo...

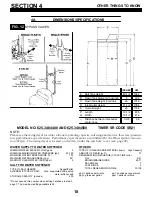
Страница 18: ...UM MAXIMUM WATER PRESSURE psi 20 120 MAXIMUM WATER TEMPERATURE F 120 MAXIMUM WATER HARDNESS gpg 90 MAXMUM CLEAR WATER IRON ppm 5 SALT FOR WATER SOFTENER TYPE OF SALT NEEDED Nugget Pellet ALTERNATE TYPE OF SALT Pure evaporated compacted water softener salt STORAGE CAPACITY pounds 200 Do not exceed this number when setting hardness in step 2 page 7 The maximum setting available is 95 OTHERS TYPE OF ...

Страница 19: ...must connect to the softener valve inlet and outlet respectively 4 Is the transformer plugged into a live grounded wall outlet and is the power cable fastened securely 5 The valve drain hose must be free of kinks and sharp bends and not elevated over 8 ft above the floor REMOVE THE TOP COVER AND SALT TANK COVER 6 Is there salt in the storage tank 7 Is the brine tubing connected See water flow diag...

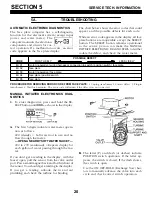
Страница 20: ...ate position switch Err 05 face plate PROCEDURE FOR REMOVING ERROR CODE FROM FACE PLATE 1 Unplug transformer 2 Correct defect 3 PlugĆin transformer 4 Wait for 6 minutes The error code will return if the defect was not corrected MANUAL INITIATED ELECTRONICS DIAG NOSTICS 1 To enter diagnostics press and hold the SEĆ LECT button until 000 shows in the display A The first 3 digits indicate water meter...

Страница 21: ...e present time display Press the SELECT button Change the SR number Press the UP or DOWN button to display correct number Press SELECT and reset the timer NOTE If the face plate is left in a diagnostic display or a flashing display when setting times or hardness present time automatically returns if a button is not pressed within 4 minutes FACE PLATE REPLACEMENT Be sure the valve is in service pos...

Страница 22: ...ng A slow flow of water to the drain will begin Verify brine draw from the brine tank by shining a flashlight into the brinewell and observing a noticeable drop in the liquid level NOTE Be sure a salt bridge is not preventing water with salt contact A If the softener does not draw brine nozzle and or venturi dirty or defective nozzle and venturi not seated properly on gasket restricted drain check...

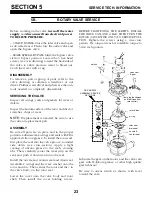
Страница 23: ...bricate ALL oĆrings and seals with FDA approved silicone grease To install the rotor seal first place the seal into the valve groove rounded side down see crossĆsection Apply a light coating of silicone grease to the seal s crossing ribs Then carefully center the wear strip on the seal and push it downward onto the seal Install the nozzle and venturi seal and drain seal Assemble 2 oĆrings and the ...

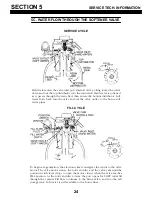
Страница 24: ...SERVICE TECH INFORMATION SECTION 5 24 5C WATER FLOW THROUGH THE SOFTENER VALVE SERVICE CYCLE FILL CYCLE ...

Страница 25: ...stributor and to the drain Hard water is available at the valve outlet When the brine valve closes to end brine draw water flow continues in the same directions to slowly RINSE brine from the resin bed and to the drain BACKWASH CYCLE Timer switch action again allows the motor to turn the rotor disc to place the valve in BACKWASH stopping water flow to the nozzle Water is routed down and out the bo...

Страница 26: ...SERVICE TECH INFORMATION SECTION 5 26 5C WATER FLOW THROUGH THE SOFTENER VALVE FAST RINSE CYCLE ...

Страница 27: ...SERVICE TECH INFORMATION SECTION 5 27 NOTES ...

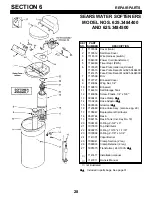
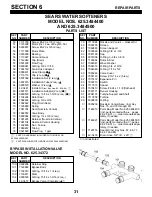
Страница 28: ...10 7100819 Brinewell 11 7144619 Salt Storage Tank 12 7143956 Screw Plastic 1 4 x 5 8 13 0900431 Hose Clamp FY 14 1103200 Hose Adaptor FY 15 9003500 Grommet FY 16 7123689 Brine Valve Assy also see pg 29 17 7105047 Replacement Distributor 18 0501744 Resin 19 7092155 Resin Tank Incl Key No 18 20 7096183 O Ring 2 3 4 x 3 21 7077870 Top Distributor 22 0900215 O Ring 13 16 x 1 1 16 23 7079092 O Ring 2 7...

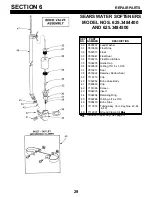
Страница 29: ...7093216 Float Rod Stem 35 7092278 Guide Cap 36 0900535 O Ring 15 16 x 1 3 16 37 0516211 Seal 38 0516924 Retainer Bottom Seal 39 7116713 Clip 40 7092252 Brine Valve Body 41 7080653 Clip 42 7131365 Screen 43 7094979 Insert 44 7092294 Retaining Ring 45 7092286 O Ring 5 16 x 9 16 46 7095470 Brine Tube 47 7113016 Tubing Assy Incl Key Nos 43 44 45 48 7112997 Ground Clamp Kit FY FY Included in parts bag ...

Страница 30: ...REPAIR PARTS SECTION 6 30 SEARS WATER SOFTENERS MODEL NOS 625 3484400 AND 625 3484500 49 VALVE ASSEMBLY ...

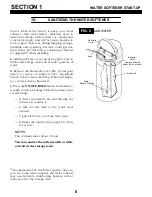
Страница 31: ... ONLY PARTS INCLUDED WITH MODEL NO 625 3484400 ONLY KEY NO PART NUMBER DESCRIPTION 79 7113024 Nozzle and Venturi Gasket Kit 80 7090705 Screen 81 7089893 Screen Support 82 7039068 O Ring 3 8 x 1 3 8 83 7081188 Cap84 85 9001006 O Ring 3 3 8 x 3 5 8 86 7103964 Rotor Disc 87 7082087 Wave Washer 88 7064372 O Ring 3 4 x 15 16 89 7064380 O Ring 7 16 x 5 8 90 7085263 Valve Cover 91 7074123 Screw 10 14 x 2...

Страница 32: ...rs Service Center or the Service Depart ment at most Sears Stores To request service or order parts by phone call the toll free numbers listed to the left When requesting service or ordering repair parts always provide the following information z Product Type z Model Number z Part Number z Part Description OWNERS MANUAL MODEL NOS 625 3484400 625 3484500 To Call Toll Free For Service 1 800 4 REPAIR...

Страница 33: ...er z Part Description For the repair or replacement parts you need Call 7 am 7 pm 7 days a week 1 800 366 PART 1 800 366 7278 For in home major brand repair service Call 24 hours a day 7 days a week 1 800 4 REPAIR 1 800 473 7247 For the location of a Sears Repair Service Center in your area Call 24 hours a day 7 days a week 1 800 488 1222 For information on purchasing a Sears Maintenance Agreement...

Отзывы: