background image

Содержание 407.53571

Страница 1: ...uidado English Espafiol Models Modelos 407 53571 I enmore Dehum di er with externa_ pump Deshumiditlcador con bomba xterna Sears Brands Management Corporation Hoffman Estates IL 60179 U S A www sears com www kmart com www kenmore com ...

Страница 2: ...ce technician to clean or maintain this product 4 Damage to or failure of this product if it is not installed operated or maintained according to the all instructions supplied with the product 5 Damage to or failure of this product resulting from accident abuse misuse or use for other than its intended purpose 6 Damage to or failure ofthis product caused by the use of detergents cleaners chemicals...

Страница 3: ...orized repair service Because the fan rotates at high speed dur ing operation always unplug dehumidifier before attempting any recommended maintenance or cleaning Do not block the inlet or outlet It may cause unit to fall or to operate inefficiently Do not remove plug from outlet by pull ing on the cord When not in use turning the unit off wilt save energy Unplug the dehumidifier when not using fo...

Страница 4: ...ical outlet is not available it is the personal responsibil ity and obligation of the customer to have one installed by a qualified electrician ELECTRICAL SHOCK HAZARD wAR I G i ii Plug into a grounded 3 prong outlet Do not remove the ground pin from the plug Do not use an adapter Do not use an extension cord Failure to follow these instructions can result in death fire or electrical shock Install...

Страница 5: ...sition for the dehumidifier to work The Bucket Full light will flash and the dehumidifier will not run if the bucket is not in the proper position Dehumidifier settings can not be changed when the bucket is not in its proper position The dehumidifier fan will shut off in 3 minutes once the desired Relative Hu midity RH setting is reached plus or minus 5 RH ii I 1 IIIIIIIIIIIIIIIIIIIIII1_ g II I I ...

Страница 6: ...ll last up to ten secondsThe dehumidifier will not run until the bucket is removed emptied and replaced 3 1 6 DELAY START 4 Unit can be programmed to turn on at a desired delay time by pressing the Timer 4 key When the unit is powered OFF press the timer key once for 2 hour delay start The 2 Hrs 7 timer indica tor will light up when the timer key is pressed Press the timer key once more for a 4 ho...

Страница 7: ...the dehumidifier Fig 3 NOTE Dehumidifier will not work and settingscan not be changed when the BUCKETFULL indicator light is flashing or without the bucket properly installed DO NOT REMOVE THE STYROFOAM IN THE BUCKET This dehumidifier is equipped with a reliable Styrofoam float system The Styrofoam located inside the float in the bucket is essential to the bucket full system working properly Do no...

Страница 8: ...he drain connector door Figl 6 I I 1 l FIG 6 Step 3 Install and secure the drainage joint onto the drain connector Fig 7 FIG 7 Step 4 Place large hose clamp on the fiat end of the dehumidifier drain hose Fig s FIG 8 ...

Страница 9: ... onto the drainage joint so that it is fully seated Fig 9 FIG 9 Step 5 Secure hose by pushing large hose clamp towards the drainage joint Fig lo r _ __ FIG 101 Step 6 Place bucket in the dehumidifier for operation Fig 11 FIG 11 9 ...

Страница 10: ...tarting on page 9 Step 2 For optimal operation it is recommended that the pump is placed on a fiat and level location Attach the water pump to a wall or other perpendicular fiat surface with the included screws for security Fig 12 Step 3 Remove red cap from drain hose connector on pump Attach the small drain hose clamp onto the pump drain hose Fig 13 FIG 13 0 ...

Страница 11: ...eated Secure hose by pushing small clamp forward towards the pump Fig 14 t FIG 14 Step 5 Secure hose by pushing small clamp forward towards the pump Fig 15 fi tt FIG 15 Step 6 Insert the angled end of the dehumidifier drain hose into the water pump tank Fig 16 ___ FIG 16 ...

Страница 12: ...CUT J 1 Remove flat end of the hose by squeezing the large clamp and pulling it to ward you 2 Remove hose from drainage joint and cut hose to appropriate length 3 Once cut is completed refer to installing the Drain Hose to re install dehumid ifier drain hose USING THE DRAIN PUMP 1 Plug into grounded electrical outlet 2 Place the other end of the pump hose where you would like to empty the wa ter f...

Страница 13: ... press and hold the FILTER key up to 5 seconds on the control panel to reset the filter setting NOTE DO NOT place the filter in a dish washer CAUTION DO NOT operate the dehumidifi er without a filter Doing so may cause a unit failure WARNING Disconnect power supply cord from re ceptacle before performing any mainte nance CLEANING THE EXTERIOR Clean the cabinet using a damp cloth and a mild deterge...

Страница 14: ...t installed allow at least 24 hours to achieve the desired humidity level Airflow is restricted Make sure there are no curtains blinds or furniture blocking the side or back of the dehumidifier See the Cleaning The Air Filter section Dirty filter The user set Humidity Level may not be set low enough Doors and windows may not be closed tightly Water is not draining i through drain hose Room tempera...

Страница 15: ...ier Is it installed correctly Check the drain hose for kinks or obstructions Check the pump drain hose on the pump Is it installed correctly Check the pump drain hose for kinks or obstruc tions Solutions The capacity of your dehumidifier may not be adequate for the room size Close all doorsand windows to the out side Thisis normal Frostwill usuallydisappear within 60 minutes Empty bucket and insta...

Страница 16: ...the dehumidifier back in for normal operation F2 Pipe Tem perature Sensor Mal function 4_ If the Error is stillindicated please contact your nearest servicecenter Call 1 800 488 1222 for servicecenter locations ITEM Moisture Removal per 24 hours PowerConsumption W Bucket Capacity PowerSource RatedCurrent Amps Sound Pressure LeveldB L M H Weight Dimensions W x D x H rm ml ml 53571 70 Pints per day ...

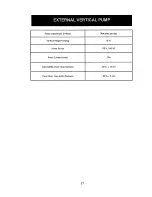
Страница 17: ...acity per 24 hours Vertical Height Pumping Power Source Rated Current Amps Dehumidifier Drain Hose Diameter Pump Drain Hose Inside Diameter u 304 pintsper day 16 ft i l L 115v 60 HZ 12A 50 in 13mm 20 in 5 mm 17 ...

Страница 18: ...enance Check at your request no extra charge Fast help by phone we call it Rapid Resolution phone support from a Sears representative on all products Think of us as a talking owner s manu al Power surge protection against electrical damage due to power fluctuations 250 Food Loss Protection annually for any food spoilage that is the result of mechanical failure of any covered refrigerator or freeze...

Страница 19: ...ci6n correcta det producto su user o manteni miento 3 Un t_cnico de servlclo para limpiar odar mantenirniento a este producto 4 Los dories o folios de este producto si la instalaci6n usa o mantenim ento no est_n de acuerdo o todas I_s instrucciones surnlnlstradas con eI producto 5 Los dares o fallas a este producto coma resultado de un accidentet abuso_ usa indebido o los uses que no sean los indi...

Страница 20: ...izado Debldo a que el ventilador gira a altas veloci dades durante su operaci6n siempre desconecte el deshumidificador antes de intentar cualquier mantenimiento recomendado o llmpieza del unidad No bloquear las entradas o salidas de la uni dad Podria causar la falla o el funcionamiento 2O No desconecteet enchufe del toma corriente tirando del cable Apague la unidad cuando no este en uso esto le ah...

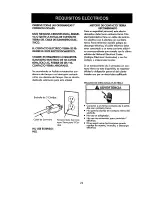
Страница 21: ...tico debe tener contacto tierra Este electrodom_st co tiene un cable de suminis tro eI6ctrico con 3 clavijas con contacto tierra Para minimizar pos ble pelicjro de descarga ei6ctrica eJcable el6ctrico debe estar conectado a un torna corriente el6ctri co correspondiente que cumpJa con la ultima edici6n de National Electrical Codes C6digos EI6ctricos Nacionales y con los c6dicjos y ordenanzas locale...

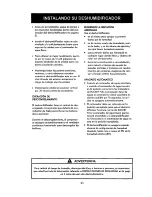
Страница 22: ...aderas de manguera los tornillos de ta born ba y el conector de drenaje F FRENTE PARTE DE ATRAS CUIDADO Pot favor sea cuidadoso cuando saque los materiales y partes No dafie el flotador en el contenedor FIG 3 Paso xl Inserte el frente del cobertor del contenedor y despu_s la parte de atr6s El cober tor estar6 segurocuando las cejillasdeatr6s secierren a presi6nen su lugar Para re instalar la manii...

Страница 23: ..._reas de e ercicio spa que tienen humedad excesiva para prevenir dafios pot humedad en cualquier lugar donde libros y ob etos de valor son almacenados durante la construcci6n o remodeJaci6n s para reducir el tiempo de secado de paredes pintadas o tratadas con recul0ri mientos sin embargo aseg_rese de revi sar y limpiar el filtro frecuentemente APAGADO AUTOMATICO Cuando el contenedor de agua esta i...

Страница 24: ... de 16 pisepara Bomba de Drenaje Manguera de 3 pies para Drenaje del Deshumidiflcador Contenedor Bornba Vertical 1 Ruedas Compartimlento para Filtro Lavable Panel de Control Cable de Suministro El_ctrico Manija I Puerta de Conector para Drenaje Continua 24 ...

Страница 25: ...ramada para funcionar en el tiempa retrasado deseado Presionando el bot6n temporlza dor TIMER 4 Cuando a un dad este apagada pres one el bot6n temporizador TIMER una vez para 2 horas de inicio retrasado El indicador de temporizador de2 horas 7 se encender_ cuando el bot6n temporizador esta presio nado Preslone e bot6n temporizador una vez mas para el inicio retrasado de 4 horas 7 EI indicador de t...

Страница 26: ...contenedor con la otra mano Ficj 2 3 Vacfe el contenedor y col6quelo de nuevo en el deshumidificador Fig 3 NOTA_ El deshumidificador no funclonara cuando la luz indicadora de contenedor Ileno BUCKETFULL esta encendtda o si el contenedor no esta colocado apropladamente Fig 1 Fig 2 Fig 3 OPCION 2 DRENAJE POR GRAVEDAD INSTALACION DE LA MANGUERA DE DRENAJE Paso 1 Saque el contenedor de la unidad Fig 5...

Страница 27: ...i i FIG 6 Paso 3 Instale y asegure la uni6n de drenaje al conector de drenaje Fig 7 l i Uni6n de Drenaje FIG 7 Paso 4 Coloque la abrazadera grande para manguera al extremo final piano de la manguera de drenaje del deshumidificador Fig 8 9 _ _ j S I 2 FIG 8 27 ...

Страница 28: ... este comple tamente asentado Fig 9 II I ii ili ili _ _ 41i FIG 9 Paso 6 Asegure la manguera empujando la abrazadera grande para manguera hacia la uni6n de drenaje Fig 10 FIG 10 Paso 7 Coloque el contenedor en el deshumidificador para su funcionamiento Fig 11 FIG 11 28 ...

Страница 29: ... funcionamiento se recomienda que la bomba sea colocada sobre una superficie plana y nivelada Atornille la bomba de agua a una pared o alguna otra super Écie plana perpendicular usando lostornillos para mayor seguridad Fig 12 ii Tomillos ii FIG t2 Paso 3 Quite el tap6n rojo del conector de manguera de drenaje de la bomba Coloque la abrazadera pequefia de la manguera de drenaje a ia manguera de ta ...

Страница 30: ...te completamente asenta da Fig 14 Paso 5 Asegure la manguera empujando la abrazadera pe quefia hacia adelante en direcci6n de la bomba Fig 15 J I FI Jr FIG 15 Paso 6 Inserte el extremo angulado de la manguera de dre naje dei deshumidiflcador en el tanque de la bomba de agua Fig 16 FIG 16 3O ...

Страница 31: ...n de drenaje y corte la manguera a ia Iongitud apropiada 3 Una vez completado el corte refi_rase a Instalando la Manguera de Drena je para re instalar la manguera de drenaje del deshumidificador NOTA_ Si el extremo angular que tiene como prop6sito ser insertado en la bomba es cortado por accidente la manguera debe tenet un extremo angulado para ei_ apropiado drenaje del agua USANDO LA BOMBA DE DRE...

Страница 32: ... y detenga el bot6n de filtra FILTER par 5 segundos en el panel de control para reajustar la configuraci6n del flitro NOTA_ NO COLOQUE el tiltro en el lavaplatoS CUIDADO NO use el deshumidificador sin et filtro Si hace esto podrfa causar fallas a la unidad ADVERTENCIA Desconecte el cable de suministro ei6ctri co del tomacorriente antes de efectuar cualquier mantenimiento LIMPIANDO ELEXTERIOR Limpi...

Страница 33: ... estar en su lugar y seguro para qua el deshumidiflcador opera correctamente i illl Hay un retraso de t empo protector 3 rain para prevenir una sobrecarga del compresor Per esta raz6n la unidad podrla no comenzar normatmente Io deshumidiflcor par 3 rain despu_s de qua el sumlnlstro et_ctrico sea restabtecido i i i ii ll Cuando se instale par primera vez permita par io menos 24 horas para obtener e...

Страница 34: ... la manguera en el deshumidificador Estdn insta adoscorrectamente Revise la manguera de drenaje por obstruccionesoa g_n doblez ill Revise la manguera de drenaje en la bomba Esta instalada correcta mente Revise ta manguera de drenaje de la bomba porobstruccioneso alg _ndoblez Soluciones i H H La capacidad de su deshumidificador podria no ser adecuado para el tamaSo del cuarto Cierre todas las puert...

Страница 35: ...utos antes de conectar el deshumidificaclor para su funcionamiento normal Si la indicaci6n de ERROR continua contacte el centro de servicio mas cercano Llame at 1 800 488 1222 para la ubica ci6n de los centros de servicio ll MODELO i 111 Eliminaci6n de Humedad en 24 horas Consumo de Energfa W i ill Capacldad de Contendor de Agua r Fuente de Energ a Corriente Amperios Nivet de Presi6n de SonidodB B...

Страница 36: ...l de Bombeo L I Fuentede Poder Corriente Amperios Di6metro Interno de la Manguera de Drenaje del Deshumidificador Di6metro Internode la Manguera de Drenaje de ta Bomba 16 pies 115V 60 HZ 12A 50 in 13 mm 20 in 5 mm 36 ...

Страница 37: ... cargo extra Ayuda r_pida por tel_fono nosotros llamamos a este servicio Resolucibn R pida apoyo por tel6fono de un representante de Sears en todos los pro ductos Piense que somos un manual de propietario que habla Protecci6n por sobrecargas el_ctricas contra daSos causados por fluctua clones o cambios el6ctricos Beneficio anual de 250 de Proteccibn Contra Perdidas de Alimentos debi do a una falta...

Страница 38: ...38 ...

Страница 39: ...39 ...

Страница 40: ...liome _pl ances and _ms l_e g_ge door openers and watei h_ers I 800_MY HOM_ Carl anytime_day or night www _ e_rs om Our Home For rep_r of carry in items like vacuums lawn equipment and ele_ranics _ail an_me for the location of your nearest Sears Parts Repair Service emer 1 800_88 12 22 _u s A WWW q_11_l_ conl To purchase _ protection agreement on a product serviced by Sears i 800_ 27 6655 u sA I P...

Отзывы: