background image


5


Prior to installing the unit, check for the following: 


1. To avoid damage, place the unit in an upright position for at least 12 hours before initial set-up. 

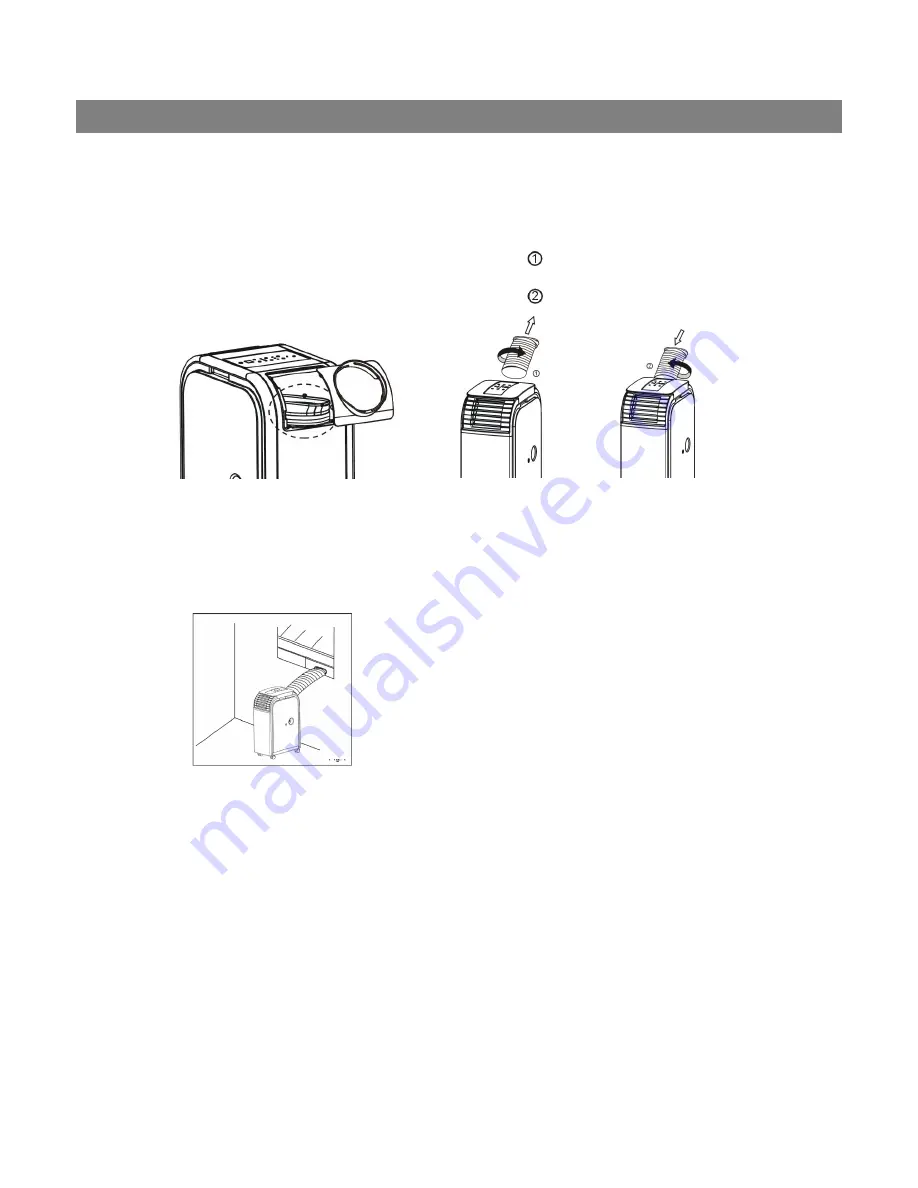
2. Release the exhaust hose holder in the unit and take out the exhaust hose. 
3. Fasten the exhaust hose before turning the unit on. 
4. Expand the exhaust hose, then turn in the direction of the arrow 

 displayed and remove it from the        

    unit. 
5. Expand the exhaust hose, then turn in the direction of the arrow 

 displayed and connect it to the unit. 


1.


Plug the unit into a 120V~60Hz grounded electrical outlet. DO NOT USE A REGULAR EXTENSION 
CORD. If it is necessary to use an extension cord with this unit, use an approved air conditioner 

extension cord only. 


LOCATION OF THE PORTABLE AIR CONDITIONER

 (Figure 1) 


1.


Select a location near a window and electrical outlet. 

2.


Install the Portable Air Conditioner in a flat, spacious location 
where the air outlets will not be covered up. Ensure there is a 

minimum clearance of 30cm from the appliance to the wall or 
other obstacles such as furniture. The plug should be easily 

accessed after the appliance is positioned. 

3.


If the unit is to be placed outside of the room to be cooled, you 

should try to position the unit on a flat solid surface and in an 
area protected from rain and sun exposure such as sunroom, 

veranda or hallway. You should not operate the unit in moist 
areas, such as e.g. saunas or similar areas. 


WINDOW KIT INSTALLATION 
The Window Kit (included) has been designed to fit most standard vertical and horizontal windows. It may 

be necessary to improvise some aspects of the installation procedures for certain types of windows.   

Note

: If the window opening is less than the mentioned length of the window slider kit, make the Window 

Slider Kit shorter by cutting it on the side with a hole to fit the window opening, be careful not to cut off the 
hole. 


The hose must be attached to the correct side of the unit for the given installation (see operating instructions). 

To change the hose to the other side of the unit, gently lift upwards the output vent cover, move hose unit to 
the other side then replace the output vent cover on the other side hose was just removed from.  


INSTALLATION


Содержание 35132

Страница 1: ...1 Kenmore 12 000 BTU Portable Air Conditioner Dehumidifier Heater with Remote Control Use Care Guide Model 35132 FOR HOUSEHOLD USE ONLY ...

Страница 2: ...ause circuit failure Changing the outlet without making the appropriate wiring changes will create an unsafe condition that could result in fire or electrical shock Refer all such work to a licensed and qualified electrician WARNING This appliance must be properly grounded The power cord of this appliance is equipped with a three prong LCDI plug To minimize the risk of electric shock use the plug ...

Страница 3: ...ed period of time could be hazardous to your health Do not use this air conditioner for non specified refrigeration purposes e g preserving precision devices food pets plants and art objects Such usage could cause damages to them Due to the possibility of oxygen deficiency ventilate the room when used together with stoves or other heating devices The air conditioner is a consumer comfort appliance...

Страница 4: ...king carton It is recommended to keep the carton and packing material for storage or transportation of the unit Hose Drain hose For continuous drainage Remote sensor kit used only in out of room cooling mode Window slider kit 3pcs 2 AAA batteries Remote Control PARTS OF THE AIR CONDITIONER ACCESSORIES UNPACKING INSTRUCTIONS Figure 1 Figure 2 Front of Unit Figure 1 1 Control panel 2 Remote receiver...

Страница 5: ... the wall or other obstacles such as furniture The plug should be easily accessed after the appliance is positioned 3 If the unit is to be placed outside of the room to be cooled you should try to position the unit on a flat solid surface and in an area protected from rain and sun exposure such as sunroom veranda or hallway You should not operate the unit in moist areas such as e g saunas or simil...

Страница 6: ... TEST and the other is marked RESET Press the TEST button you will hear a click as the RESET button pops out 3 Press the RESET button you will hear a click as the button engages 4 The power supply cord is now energized and supplying electricity to the air conditioner it is indicated by a light on the plug head Under no circumstances should this device be used to turn the unit on or off The RESET b...

Страница 7: ...perature of 25 C 4 TEMP Pressing this button in cooling mode adjusts the required room temperature by 1 C to a minimum temperature of 17 C Pressing this button in heating function adjusts the required room temperature by 1 C to a minimum temperature of 15 C 5 LED DISPLAY The display shows the current ambient temperature in operation By pressing the or buttons the required target temperature is dis...

Страница 8: ...xpired the delayed start up will be cancelled the unit turns on and can be operated in the required operating mode How to program a delayed shutdown This function is used to set the number of hours delay before the appliance goes off Proceed as follows Start the unit in required function cooling heating or dehumidifying Press the TIMER button during operation and enter the required number of hours...

Страница 9: ...on the appliance Reception is confirmed by a beep from the main unit The remote control will not operate if curtains door or other material block the signal from the receiver to the remote control Prevent any liquid from falling into the remote control Do not expose the remote control to direct sunlight or heat if the infrared signal receiver on the indoor unit is exposed to sunlight the air condi...

Страница 10: ...con The warm extract air must be emitted from the room via the exhaust hose Make sure that no warm outside air can enter the room For effective cooling we recommend our selection of various accessories which reduce or prevent entry of warm air into the room Set the function to COOLING Set the target temperature using the temperature control The target temperature can range between 17 C and 30 C 65...

Страница 11: ...g cooled by pushing it into the hole The sensor must face the room being cooled and be positioned above the air outlet 3 Remove the plastic cover from the remote sensor jack on the main body of the unit found near the top of the front of the unit Keep it for later use 4 Attach the end of the supplied cable to the jack on the main unit Organize the wire so it will not get damaged stepped on or pinc...

Страница 12: ...ide of the unit and attach the drainage hose Allow water to flow out continuously into a bucket or floor drain in order to achieve higher dehumidification capacity In the dehumidify mode you must not feed the room air outside with the extract air hose Note In the dehumidify mode the ventilation level is already preset to ensure efficient dehumidification of ambient air You will not be able to adju...

Страница 13: ...NDED PERIOD OF NON USE If the air conditioner will not be used for a long period of time remove the bottom rubber plug from the back hole and attach a section of the Continuous Drain Hose and completely drain the unit of water Follow cleaning instructions A D Perform reverse Installation Instructions Repack the unit in its original package and store upright in a cool dry place Important Always sto...

Страница 14: ...g the air from being discharged Position the air hose correctly keeping it as short and free of curves as possible to avoid bottlenecks Check and remove any obstacles obstructing air discharge Room is not cool enough Windows doors in room are open There are heat sources nearby Exhaust air duct is not connected or is blocked Temperature setting is too high Air filter blocked by dust Close all windo...

Страница 15: ...he unit requires qualified inspection E2 Temperature of the cooling agent lines too high or too low Temporary error on measuring output temperature Please switch the TRANSFORM unit off and start it again after approx 30 minutes If the error occurs continuously the unit requires qualified inspection E3 Incorrect signal This error message in the cooling function refers to too high ambient temperatur...

Страница 16: ...rs compressor only Implied Warranties Any implied warranties which the purchaser may have are limited in duration to 1 year for parts and 5 years for the compressor only from the date of purchase This limited warranty is in lieu of all other warranties expressed or implied including warranties of merchantability and fitness for a particular purpose and excludes all liability for incidental or cons...

Отзывы: