background image

6

Towels and 

bedding

Sanitize*

Wrinkle Guard™ 

Cycle Signal

Extended high-heat drying cycle 

intended to help sanitize items such as 

bedding and towels. This cycle is not 

recommended for all fabrics. For best 

results, run cycle to completion, do not 

interrupt. 

NOTE:

 Steam portion of Wrinkle 

Guard™ w/Steam option is disabled for 

this cycle.

Jackets, 

comforters, pillows

Bulky/

Bedding

Damp Dry Signal


Wrinkle Guard™ 

Cycle Signal

Use for drying large, bulky items; do not 

overfill dryer drum. 

Heavyweight items 

such as towels and 

jeans

Heavy 

Duty

Damp Dry Signal 

Wrinkle Guard™ 

Cycle Signal

Use for drying large or heavy items. 

Corduroys, work 

clothes

Normal

Damp Dry Signal 

Wrinkle Guard™ 

Cycle Signal

Medium to large loads of mixed fabrics 

and items.

No-iron fabrics, 

cottons, perm 

press, linens, 

synthetics

Casual

Damp Dry Signal 

Wrinkle Guard™


Cycle Signal

For normal light- to medium-weight 

fabrics. Drying time varies based on 

fabric type, load size, and dryness 

setting.

Lingerie, blouses, 

washable knit 

fabrics

Delicates

Damp Dry Signal 

Wrinkle Guard™ 

Cycle Signal

For gently drying delicate items.

NOTE:

 Steam portion of Wrinkle 

Guard™ w/Steam option is disabled for 

this cycle.

Items to dry:

Cycle:

Dry Temp:

Dry Level

:

Available 

Options:

Cycle Details:

SENSING CYCLES –

 Senses moisture in the load and shuts off when the load reaches the selected dryness level. The dry temperature 

shown is the default temperature. This setting can be modified on some cycles but is not retained for future drying with this cycle. The 

dryness level shown is the default dryness setting. This setting can be changed on some cycles and will be retained for future drying with 

this cycle. Available options in 

bold

 are default settings for that cycle.

To get the most energy savings and enhanced fabric care from your dryer, use the Sensing cycles. These cycles measure the drying 

air temperature and moisture levels to turn the dryer off once the load reaches the selected dryness level. For electric models, dryer 

performance and results may vary with service voltage less than 240.

Damp Signal

Touch to select the Damp Signal to on or off. When 

selected, a series of beeps will sound when the load is 

damp, but not completely dry. This will allow you to take 

clothes out of the load that do not need to dry completely. 

This option is not available on Sanitize, Steam Refresh, 

and the Timed cycles.

CYCLE STATUS LIGHTS

The indicator bar on the right side of the control will let you 

know what stage of the drying cycle is in process. 

Damp

This indicator shows that the load is partially dried and 

items that you may wish to hang up or iron while still 

damp may be removed.

Cool Down

The dryer has finished drying with heat, and is now 

tumbling the load without heat to cool it down and  

reduce wrinkling.

Complete

This will indicate that the selected cycle has ended and 

the load may be removed from the dryer. If Wrinkle 

Guard™ option has been selected, the dryer may continue 

to tumble the load, even if the Complete indicator is lit.

Wrinkle Guard™

This indicator will light if the Wrinkle Guard™ option has 

been selected and is running. The dryer will periodically 

tumble the load for up to 150 minutes after the cycle has 

ended.

Check Lint Screen

The Check Lint Screen indicator light will flash as a 

reminder to clean the lint screen. It will flash until the door 

is opened or a cycle is started. It will turn off when the 

dryer is turned off.

START/PAUSE BUTTON

Touch and hold START/PAUSE button for up to 3 seconds or 

until the dryer starts to begin the selected cycle; touch again 

to pause a cycle.

6

7

*  Extended high-heat drying cycle intended to help sanitize items such as sheets and towels. This cycle is not recommended for all  


  fabrics. For best results, this cycle should be run to completion to ensure sanitization and do not interrupt cycle.  


If loads do not seem as dry as you would like or are drier than you would like, select More Dry or  

  Less Dry next time you dry a similar load.

CYCLE GUIDE – SENSING CYCLES

Содержание 110.66132*410

Страница 1: ...Kenmore Electric or Gas Dryer Secadora eléctrica o a gas Sécheuse électrique ou à gaz Models Modelos Modèles 110 66132 410 110 67132 410 110 76132 410 110 77132 410 110 C66132 410 P N W10680133C Sears Brands Management Corporation Hoffman Estates IL 60179 U S A www kenmore com www sears com Sears Canada Inc Toronto Ontario Canada M5B 2C3 www sears ca ...

Страница 2: ...OOD AIR FLOW 4 USE SENSING CYCLES FOR BETTER FABRIC CARE AND ENERGY SAVINGS 4 CONTROL PANEL AND FEATURES 5 CYCLE GUIDE 6 USING YOUR DRYER 8 DRYER CARE 10 TROUBLESHOOTING 12 PROTECTION AGREEMENTS 15 WARRANTY 15 ASSISTANCE OR SERVICE Back Cover TABLE OF CONTENTS ...

Страница 3: ...3 IMPORTANT When discarding or storing your old clothes dryer remove the door ...

Страница 4: ...material n Using the shortest length of vent possible n Using no more than four 90 elbows in a vent system each bend and curve reduces air flow n Removing lint and debris from the exhaust hood n Removing lint from the entire length of the vent system at least every 2 years When cleaning is complete be sure to follow the Installation Instructions supplied with your dryer for final product check n C...

Страница 5: ...Sensing Cycles except for the Sanitize cycle if desired NOTE Dry Level is for use with Sensing Cycles only 1 2 3 Cycle Signal The Cycle Signal produces an audible sound when the drying cycle is finished Promptly removing clothes at the end of the cycle reduces wrinkling NOTE When the Wrinkle Guard option is selected and the Cycle Signal is on the tone will sound at 15 minutes 30 minutes and at the...

Страница 6: ... dryer off once the load reaches the selected dryness level For electric models dryer performance and results may vary with service voltage less than 240 Damp Signal Touch to select the Damp Signal to on or off When selected a series of beeps will sound when the load is damp but not completely dry This will allow you to take clothes out of the load that do not need to dry completely This option is...

Страница 7: ...nal Select a drying temperature based on the fabrics in your load If you are unsure of the temperature to select for a load select the lower setting rather than the higher setting Any load Touch Up 20 Wrinkle Guard Cycle Signal Use this cycle to quickly refresh an item or remove light wrinkles The load is cooled slowly to reduce wrinkling and make it easier to handle Small loads and sportswear 2 t...

Страница 8: ...n firmly back into place For additional cleaning information see Dryer Care Place laundry in the dryer Close the door Do not tightly pack the dryer clothes should be able to tumble freely WARNING To reduce the risk of fire electric shock or injury to persons read the IMPORTANT SAFETY INSTRUCTIONS before operating this appliance USING YOUR DRYER 3 Touch Power Touch POWER to turn on the dryer 2 Load...

Страница 9: ... the time in 1 minute increments Touch and hold to change the time in 5 minute increments The default temperature may be changed by touching Dry Temp until the desired dry temperature is lit 4 Select the desired cycle Select the desired cycle for your load See the Cycle Guide for more information about each cycle Steam Refresh Reduces light wrinkles and odors from a few garments at a time Do not a...

Страница 10: ...power is off to adjust the default settings 1 Before starting a cycle touch and hold DRY LEVEL for 3 seconds 2 Touch DRY LEVEL to select the dryness level shown in the time display 0 1 2 3 or 4 3 Touch START PAUSE to save the new dryness level setting Cleaning the dryer interior cont 3 Tumble a load of clean cloths or towels to dry the drum OR Use a microfiber cloth and hot water in a spray bottle...

Страница 11: ... door For direct wired dryers 1 Disconnect power 2 Disconnect wiring from dryer and secure wire ends 3 Steam models only Shut off water faucet 4 Steam models only Disconnect the water inlet hose from faucet then drain the hose Transport hose separately 5 Make sure leveling legs are secure in dryer base 6 Use tape to secure dryer door Reinstalling the Dryer Follow the Installation Instructions to l...

Страница 12: ...Thumping noise Dryer hasn t been used in a while This is normal The thumping sound should diminish after a few minutes of use Rattling or vibrating noise A small object caught between the edges of dryer drum Check the front and rear edges of the drum for small objects Clean out pockets before laundering Dryer isn t properly leveled The dryer may vibrate if not properly installed See the Installati...

Страница 13: ...not use fabric softener sheets with steam cycles Stains on drum Loose dyes in clothes Drum stains are caused by dyes in clothing usually blue jeans These will not transfer to other clothing Loads are wrinkled The load was not removed from dryer at the end of the cycle Select Steam Refresh cycle to tumble the load with water and heat This cycle is best for smoothing out wrinkles and reducing odors ...

Страница 14: ... diagnostic code is present Touch any pad to clear the code from the display and return to the estimated time remaining Try the following Check to see if a household fuse has blown or circuit breaker has tripped Electric dryers use two household fuses or breakers Replace the fuse or reset the circuit breaker Confirm that the power cord is properly installed Refer to the Installation Instructions f...

Страница 15: ...more com warranty This warranty applies for only 90 DAYS from the sale date in the United States and is void in Canada if this appliance is ever used for other than private household purposes This warranty covers ONLY defects in material and workmanship and will NOT pay for 1 Expendable items that can wear out from normal use including but not limited to filters belts bags or screw in base light b...

Страница 16: ...NSING CYCLES Ciclos de detección PARA UN MEJOR CUIDADO DE LAS TELAS Y AHORRO DE ENERGÍA 19 PANEL DE CONTROL Y CARACTERÍSTICAS 20 GUIÁ DE CICLOS 22 USO DE LA SECADORA 24 CARACTERÍSTICAS ADICIONALES 26 CUIDADO DE LA SECADORA 26 SOLUCIÓN DE PROBLEMAS 28 CONTRATOS DE PROTECCIÓN 31 GARANTÍA 31 AYUDA O SERVICIO TÉCNICO Contraportada Índice ...

Страница 17: ...17 ...

Страница 18: ...18 IMPORTANTE Cuando descarte o guarde su vieja secadora de ropa quítele la puerta ...

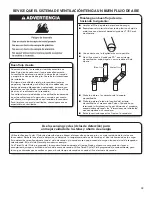
Страница 19: ...dos o aplastados así como una instalación con ventilación inadecuada disminuirán el flujo de aire y el rendimiento de la secadora Las visitas de servicio debidas a la ventilación inadecuada no están cubiertas por la garantía y correrán por cuenta del cliente sin importar quién haya instalado la secadora Para limpiar o reparar la ventilación comuníquese con un especialista en ventilación Bien Mejor...

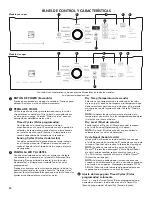
Страница 20: ...iclo No todos los ajustes están disponibles con todos los ciclos 1 2 3 Dry Temp Temperatura de secado Seleccione una temperatura de secado según las telas de su carga Si tiene duda respecto a la temperatura que debe seleccionar para una carga de ropa elija el ajuste más bajo en vez del ajuste más alto Consulte Guía de ciclos NOTA La detección de ciclos permite el ajuste de la temperatura se permit...

Страница 21: ... Steam Protección antiarrugas con vapor según el modelo Si no es posible sacar la carga de la secadora tan pronto como ésta se detenga se pueden formar arrugas La función Wrinkle Guard Protección antiarrugas periódicamente da vueltas acomoda y esponja la ropa para ayudar a evitar que se formen arrugas El ajuste Wrinkle Guard w Steam Protección antiarrugas con vapor según el modelo agregará un cicl...

Страница 22: ...ky Bedding Artículos voluminosos Ropa de cama Damp Dry Signal Wrinkle Guard Cycle Signal Úselo para secar artículos grandes y voluminosos no llene en exceso el tambor de la secadora Artículos pesados tales como toallas pantalones de mezclilla Heavy Duty Muy intenso Damp Dry Signal Wrinkle Guard Cycle Signal Úselo para secar artículos grandes o pesados Pana ropa de trabajo Normal Damp Dry Signal Wr...

Страница 23: ...vapor Han sido diseñados para usarse con cargas secas para alisar las arrugas quitar los olores y revitalizar las telas Los ajustes y las opciones que se muestran en negrita son los ajustes por defecto para ese ciclo No todos los ajustes y las opciones están disponibles con cada ciclo GUÍA DE CICLOS STEAM CYCLE Ciclo con vapor Cualquier carga Timed Dry Secado Programado 40 Wrinkle Guard Cycle Sign...

Страница 24: ...e hasta que quede en su lugar Para obtener más información sobre la limpieza vea Cuidado de la secadora 2 Cargue la secadora Ponga la ropa en la secadora Cierre la puerta No cargue la secadora de manera apretada las prendas deben poder girar libremente 4 Seleccione el ciclo deseado Seleccione el ciclo deseado para su carga Para obtener más información acerca de cada ciclo vea la Guía de ciclos Rev...

Страница 25: ...ción antiarrugas con vapor según el modelo Si no es posible sacar la carga de la secadora tan pronto como ésta se detenga se pueden formar arrugas La función Wrinkle Guard Protección antiarrugas periódicamente da vueltas acomoda y esponja la ropa para ayudar a evitar que se formen arrugas El ajuste Wrinkle Guard w Steam Protección antiarrugas con vapor según el modelo agregará un ciclo breve de va...

Страница 26: ...ugar donde está la secadora CUIDADO DE LA SECADORA Limpieza del filtro de pelusa Limpieza de cada carga El filtro de pelusa está localizado en la abertura de la puerta de la secadora Un filtro obstruido con pelusa puede aumentar el tiempo de secado Para limpiar 1 Jale el filtro de pelusa en sentido recto hacia arriba Quite la pelusa del filtro enrollándola con sus dedos No enjuague ni lave el filt...

Страница 27: ...a una tapa en la línea abierta del suministro de combustible 5 Modelos con vapor únicamente Cierre el grifo de agua 6 Modelos con vapor únicamente Desconecte la manguera de entrada de agua del grifo y elimine el agua de la manguera Transporte la manguera en forma separada 7 Asegúrese de que las patas niveladoras estén fijas en la base de la secadora 8 Use cinta adhesiva para asegurar la puerta de ...

Страница 28: ...ado la secadora o no se ha usado por un tiempo prolongado tal vez la bomba haga más ruido y funcione durante más tiempo Esto es normal Golpeteo No se ha usado la secadora durante un tiempo Esto es normal El sonido de golpeteo deberá disminuir después de unos pocos minutos de uso Traqueteo o vibraciones Hay un objeto pequeño atrapado entre los bordes del tambor de la secadora Revise los bordes fron...

Страница 29: ...a antes de tiempo Cambie el ajuste del nivel de sequedad en los Sensing Cycles Ciclos de detección Aumentar o disminuir el nivel de sequedad cambiará la duración del secado en un ciclo Si las cargas terminan siempre demasiado pronto también ver Cómo cambiar los ajustes de Sensing Cycle Ciclo de detección para aumentar o disminuir el tiempo de secado Pelusa en la carga El filtro de pelusa está obst...

Страница 30: ...evitar secar la carga en exceso La secadora muestra mensajes codificados o un indicador se enciende PF corte de corriente Se ha interrumpido el ciclo de secado debido a un corte de corriente Toque la tecla START Inicio para borrar el mensaje de error PF mantenga presionado Start Inicio para reanudar el ciclo Código de diagnóstico L2 problema de bajo voltaje o no hay voltaje en la línea Puede ser q...

Страница 31: ...a sobre reparaciones y repuestos sin cargo visite la página web www kenmore com warranty Esta garantía es válida solamente durante 90 DÍAS a partir de la fecha de venta en los Estados Unidos y no tiene validez en Canadá si este electrodoméstico se utiliza en algún momento para fines que no sean domésticos Esta garantía cubre SOLAMENTE los defectos de material y mano de obra y NO pagará por 1 Los a...

Страница 32: ...MMES DE DÉTECTION POUR UN MEILLEUR SOIN DU TISSU ET DAVANTAGE D ÉCONOMIES D ÉNERGIE 35 TABLEAU DE COMMANDE ET CARACTÉRISTIQUES 36 GUIDE DE PROGRAMME 38 UTILISATION DE LA SÉCHEUSE 40 CARACTÉRISTIQUES SUPPLÉMENTAIRES 42 ENTRETIEN DE LA SÉCHEUSE 42 DÉPANNAGE 44 CONTRATS DE PROTECTION 47 GARANTIE 47 ASSISTANCE OU SERVICE Couverture arrière TABLE DES MATIÈRES ...

Страница 33: ...33 ...

Страница 34: ...34 IMPORTANT Pour mettre l ancienne sécheuse au rebut ou la remiser enlever la porte ...

Страница 35: ...n de l air Des conduits d évacuation bloqués ou écrasés ainsi qu une installation inadéquate de l évacuation diminuent la circulation d air et les performances de la sécheuse Les interventions de dépannage causées par une ventilation incorrecte ne sont pas couvertes par la garantie et seront à la charge du client quel que soit l installateur de la sécheuse Pour nettoyer ou réparer l évacuation d a...

Страница 36: ...ous les réglages ne sont pas disponibles avec tous les programmes 1 2 3 Dry Temp température de séchage Choisir une température de séchage en fonction des tissus de votre charge Si vous hésitez sur la température à sélectionner pour une charge donnée choisir le réglage plus bas plutôt que le réglage plus élevé Voir Guide de programmes REMARQUE Les programmes de détection permettent de régler la te...

Страница 37: ...n n est pas disponible pour les programmes Sanitize assainissement Steam Refresh rafraîchissement avec vapeur et Timed séchage minuté TÉMOINS LUMINEUX DE PROGRAMME La barre témoin située du côté droit de la commande indique à l utilisateur l étape que le programme de séchage est en train d effectuer Damp humide Ce témoin indique que la charge est partiellement sèche et qu il est possible de retire...

Страница 38: ...e literie Damp Dry Signal Wrinkle Guard Cycle Signal À utiliser pour le séchage de gros articles volumineux ne pas surcharger le tambour de la sécheuse Les articles lourds tels que serviettes et jeans Heavy Duty service intense Damp Dry Signal Wrinkle Guard Cycle Signal Utiliser pour le séchage d articles volumineux ou lourds Vêtements de travail articles en velours côtelé Normal Damp Dry Signal W...

Страница 39: ...is de réduire les odeurs et de rafraîchir les tissus Les réglages et options indiqués en gras sont les réglages par défaut pour ce programme Tous les réglages et options ne sont pas disponibles sur tous les programmes GUIDE DE PROGRAMMES PROGRAMMES AVEC VAPEUR Toute charge Timed Dry séchage minuté 40 Wrinkle Guard antifroissement Cycle Signal signal de programme Choisir une température de séchage ...

Страница 40: ...E SÉCURITÉ avant de faire fonctionner cet appareil 1 Nettoyer le filtre à charpie Nettoyer le filtre à charpie avant chaque charge Enlever le filtre à charpie en le tirant tout droit vers le haut Enlever la charpie du filtre en la roulant avec les doigts Ne pas rincer ni laver le filtre pour enlever la charpie Remettre le filtre à charpie fermement en place Pour plus d informations sur le nettoyag...

Страница 41: ...appuyer sur le bouton correspondant à l option souhaitée S il n est pas possible de retirer rapidement la charge sélectionner l option Wrinkle Guard antifroissement avant d appuyer sur START mise en marche Modification des réglages de programme de détection pour augmenter ou diminuer la durée de séchage Si toutes les charges de tous les programmes de détection sont systématiquement moins sèches qu...

Страница 42: ...charpie en le tirant tout droit vers le haut et pousser la patte avant vers le bas pour l ouvrir Enlever la charpie du filtre en la roulant avec les doigts Ne pas rincer ni laver le filtre pour enlever la charpie La charpie mouillée s enlève difficilement 2 Refermer le filtre à charpie et le remettre fermement en place IMPORTANT n Ne pas faire fonctionner la sécheuse avec un filtre à charpie dépla...

Страница 43: ...es avec raccordement direct 1 Déconnecter la source de courant électrique 2 Débrancher le cordon de la sécheuse et protéger l extrémité du connecteur 3 Modèles vapeur uniquement Fermer le robinet d eau 4 Modèles vapeur uniquement Déconnecter le tuyau d arrivée d eau du robinet puis vidanger le tuyau Transporter le tuyau séparément 5 S assurer que les pieds de nivellement sont solidement fixés à la...

Страница 44: ...nt une période prolongée la pompe peut faire plus de bruit ou fonctionner pendant plus longtemps Ceci est normal Bruit saccadé La sécheuse n a pas été utilisée pendant un moment Ceci est normal La bruit saccadé devrait s atténuer après quelques minutes d utilisation Bruit de grattement ou de vibration Un petit objet est coincé dans le bord du tambour de la sécheuse Vérifier les bords avant et arri...

Страница 45: ...e de degré de séchage pour les programmes de détection L augmentation ou la diminution du degré de séchage modifiera la durée de séchage d un programme Si le séchage des charges se termine systématiquement trop tôt voir aussi Changement des réglages par défaut des programmes de détection pour augmenter ou diminuer la durée de séchage Charpie sur la charge Le filtre à charpie est obstrué par de la ...

Страница 46: ...ment sèche La sécheuse affiche un message codé ou un témoin de détection s allume PF coupure de courant Le programme de séchage a été interrompu par une panne de courant Appuyer sur le bouton START mise en marche pour effacer le message d erreur PF puis appuyer et maintenir enfoncé le bouton START mise en marche pour relancer le programme Code de diagnostic L2 tension électrique faible ou inexista...

Страница 47: ...nager est utilisé à d autres fins que pour un usage privé et domestique la présente garantie ne s applique que pendant 90 JOURS à partir de la date d achat aux États Unis et est nulle au Canada La présente garantie couvre UNIQUEMENT les vices de matériaux et de fabrication et NE prendra PAS en charge 1 Les pièces courantes pouvant s user suite à une utilisation normale notamment les filtres courro...

Страница 48: ...W10680133C 02 15 Printed in U S A Impreso en EE UU Imprimé aux É U ...

Отзывы: