5
。
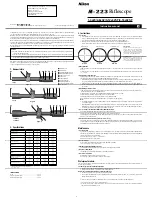
(View observed by 20mm eyepiece)
②
①
Tighten the adjustment screw
Loosen the adjustment screws
②
①
Mo
re
tha
n 2
km
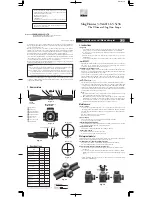
Focus Knob
Aligning the Finder Scope
●
What is a finder scope?
If you try to find a star with a telescope from the very beginning, it is very hard to catch the target astral object due to
high-powers and narrow field of view of the telescope. The finder has a lower-powers and wider field of view
compare to the main telescope and it is easier to find the positional relations between the stars. You can see the
reticle in the center field of the finder and set the target astral object at this cross point.
In order to smoothly introduce the target astral object to the main tube through the finder scope, the finder must be
collimated (aligned) with the telescope first. Please align the optical axis of the finder scope through the following
steps before observing.
●
Steps to align the finder scope
1) It is better to carry out most of this procedure
during the daytime.
6) By adjusting (tighten or loosen) the 3 adjustment
screws on the finder bracket, the direction of the
finder can be changed.
※
For example, by tightening the adjustment screw on the top
and loosening the two adjustment screws on the bottom, the
finder can be turned to face upwards (see the above picture for
reference).
7) When the object seen through the main tube has been
centered on the crosshair of the finder, slowly tighten the
adjustment screws equally to fix the finder.
8) The alignment of the finder scope has been completed. Please
make sure that the axis of the scope is not out of alignment
before star observation.
2) Aim the telescope
at a small object that is
about several km
away, such as a
chimney top or tip of
an antenna.
3) Center the object in
the eyepiece.
4) If it is not focused,
slowly turn the
focusing knob until
the object comes into
focus.
5) After that, look at the object with the finder scope
this time. If the object has already been centered on
the crosshair, alignment of the finder is not neces-
sary.
Eyepiece
(
20
mm)
Diagonal
Locking
Screw
(1) View observed by 20mm eyepiece
(2) View observed by finder
(1) View observed by 20mm eyepiece
(2) View observed by finder
Finder Adjustment Screws
Содержание New Moonlight II
Страница 1: ...Operating Instructions...