background image

27

Oven Controls

Self Clean

A self cleaning oven cleans with very high temperatures well 
above normal cooking temperatures. The high temperature elim-
inates soils completely or reduces them to a fine powdered ash 
you can wipe away afterwards with a damp cloth.

The Self Clean function allows you to set a cleaning time from 2 
hours to 4 hours. A 3 hour cleaning time is recommended for 
normal cleaning, 2 hours for light cleaning, and 4 hours for 
heavy cleaning.

Read before starting Self Clean:

 Do not leave small children unattended near 

the appliance. During the self cleaning cycle, the outside of the 
oven can become very hot to touch and can cause burns. The 
oven bake and broil elements may appear to have cooled after 
they have been turned off. The elements may still be hot and 
can cause burns if touched before they have sufficiently cooled.

Do not line the oven walls, racks, bottom or any 

other part of the oven with aluminum foil. Doing so will destroy 
heat distribution, produce poor baking results and cause 
permanent damage to the oven interior. Aluminum foil will melt 
to the interior of the oven.

The health of some birds is extremely sensitive to the fumes 
given off during the self cleaning cycle of any oven. Move birds 
to another well-ventilated room.

 Do not force the door open. This can damage 

the automatic door locking system. Use caution when opening 
the oven door after self cleaning. The oven may still be very hot 
and can cause burns. To avoid possible burns stand to the side 
of the oven when opening the oven door to allow hot air or 
steam to escape

Completely remove all oven racks and any accessories from 
oven cavity to avoid damage to oven racks. If the oven racks 
are not removed they may discolor.

Remove all items from the oven including bakeware, utensils 
and any aluminum foil. Aluminum foil will not withstand 
high temperatures from a self clean cycle and will melt. 

Do not use oven cleaners or oven protective coatings in or 
around any part of the oven interior.

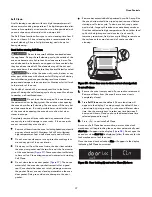
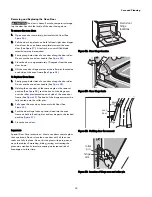
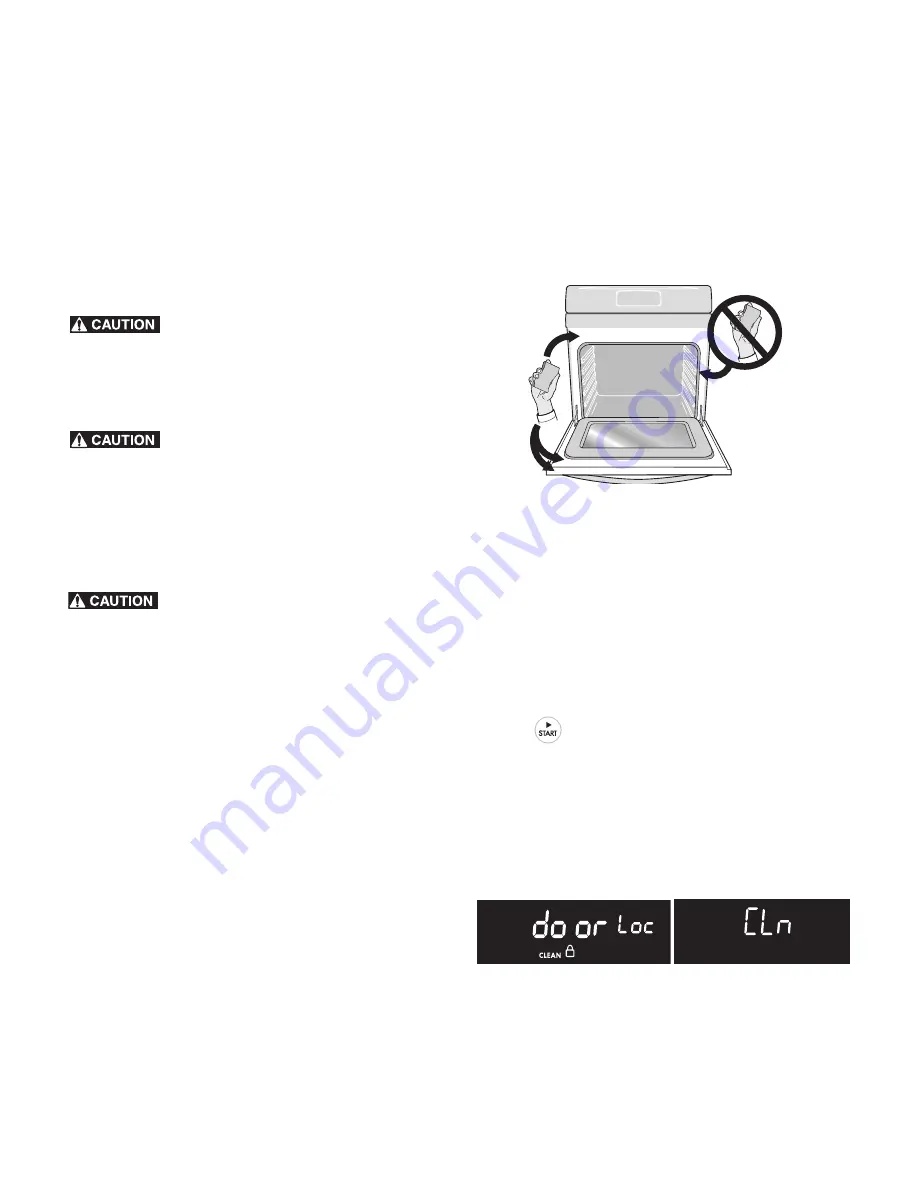
Clean any soil from the oven frame, the door liner outside 
the oven door gasket and the small area at the front center 
of the oven bottom (

Figure 27

). These areas heat sufficiently 

to burn soil on. Clean using soap and water prior to starting 
Self Clean.

Do not clean the oven door gasket (

Figure 27

). The woven 

material of the oven door gasket is essential for a good 
seal. Care should be taken not to rub, damage or remove 
the gasket. Do not use any cleaning materials on the oven 
door gasket. Doing so could cause damage to the door 
gasket.

Remove any excessive build up caused by spills. Any spill on 
the oven bottom should be wiped up and removed before 
starting a self clean cycle. To clean, use hot, soapy water 
and a cloth. Large spill residue can cause heavy smoke or 
fire when subjected to high temperatures. Do not allow food 
spills with a high sugar or acid content (such as milk, 
tomatoes, sauerkraut, fruit juices or pie filling) to remain on 
the surface as they may leave a dull spot even after 
cleaning. 

To set self clean:

1.

Be sure the oven is empty and all oven racks are removed. 
Remove all items from the oven. Be sure oven door is 
completely closed. 

2. Press 

Self Clean

 and the default 3 hour clean time will 

appear in the display. You may accept the default 3 hour 
clean time by going to step 3, or choose a different clean 
time. Use the numeric keys to select any time between 2 
hours and 4 hours. Once you have the desired clean time 
selected proceed to step 3. 

3. Press 

 to activate Self Clean.

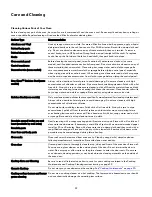
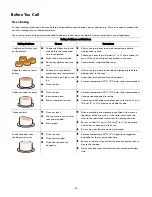
As soon as Self Clean becomes active, a motor driven lock 
mechanism will begin locking the oven door automatically and 
door Loc will appear in the display (

Figure 28

). Do not open the 

oven door when door Loc is displayed (allow 15 seconds for the 
lock mechanism to lock the oven).

Once the oven door has locked, CLn will appear in the display 
indicating Self Clean has started. 

Figure 27:  Oven door area to clean and not clean (gasket).

Figure 28:  Door locking (L) and active Clean (R) shown

Содержание 970C4254

Страница 1: ...Range Cuisini re lectrique color number num ro de coleur Use Care Guide Guide d utilisation et d entretien English Fran ais Model Mod le 970C4254 P N 139901401 Rev A Sears Canada Inc Toronto Ontario C...

Страница 2: ...talled operated or maintained according to all instructions supplied with the product 7 Damage to or failure of this product resulting from accident abuse misuse or use for other than its intended pur...

Страница 3: ...Call 1 800 4 MY HOME TM Sears ca parts_ MAJOR APPLIANCES And a whole lot more We have access to over 1 million parts and accessories REFRIGERATORS Water Air Filters Ice Maker Stainless Steel Water Lin...

Страница 4: ...to the left side of the oven frame Record the date of purchase model and serial number of your product in the corresponding space below Model Number _____________________________ Serial Number ______...

Страница 5: ...can result in serious injuries and also cause damage to the appliance Do not allow children to climb or play around the oven The weight of a child on an open over door may cause the oven to tip result...

Страница 6: ...lor Interior surfaces of ovens become hot enough to cause burns During and after use do not touch or let clothing or other flammable materials contact heating elements or interior surfaces of oven unt...

Страница 7: ...s ceramic earthenware or other types of glazed utensils are suitable for use on the cooktop Improper cookware may break due to sudden changes in temperature Check the cookware manu facturer s recommen...

Страница 8: ...the self clean cycle to clean only the parts listed in this manual Before using self clean remove the broiler pan any food utensils and bakeware from the oven Remove oven racks unless otherwise instru...

Страница 9: ...ft empty and it may bond to the ceramic cooktop If the cookware melts it will damage the cooktop Follow all the cookware manufacturer s suggestions when using any type of cookware on the ceramic cookt...

Страница 10: ...ions of this Use Care Guide Types of Cooktop Surface Elements The ceramic glass cooktop has radiant surface elements located below the surface of the glass The patterns on the ceramic glass will outli...

Страница 11: ...aning in the General Care Cleaning section and Before You Call checklist section of this Use and Care Guide Radiant elements have a limiter that allows the element to cycle on and off even at the HI s...

Страница 12: ...Potholders towels or wooden spoons could catch fire if placed too close to the surface elements Do not allow aluminum foil empty glass porcelain cookware or ANY material that can melt to make contact...

Страница 13: ...tor lights will remain on while the zone is heating The warm zone indicator lights will stay on until the warm zone is turned off To adjust the temperature up or down use the arrow keys 5 When ready t...

Страница 14: ...Pull the oven rack straight forward until it reaches the stop position Lift up front of oven rack slightly and slide out To replace Place the oven rack on the rack guides on both sides of oven walls...

Страница 15: ...ime Use to set a specific amount of time needed for cooking Automatically cancels cooking process at end of set time 15 Delay Start Use to set a delayed cooking function or a delayed self clean 16 Con...

Страница 16: ...lay Start has been set or Self Clean is active Setting 12 hour or 24 hour display mode The clock display mode allows you to select 12 hr or 24 hr modes The factory pre set clock display mode is 12 hou...

Страница 17: ...and the control will sound a beep three times every 30 seconds until Timer Set Off key is pressed To cancel the timer when active press Timer Set Off again Important note The timer does not start or...

Страница 18: ...ods such as cakes pastries and breads use the regular bake function for best results Setting Convec Bake The convection function uses a fan to circulate the oven s heat uniformly and continuously arou...

Страница 19: ...ck food when the bake time is 75 complete At this time the oven control will sound 1 long beep at regular intervals until the set cook time has finished To program oven for Convec Convert with oven de...

Страница 20: ...or Convec Convert has been activated If the oven door is opened when any convection function is active the convection fan will stop rotating until the oven door is closed It is not recommended to roas...

Страница 21: ...k but will not burn the outside as it seals in the meat s juices Two Slow Cook settings are available high Hi or low Lo The high setting is best for cooking foods between 4 and 5 hours The low setting...

Страница 22: ...e insert and never cover the pan with foil exposed grease could ignite When broiling always pull the oven rack out to the stop position before turning or removing food To set Broil with the default br...

Страница 23: ...indi cator light will turn off Warmer Drawer Temperature Selection Refer to the chart below for recommended settings If a particu lar food is not listed start with the medium setting If more crisp ne...

Страница 24: ...rm Hold will keep the oven temperature at 170 F 77 C To set Warm Hold 1 If needed arrange oven racks and place cooked food in oven 2 Press Warm Hold HLd will appear in the display If no other keys are...

Страница 25: ...esired oven temperature again Food poisoning hazard Do not let food sit for more than one hour before or after cooking Doing so can result in food poisoning or sickness Foods that can easily spoil suc...

Страница 26: ...ns to a factory default setting using this method all of the above user settings will be restored to the factory default settings This includes the oven temperature offset that will reset to 0 zero 1...

Страница 27: ...and will melt Do not use oven cleaners or oven protective coatings in or around any part of the oven interior Clean any soil from the oven frame the door liner outside the oven door gasket and the sm...

Страница 28: ...t with the correct time of day the oven is empty and ALL oven racks are removed Be sure oven door is completely closed 2 Press Delay Start 3 Using numeric keys enter 9 0 0 for time to start 4 Press to...

Страница 29: ...ess Steel some models Only use cleaners and polishes that are specifically manufactured for cleaning stainless steel Always rub in direction of metal grain to avoid damaging Do not use cleaners with h...

Страница 30: ...us to your health and can chemically damage the ceramic glass surface Before cleaning the cooktop be sure the controls are turned to OFF and the cooktop is COOL The glass surface could be hot and burn...

Страница 31: ...foil linings may trap heat causing a fire hazard Protective Liners DO NOT USE ALUMINUM FOIL to line the oven bottom Only use aluminum foil as recom mended in this manual Improper installation of thes...

Страница 32: ...ance To replace the warmer drawer 1 Pull the bearing glides to the front of the outer compart ment glide channels until they snap into place See Figure 34 2 Carefully line up both sides of the warmer...

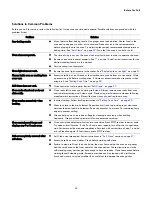
Страница 33: ...igure 38 2 Holding the oven door at the same angle as the removal position See Figure 38 seat the hook of the hinge arm over the roller pins located on each side of the oven door frame See Figure 39 T...

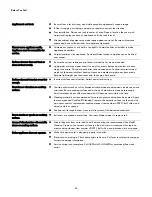
Страница 34: ...temperature before placing food in the oven Use proper rack position for baking needs Set oven temperature 25 F 13 C lower than recommended Cakes not done in center Oven too hot Incorrect pan size Pan...

Страница 35: ...en cavity before starting a self clean cycle Clean using a mild abrasive cleaner following manufacturer s instructions Rinse with clean water dry and replace in oven Oven smokes excessively when broil...

Страница 36: ...r not hot enough Incorrect surface control setting Adjust power level setting Scratches or abrasions on cooktop surface Coarse particles such as salt or hardened soils between cooktop and utensils can...

Страница 37: ...424712 10 20 08 SR Printed in the U S A 02488...

Отзывы: