background image

4 – KEMPPI PRO EVOLUTION PROCOOL 30 / 0532

© KEMPPI OY

A

D

H

J

I

C

F

G

2.   INSTALLATION

2.2.   LOCATING THE MACHINE

2.1.  REMOVAL FROM PACKAGING

The equipment is packed in durable packages specially designed for them. Check the equipment 

before taking it into use, to make sure that the equipment or a part of it have not got damaged 

during the transportation. Also check that the delivery corresponds your order and that you have 

received all the necessary instructions for installing and operating the equipment. The packaging 

material can be recycled.

2.4.  INSTALLATION AND MAIN PARTS

Place the machine on a horizontal, stable and clean ground. Protect the machine from heavy 

rain and burning sunshine. Check that there is enough space for cooling air circulation in front 

of and behind the machine.

The serial number of the machine is marked on the machine CE-marking. Identificating the serial 

number is the only proper means of maintaining and identifying parts for a specific product. It 

is important to make correct reference to the serial number of the product when making repairs 

or ordering spare parts.

2.4.1.   Assembling the equipment

The equipment is assembled in the following order: 

1. Transport unit P40/P40L 

6185264/6185264L 

2. Cooling unit Procool 30 

6262016

Assembly the transport unit according to the instructions in the package. Fasten the cooling unit 

to the transport unit by using the screws and bolts delivered with the equipment.

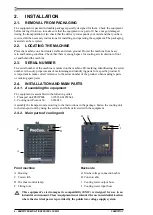
2.4.2.   Main parts of cooling unit

2.3.   SERIAL NUMBER

Front machine

A  Housing
C  Test switch
D  Overheat control lamp
F  Filling hole

Back side

G  Mains voltage connection cable
H  Control cable
I  Cooling water output hose
J  Cooling water input hose

This  equipment’s  electromagnetic  compatibility  (EMC)  is  designed  for  use  in  an 

industrial environment. Class A equipment is not intended for use in residential location 

where the electrical power is provided by the public low-voltage supply system.

Содержание PRO EVOLUTION PROCOOL 30

Страница 1: ...KEMPPI PRO EVOLUTION PROCOOL 30 Operation instructions english Gebrauchsanweisung deutsch Gebruiksaanwijzing nederlands Manuel d utilisation fran ais 1926411E 0532...

Страница 2: ...g the machine 4 2 3 Serial number 4 2 4 Installation and main parts 4 2 4 1 Assembling the equipment 4 2 4 2 Main parts of cooling unit 4 2 5 Preparing for operation 5 3 OPERATION 5 3 1 Cooler operati...

Страница 3: ...stalling operating and servicing the machine Welding arc and spatters Welding arc hurts unprotected eyes Be careful also with re ecting arc ash Welding arc and spatter burn unprotected skin Use safety...

Страница 4: ...i cating the serial number is the only proper means of maintaining and identifying parts for a speci c product It is important to make correct reference to the serial number of the product when making...

Страница 5: ...er pump starts to operate when the welding begins After the welding has stopped the pump will operate 1 to 5 minutes longer depending on the welding time During this time the liquid will cool down to...

Страница 6: ...panel Check the liquid hoses for damages Remove any hose blockages Check water circulation add liquid if needed For further information and assistance contact your nearest Kemppi service workshop 4 4...

Страница 7: ...Power factor 0 42 Control voltage 50 V DC Cooling power 1 25 kW Start pressure max 400 kPa Cooling liquid 20 40 glycol water Reservoir volume ca 3 l Overall dimension length 610 mm width 230 mm height...

Страница 8: ...ntee does not cover direct or indirect travelling costs daily allowances or accommodation Note Under the terms of guarantee welding torches and their consumables feeder drive rolls and feeder guide tu...

Страница 9: ...076 5717 750 Telefax 076 5716 345 e mail sales nl kemppi com KEMPPI UK Ltd Martti Kemppi Building Fraser Road Priory Business Park BEDFORD MK443WH ENGLAND Tel 0845 6444201 Fax 0845 6444202 e mail sale...

Отзывы: