Digital Connectivity Module (DCM)
Operating manual - EN
© Kemppi
10
1921370 / 2212
Страница 1: ...Digital Connectivity Module DCM Operating manual EN DIGITAL CONNECTIVITY MODULE DCM Operating manual Kemppi 1 1921370 2212 ...
Страница 2: ...stalling WeldEye App 12 2 4 Android operating system settings 15 3 Operation 16 3 1 Pairing with mobile device 17 3 2 Settings 18 3 3 Using WeldEye App 21 3 4 During welding 28 3 5 Completing welding tasks with WeldEye App 29 3 6 Synchronizing welding data 30 3 7 Resetting 31 3 8 Disconnecting 32 3 9 Updating DCM 33 4 Technical data 34 5 Ordering codes 35 Kemppi 2 1921370 2212 ...
Страница 3: ...welding equipment MasterMig 353 355 X5 FastMig FastMig KMS FastMig Pulse FastMig M FastMig X Kemparc Kemparc Pulse A7 MIG Welder DCM also supports non Kemppi welding equipment through ARC Euro Adapter CV ARC Saw Adapter and ARC Univer sal Adapter CV TIG Important notes Read the instructions through carefully For your own safety and that of your working environment pay particular atten tion to the ...
Страница 4: ... in this guide is accurate and com plete no liability can be accepted for any errors or omissions Kemppi reserves the right to change the spe cification of the product described at any time without prior notice Do not copy record reproduce or transmit the contents of this guide without prior permission from Kemppi Kemppi 4 1921370 2212 ...
Страница 5: ...ained a Red yellow green Additional notification light A b Green Lit when the power is on B c Blue Blinks infrequently when ready and available blinks more frequently when in beacon mode is lit con tinuously when a mobile device with the WeldEye App is connected C Additional requirements Bluetooth enabled mobile device running Android 6 0 or newer and WeldEye App Internet connection available for ...
Страница 6: ...r distinctive location on the device Quick Response QR code The serial number and other device related identification information may also be saved in the form of a QR code or a barcode on the device Such code can be read by a smartphone camera or with a dedicated code reader device providing fast access to the device specific information Kemppi 6 1921370 2212 ...
Страница 7: ...before the installation is complete Mounting on equipment on the next page Connecting cables on page 11 Installing WeldEye App on page 12 Android operating system settings on page 15 Before installation Check the contents of the packages and make sure the parts are not damaged Kemppi 7 1921370 2212 ...
Страница 8: ...om the DCM device before fixing This way the mounting tape coun terparts are positioned correctly on the installation surface Install the DCM device the connectors facing down This also prevents e g dust and impurities from getting into the connectors Fixing with mounting tape 1 Clean the installation surface where the DCM device is to be fixed 2 Remove the cover wrappings from the mounting tape c...
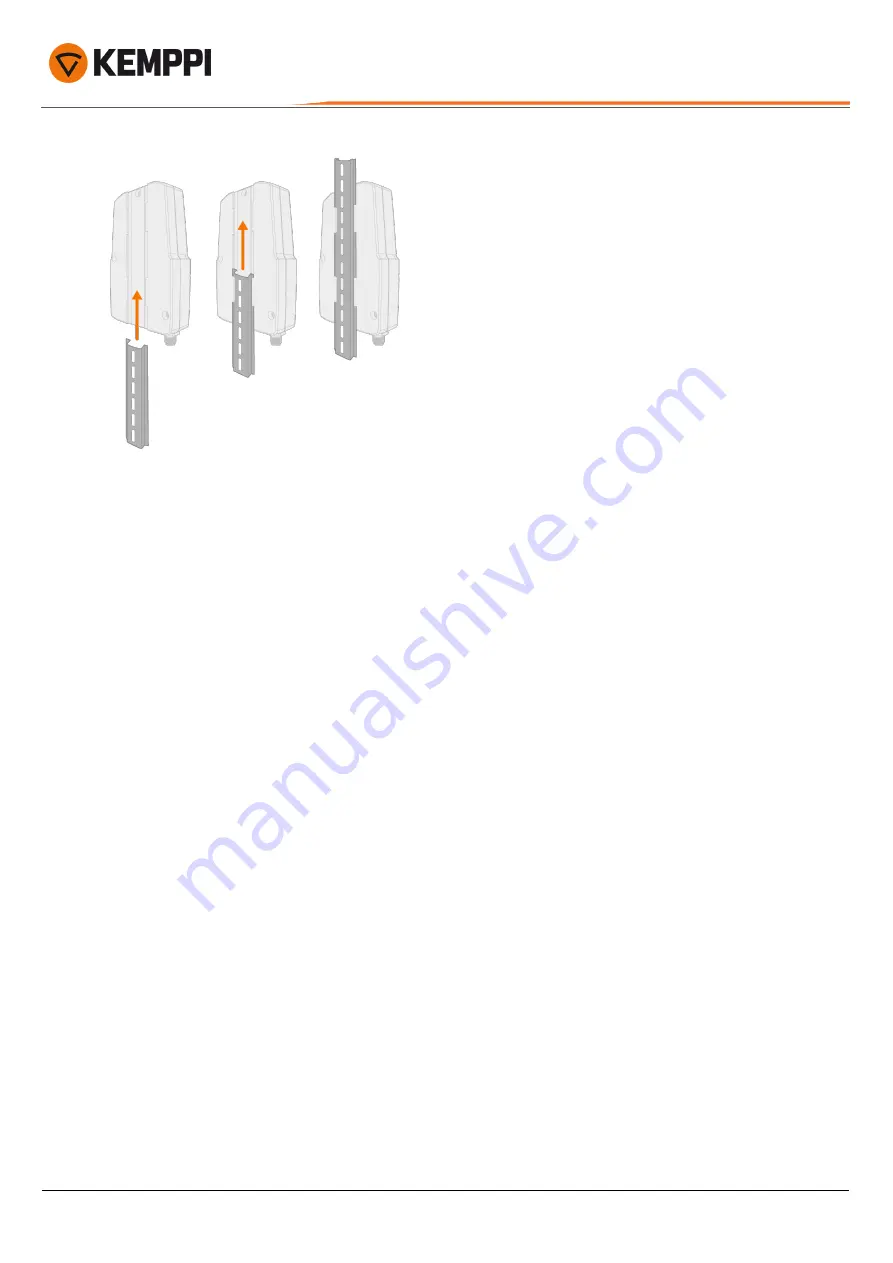
Страница 9: ...pes it is now possible to detach and attach the DCM device if needed Mounting on DIN rail optional Note that the rail installation typically requires drilling fixing holes on the fixing surface for the rail itself This is not covered by this instruction The rear of the DCM box has a groove for the standard DIN rail fixing Kemppi 9 1921370 2212 ...
Страница 10: ...Digital Connectivity Module DCM Operating manual EN Kemppi 10 1921370 2212 ...
Страница 11: ...only the CAN cable to be connected Unused DCM connectors are covered Leave the covers in place 1 Connect the CAN cable to the power source or to the wire feeder 2 Connect the other end of the CAN cable to the DCM box Secure the cable by turning the cable coupling firmly on the connector threads Kemppi 11 1921370 2212 ...
Страница 12: ...Install the application 3 Open the application and sign in Signing in with WeldEye credentials Select Sign in Select Log in manually with email and password Enter the email address and password associated with your WeldEye account Logging in using a QR code On a computer sign in to your WeldEye welding management software cloud In your WeldEye welding management software browse to Administration M...
Страница 13: ...and aim the mobile device s camera at the QR code on the computer screen Once the login process is completed the mobile device as well as the welding equipment connected to the WeldEye App are associated with your organization in the WeldEye welding management software Kemppi 13 1921370 2212 ...
Страница 14: ...oid operating system s power saving and optimizing features for the WeldEye application Otherwise the operating system may shut down the WeldEye App processes on the mobile device and therefore prevent welding data transmission See Android operating system set tings on the next page for more instructions Kemppi 14 1921370 2212 ...
Страница 15: ...unt of Android mobile device makes and models these instructions are only for generic ref erence For a specific Android device model please refer to the device manufacturer s instructions 1 Access your Android mobile device s settings and go to Apps 2 Select the WeldEye application on the list 3 Go to the Battery settings 4 Go to the Optimize battery usage settings 5 Disable the battery optimizati...
Страница 16: ...g with mobile device on the next page Settings on page 18 Using WeldEye App on page 21 During welding on page 28 Completing welding tasks with WeldEye App on page 29 Synchronizing welding data on page 30 Resetting on page 31 Disconnecting on page 32 Kemppi 16 1921370 2212 ...
Страница 17: ...our mobile device and select Click to connect WeldEye App automatically starts searching available DCM devices 3 On the list select the DCM and welding equipment you wish to connect to If there are several DCM boxes available to choose from and you are uncertain which is which you can press the function button on the DCM box briefly 1 sec to turn on its Bluetooth beacon A blue indicator is shown n...
Страница 18: ... Diagnostics on the next page settings in the WeldEye App can be accessed by clicking the settings icon at the top of the home view Cable compensation 1 Click EDIT to access the cable compensation adjustment 2 Select a value for adjusting by clicking on the corresponding row Kemppi 18 1921370 2212 ...
Страница 19: ...s This settings view includes information on application version connected organization device information used net work connection and available memory for example In the diagnostics view you can also select the log level INFO for basic information and DEBUG for collecting all inform ation available and export log files Kemppi 19 1921370 2212 ...
Страница 20: ...perating manual EN To export log files Select Export log files Once WeldEye App has finished sending the log information the log s ID string is shown for later reference Select Close to exit the log export dialog Kemppi 20 1921370 2212 ...
Страница 21: ...tion WPS on page 24 Selecting filler material on page 26 Selecting shielding gas on page 27 Selecting user welder 1 Click the welder icon 2 Select the user welder on the list Selecting reason code By default WeldEye App uses Working as a reason code to describe the current status With this selection it is also pos sible to report breaks etc as applicable 1 Click the reason code row Kemppi 21 19213...
Страница 22: ...or the current situation The selected reason code is applied immediately once selected and a time counter is started No reason code returns the status to Working Selecting work order 1 Click Select work order 2 Search and or choose a work order on the work order list Kemppi 22 1921370 2212 ...
Страница 23: ...nual EN 3 Choose a weld on the work order or click Select work order to continue without selecting a specific weld If a Weld ing Procedure Specification WPS is saved for the selected weld the WPS is automatically activated Kemppi 23 1921370 2212 ...
Страница 24: ...shielding gas used Recommendations for both are then sourced from the WPS 1 Click the WPS icon 2 As necessary filter the available WPSes on the list based on welded material material thickness joint type or weld ing process for example Sort the items in alphabetical order or based on the date 3 Click on a WPS to see its details and to select it 4 Select the WPS by clicking Select WPS Kemppi 24 192...
Страница 25: ...asic information of the selected WPS is also shown in the home view For more detailed WPS information click the info i symbol on the right The weld pass in the selected WPS can be changed by clicking the WPS pass number in the home view Kemppi 25 1921370 2212 ...
Страница 26: ...ion WPS is already selected and if the WPS includes a recommendation for the filler material the recommended filler material is shown first on the list 3 Click Enter filler batch number and enter the filler material batch number manually or read the barcode with the WeldEye App Adding the filler material batch information improves traceability later on Kemppi 26 1921370 2212 ...
Страница 27: ... Welding Procedure Specification WPS is already selected and if the WPS includes a recommendation for the shielding gas the recommended shielding gas is shown first on the list DCM and WeldEye App are now ready to record your welding data Tip You can always return to the home view by clicking the HOME button at the top Kemppi 27 1921370 2212 ...
Страница 28: ...During welding the WeldEye App displays an informative visualization of the welding parameters and weld progress This view is for informational purposes only The settings and parameter values shown cannot be changed during welding in the WeldEye App Kemppi 28 1921370 2212 ...
Страница 29: ...ng manual EN 3 5 Completing welding tasks with WeldEye App 1 In the home view select the work order or weld for completion 2 At the bottom of the view select Complete work order weld depending on the previous selection Kemppi 29 1921370 2212 ...
Страница 30: ...is automatically synchronized Note that the synchronization with the WeldEye welding management soft ware cloud requires a working internet connection Once the welding data has been synchronized it is automatically erased from the DCM and stored in WeldEye Other wise the DCM stores the welding data for two weeks After that the data is automatically erased from the device memory Kemppi 30 1921370 2...
Страница 31: ...le Blue LED blinks infrequently 2 Press the button on the DCM box for 30 seconds After the first 10 seconds the leftmost LED turns red After 20 seconds the leftmost LED turns yellow After 30 seconds the leftmost LED turns green 3 When the leftmost LED is lit in green release the button Now the factory settings have been restored and the welding data erased from the memory Kemppi 31 1921370 2212 ...
Страница 32: ... 3 8 Disconnecting You can disconnect the WeldEye App from the DCM and connected welding equipment 1 In the home view select the currently connected equipment 2 Click Disconnect to disconnect from the currently connected equipment Kemppi 32 1921370 2212 ...
Страница 33: ...e D 5 Remove the USB memory stick from the computer Install update 1 Start the welding machine attached to the DCM and wait approx 10 seconds until the DCM is on standby 2 Insert the USB memory stick to the DCM s USB connector A green light starts to blink slowly 3 Wait until the green light starts to blink rapidly 4 Remove the USB memory stick from the DCM s USB connector DCM will automatically r...
Страница 34: ... Operating temperature range 20 40 C Degree of protection IP class IP24 External dimensions LxWxH 30 x 104 x 171 Weight without accessories 0 235 kg Wireless communication type Bluetooth 4 2 2 4 GHz dual mode Wired communication type CAN USB Ethernet Standards IEC 60974 1 2012 IEC 60974 10 2014 A1 Kemppi 34 1921370 2212 ...
Страница 35: ...Digital Connectivity Module DCM Operating manual EN 5 ORDERING CODES Product Ordering code Digital Connectivity Module DCM 6265051 Kemppi 35 1921370 2212 ...