background image

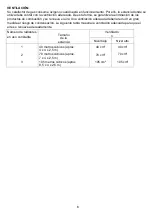
VENTILACIÓN: 

Su calefactor de gas consume oxígeno cuando está en funcionamiento. Por ello, la estancia donde se 

utiliza debe contar con la ventilación adecuada. De esta forma, se garantiza la eliminación de los 

productos de combustión y se renueva el aire. Una ventilación adecuada debería reducir en gran 

medida el riesgo de condensación. La siguiente tabla muestra la ventilación adecuada para que el 

aire se renueve adecuadamente. 
Número de radiantes 
en uso constante 

Tamaño 

de la 

estancia 

Ventilació

Nivel bajo 

Nivel alto 

40 metros cúbicos (aprox. 

4 x 4 x 2,5 m) 

40 cm² 

40 cm² 

70 metros cúbicos (aprox. 

7 x 4 x 2,5 m) 

70 cm² 

70 cm² 

105 metros cúbicos (aprox. 

8,5 x 4 x 2,5 m) 

105 cm² 

105 cm² 

Содержание NOVA SLIM

Страница 1: ...Manual de instrucciones Instruction manual REF KT0655 ESTUFA DE GAS INTERIOR NOVA SLIM ...

Страница 2: ...es Este aparato no debe utilizarse en sótanos subterráneos o en vehículos recreativos como caravanas y autocaravanas No instale el aparato en apartamentos de edificios de torre sótanos baños o en habitaciones cerradas No coloque objetos inflamables telas cortinas etc sobre o contra el aparato No almacene productos químicos o materiales inflamables o aerosoles cerca de esta unidad No utilice este a...

Страница 3: ...dro de gas en sentido horario Gírelo solo a mano No utilice una llave de ajuste Atornille hasta que la tuerca esté completamente encajada 4 PRUEBA IMPORTANTE para detectar fugas Esta prueba debe realizarse en una zona bien ventilada sin llamas abiertas u otras fuentes de ignición Con el regulador conectado al cilindro gire la válvula del cilindro de gas una vuelta y media en sentido antihorario Ce...

Страница 4: ...máx 4 2 kW 305 g h Caudal medio 2 8 kW 205 g h Caudal mínimo 1 6 kW 117 g h Tres inyectores con un diámetro de 0 59 mm Encendido piezoeléctrico Dispositivo de seguridad ODS 1112 A Cilindro de gas 10 kg máx Capacidad de calentamiento del cuarzo 400 800 1200 W Voltaje frecuencia 220 240 V 50 60 HZ INSTRUCCIONES DE INSTALACIÓN l Saque el aparato del embalaje l Monte las diferentes partes del aparato ...

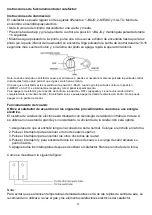
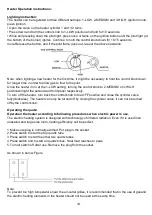
Страница 5: ...ra apagar el calefactor gire la perilla de control a la posición OFF apagado y cierre la válvula del cilindro completamente en sentido horario El calefactor solo se puede apagar cerrando la válvula del cilindro No se puede apagar con la perilla de control Funcionamiento del cuarzo Utilice el calefactor de acuerdo con los siguientes procedimientos cuando se use energía eléctrica El sistema de calef...

Страница 6: ... 5 m de las paredes La parte delantera de la unidad debe contar con al menos 2 metros de espacio libre delante SUSTITUCIÓN DEL CILINDRO DE GAS La sustitución del cilindro de gas debe realizarse en una estancia no inflamable y bien ventilada El aparato debe estar apagado Cierre la válvula del cilindro Desconecte y retire el regulador del cilindro Sustituya el cilindro vacío por un cilindro de gas l...

Страница 7: ...ueva el aire Una ventilación adecuada debería reducir en gran medida el riesgo de condensación La siguiente tabla muestra la ventilación adecuada para que el aire se renueve adecuadamente Número de radiantes en uso constante Tamaño de la estancia Ventilació n Nivel bajo Nivel alto 1 40 metros cúbicos aprox 4 x 4 x 2 5 m 40 cm 40 cm 2 70 metros cúbicos aprox 7 x 4 x 2 5 m 70 cm 70 cm 3 105 metros c...

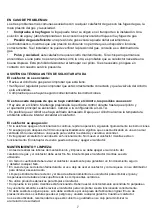
Страница 8: ...tes de intentar encender el calefactor El calefactor se apaga solo Si la estufa se apaga en funcionamiento continuo repita la operación siguiendo rigurosamente las instrucciones Si se apaga poco después de 30 minutos aproximadamente significa que se está utilizando en una zona mal ventilada Abra una ventana o una puerta para ventilar la estancia y vuélvalo a encender Evite golpear el calefactor cu...

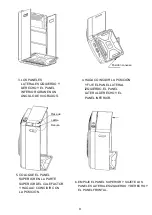
Страница 9: ...dros en un sótano o ático El calefactor debe almacenarse en un lugar seco y protegido del polvo preferiblemente guárdelo en su embalaje original Diagramas de montaje LISTA DE EMBALAJE DE PIEZAS DE REPUESTO DENTRO DEL PAQUETE 1 PANEL SUPERIOR PANEL TRASERO 2 5 RUEDAS 3 TORNILLOS 4 HERRAMIENTAS DE INSTALACIÓN DESTORNILLADOR Y LLAVE 1 RETIRE EL CALEFACTOR DEL EMBALAJE Y ALCANCE EL TORNILLO LA RUEDECI...

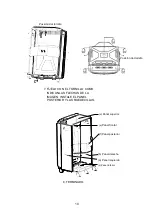
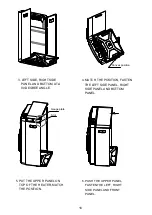
Страница 10: ...A COINCIDIR LA POSICIÓN Y FIJE EL PANEL LATERAL IZQUIERDO EL PANEL LATERAL DERECHO Y EL PANEL INFERIOR Placa de calibre Ranura 5 COLOQUE EL PANEL SUPERIOR EN LA PARTE SUPERIOR DEL CALEFACTOR Y HÁGALO COINCIDIR CON LA POSICIÓN 6 EMPUJE EL PANEL SUPERIOR Y SUJETE LOS PANELES LATERALES IZQUIERDO Y DERECHO Y EL PANEL FRONTAL ...

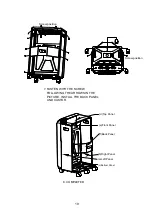
Страница 11: ... del tornillo 7 FÍJELO CON EL TORNILLO COMO INDICAN LAS FLECHAS DE LA IMAGEN INSTALE EL PANEL POSTERIOR Y LAS RUEDECILLAS d Panel superior e Panel frontal f Panel posterior b Panel derecho a Panel izquierdo c Panel inferior 8 TERMINADO ...

Страница 12: ...be used in cellars underground or iin recreational vehicles such as caravans and camp cars caravans Do no install the appliance in apartments of tower buildings basements bathroonms or in enclosed rooms Do not place flammable objects fabrics curtains etc On or against the appliance Do not store chemicals or flammable materials or aerosols near this unit Do not operate this appliacne in a flammable...

Страница 13: ...gulator onto the outlet of the gas cylinder valve clockwise Turn by hand only Do not use a spanner Screw on until the nut is fully home 4 IMPORTANT TEST for leaks This must be carried out in a well ventilated area free from any open flames or other sources of ignition With the regulator connected to the cylinder turn on the gas cylinder valve 1 and 1 2 turns anti clockwise Brush all hose connectio...

Страница 14: ... 4 2 kW 305 g h Average flow 2 8 kW 205 g h Minimum flow rate 1 6 kW 117 g h 3 injectors with a diameter of 0 59 mm Ignition piezo electric Safety device ODS 1112A Gas Cylinder 10 kg Max Quartz heating capacity 400 800 1200W Valtage Frequency 220 240V 50 60HZ INSTRUCTIONS FOR INSTALLATION Remove the appliance from its packaging Mount the different parts of the appliance according to the illustrati...

Страница 15: ... light the second and third panel respectively To turn off the heater turn back the control knob to the OFF position and close the cylinder valve fully clockwise The heater can only be turned off by closing the cylinder valve It can not be turned offby the control knob Operating the quatz Operation the heater according to following procedures when electric power is use The electric heating system ...

Страница 16: ...empty cylinder with a full gas cylinder checking that the seal is in good condition and that the hose is in good condition and is not bent or crushed or in contact with the hot surfaces of the unit Gently open the cylinder valve and check for leaks no leakage with soapy water In the event of leakage bubbles close the cylinder valve and eliminate leaks If not call a qualified technician VENTILATION...

Страница 17: ... reach room temperature before attempting to start the heater The heater turns off by itself If the heater goes out on continuous working repeat the operation following the instructions faithfully If it goes out soon after 30 minutes or so it means that it is operated in a badly ventilated area Open a window or a door to ventilate the area and reignite Avoid bumping the heater in operation Don t m...

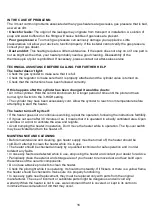
Страница 18: ... stored in a dry place and protected from dust even better store it in its original packaging Assembly diagrams PACKING LIST OF SPAREPART INSIDE THE PACKAGE 1 UPPER PANEL BACK PANEL 2 5 WHEELS 3 SCREWS 4 INSTALL TOOLS SCREW DRIVER AND WRENCH 1 REMOVE THE HEATER FROM THE PACKAGE PICK UP THE SCREW CASTOR AND THE BACK PANEL 17 Push Down Locate 2 LEFT SIDE AND RIGHT SIDE PANEL TURN OUSIDE AT A 10 DEGR...

Страница 19: ...ANGLE 18 4 MATCH THE POSITION FASTEN 5 PUT THE UPPER PANEL ON THE LEFT SIDE PANEL RIGHT TOP OF THE HEATER MATCH SIDE PANEL AND BOTTOM THE POSITION PANEL 6 PUSH THE UPPER PANEL FASTEN THE LEFT RIGHT SIDE PANEL AND FRONT PANEL Convex position Gauge plate Slot ...

Страница 20: ...WITH THE SCREW FOLLOWING THE ARROWS IN THE PICTURE INSTALL THE BACK PANEL AND CASTOR 19 d Top Panel e Front Panel f Back Panel b Right Panel a Left Panel c Bottom Panel Screw position Screw position 8 COMPLETED ...

Страница 21: ...oreras 1 Naves 7 10 Pol Ind Camporrosso Sur 28350 Madrid España Oficina Tel 34 911 34 50 46 Email info kovyx com Servicio Post Venta Tel 34 918 09 62 29 Email spv kovyx com Av de Andalucía 208 28341 Valdemoro Madrid www kovyx com ...

Отзывы: