2.0 Getting Started
This section will cover information that will help get started with the SoftStep (What? No way!). We will
introduce the SoftStep hardware, the MIDI Expander hardware, and how to connect the SoftStep to the
world.
2.1 SoftStep Hardware
The SoftStep hardware!!!
2.1.1 Overview
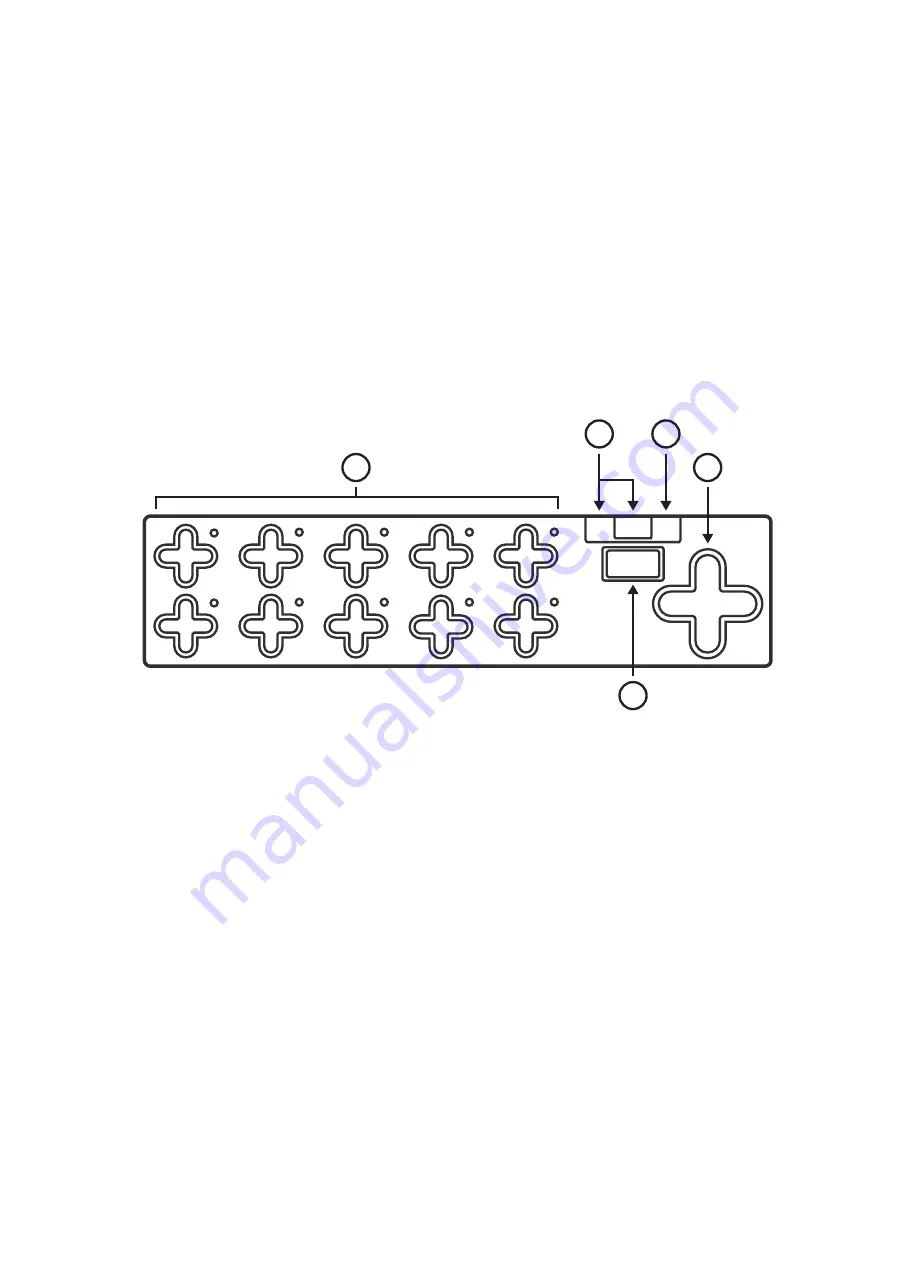
(1) Keys
Keys are where the action happens. Step on these to make the SoftStep perform itÕs deÞned
functions.
Each key has a green and red LED (at the northeast corner of the key) for visual feedback.
(2) Nav Pad
Short for “navigation pad”. Press left or right to change presets. Up/Down can be programmed to
perform a number of different functions.
(3) Display
Used for visual feedback. The SoftStep’s display can show what preset is currently loaded, the
name of an activated key, and real-time parameter values.
(4) USB Ports
Used to connect SoftStep to the MIDI world. Connect a KMI MIDI Expander using the Expand port
(mini-USB) or connect to a computer/tablet via the main USB port (the big one).
1
6
2
7
3
8
4
9
5
0
V
V
V
V
!"#$
!
"
#
$
%
Getting Started 11
この章には、SoftStep を使い始めるにあたって役立つ情報が収録されています。具体的には、SoftStep 本体と
MIDI Expander 本体の紹介と、SoftStep を外の世界と接続する方法についての解説です。
はじめに
まずは SoftStep 本体です!
SoftStep 本体
本体の概要
(1)キー
この部分でほとんどの操作を行います。これらのキーを踏むと、それぞれに割り当てた機能が動作します。
それぞれのキーには、緑や赤に光る LED が対応しており(キーの右上にあります)、視覚的にも動作を確認
できます。
(2)ナブ・パッド
「ナビゲーション・パッド」の短縮形で、左右の部分を踏むとプリセットが切り替わります。
上下の部分には、プログラムで様々な機能を割り当てることができます。
(3)ディスプレイ
動作状況を視覚的に確認するのに使います。SoftStep のディスプレイには、呼出し中のプリセットや動作中
のキー、リアルタイムのパラメーター値が表示されます。
(4)USB ポート
SoftStep を MIDI の環境に接続します。「Expand」(mini-USB)ポートには KMI MIDI Expander、メインの
USB ポート(大きな方)にはコンピューターやタブレットをそれぞれ接続します。
Содержание SoftStep
Страница 10: ...Getting Started 10 Getting Started Keith McMillen 1 6 2 7 3 8 4 9 5 0 V V V V STEP SoftStep Z ...
Страница 21: ...Basic Editor 21 Basic Editor ...
Страница 31: ...Advanced Editor 31 Advanced Editor ...
Страница 53: ...Appendix 53 Keith McMillen 1 6 2 7 3 8 4 9 5 0 V V V V STEP SoftStep Z Appendix ...


