background image

STEP 1

: Connect the helmet with the computer.

Turn on the smart helmet, unplug the connection cable between

the thermal imaging module and the computer, and plug the included

TYPE-C data cable to connect the computer and the smart helmet.

STEP 2

: Projection

Open

Scrcpy1.8

, and project the AR display to the computer

screen;

STEP 3

: Change the USB connection to

File Transfer"

Double-click the menu bar on the upper right of the projection

screen to pop up the system settings menu. Select the connection
method as

File Transfer

at the bottom of the system settings menu

bar , and the system will exit the projection mode;

STEP 4:

Select

KCPH2

in

My Computer

to open the

helmet storage folder, and then open the file path of the face database:

\KcUvcCamera\video;

STEP 5:

Copy the videos in the folder and paste to the

destination folder on your desktop computer to export the videos.

4.9. Power down

To shut down the helmet after use, press the Power button for

three seconds.

26

Содержание N901

Страница 1: ...Smart Helmet N901 User Manual Release Version V1 09...

Страница 2: ...N 13 4 5 SELECTION OF COLOR PALETTE 14 4 6 WORKING MODES 14 4 6 1 SINGLE PERSON TEMPERATURE MEASUREMENT MODE 15 4 6 2 LARGE CROWD TEMPERATURE MEASUREMENT MODE 16 4 6 3 QR CODE TEMPERATURE MEASUREMENT...

Страница 3: ...1 4 THERMAL IMAGING SCREEN IS STUCK OR GHOSTING OR SMEARING 28 6 1 5 SHORT BATTERY LIFE 28 6 1 6 NO HEADPHONES OUTPUT 29 6 2 FUNCTIONALAND OPERATIONAL FAQ 29 6 2 1 QUESTIONS ABOUT BATTERY 29 6 2 2 QUE...

Страница 4: ...before using the KC Smart Helmet N901 All illustrations in this manual are for reference only please refer to the actual product Due to the differences of the field environment the functions described...

Страница 5: ...ology It is the first to implement mobile deployment based control scenarios The unaware and contactless temperature measurement is portable safe and effective in epidemic prevention Figure 1 Appearan...

Страница 6: ...haracterized by large field of view high resolution high definition high contrast small blind spot large scale eye movement and natural appearance Lightweight The helmet is made of the advanced compos...

Страница 7: ...0 Field of view Resolution 78 1080P 30fps Data Communication Wi Fi Dual Frequency IEEE 802 11 b g n 2 4GHz 5GHz Bluetooth BT 4 2 backward compatible with 3 0 2 1 supporting BLE Electrical Characteris...

Страница 8: ...3 Note In the temperature measurement mode the battery life as AR display always on is about 5 hours and can be extended to 8 hours by turning off the screen 2 4 Product Composition KC smart helmet N9...

Страница 9: ...etooth key TYPE C port Safty goggles AR display module Strap Microphone port SIM card slot Power indicator Power on key Microphone Strap Buckle Volume button Mounts of Thermal imaging module 8 19 Head...

Страница 10: ...ight monocular only which is fixed to the interior of the safety goggles The position of AR display screen can be fine tuned by adjusting the arms of the AR glasses to ensure that the AR display scree...

Страница 11: ...Figure3 The appearance of AR glasses and safety goggles Figure 4 Retracted State of safety goggles 10...

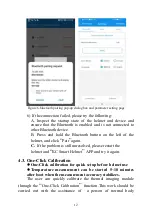
Страница 12: ...ooth button on the left of the helmet 2 Turn on bluetooth on the smart phone 3 Open KC Smart Helmet App 4 Click the icon in the top right to search the Bluetooth device nearby and find the correspondi...

Страница 13: ...eft of the helmet and click Pair again C If the problem is still unresolved please restart the helmet and KC Smart Helmet APP and try it again 4 3 One Click Calibration One Click calibration for quick...

Страница 14: ...ibration parameter has a great influence on the measurement precision so the calibration parameter should be reset when the precision has a large error during the use This work should be carried out w...

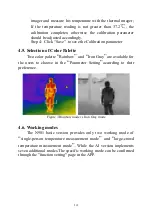
Страница 15: ...te Two color palette Rainbow and Iron Gray are available for the users to choose in the Parameter Setting according to their preference Figure 7 Rainbow mode vs Iron Gray mode 4 6 Working modes The N9...

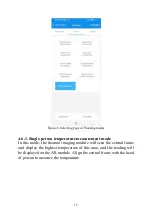
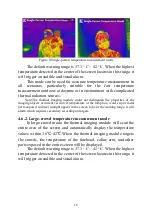
Страница 16: ...ture measurement mode In this mode the thermal imaging module will scan the central frame and display the highest temperature of this area and the reading will be displayed on the AR module Align the...

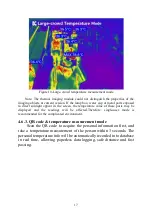
Страница 17: ...current version If temperature of the lamp box water cup or metal parts exposed to direct sunlight appear in the screen to be in the warning range it will alarm which requires secondary screening on t...

Страница 18: ...value of these parts may be displayed and the readings will be affected Therefore single user mode is recommended for the complicated environment 4 6 3 QR code temperature measurement mode Scan the QR...

Страница 19: ...recognition mode Scan the QR code by helmet to automatically record personal info into the database allowing paperless data logging Figure 12 QR code recognition mode 4 6 5 License plate recognition m...

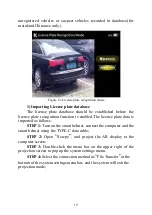
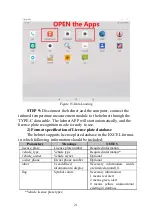
Страница 20: ...he license plate data is imported as follows STEP 1 Turn on the smart helmet connect the computer and the smart helmet using the TYPE C data cable STEP 2 Open Scrcpy and project the AR display to the...

Страница 21: ...opy and paste the EXCEL files containing the license plate information into this folder Support import of up to 15 EXCEL files at a time STEP 7 Use the Scrcpy software to project again STEP 8 Click KC...

Страница 22: ...ate database in the EXCEL format in which following information should be included Parameters license_plate vehicle_type vehicle_owner owner_phone other Meanings License plate number Vehicle type Vehi...

Страница 23: ...e recognition temperature measurement mode Recognize the vehicle license plate identify and alert unregistered vehicles or suspect vehicles recorded in database for mainland China use only Besides thi...

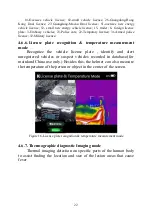
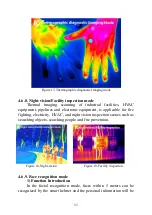
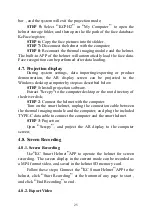
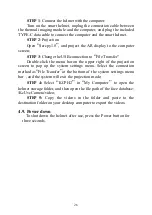
Страница 24: ...ment is applicable for fire fighting electricity HVAC and night vision inspection scenes such as searching objects searching people and fire prevention Figure 18 Night vision Figure 19 Facility inspec...

Страница 25: ...he name or ID will be displayed on the AR screen as a face recognition result STEP 2 Connect the helmet with the computer Turn on the smart helmet unplug the connection cable between the thermal imagi...

Страница 26: ...ibed below STEP 1 Install projection software Extract Scrcpy to the computer desktop or the root directory of the driver disk STEP 2 Connect the helmet with the computer Turn on the smart helmet unplu...

Страница 27: ...k the menu bar on the upper right of the projection screen to pop up the system settings menu Select the connection method as File Transfer at the bottom of the system settings menu bar and the system...

Страница 28: ...rmation discoloration bulging and leakage during use charging or storage please stop using the battery immediately and contact the service center for battery replacement to avoid safety problems 5 2 M...

Страница 29: ...et is turned off due to maloperation Press and hold the power button for 3 seconds to restart 3 If press and hold the power button cannot turn the helmet on and the power indicator light is steady red...

Страница 30: ...rmal check the appearance of the headphones for damage If the headphones are damaged please contact the after sales service for replacement 3 If the headphones are not damaged reboot the system and tr...

Страница 31: ...e AR glasses is limited large range adjustment of the AR glasses on the safety goggles should be avoided If the AR glasses require a wide adjustment range the AR glasses should be adjusted after the h...

Страница 32: ...ance 7 2 Customer service policy under warranty 1 The warranty period of the product is 1 year from the date of product acceptance During the warranty period the company is responsible for free repair...

Отзывы: