background image

U t i l i s a t i o n   e t   M a i n t e n a n c e


|


Optima

39

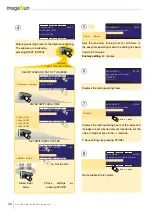
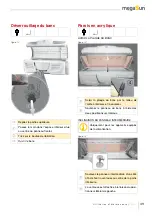
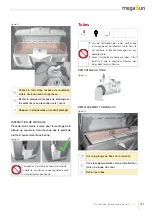
Déverrouillage du banc

Figure 12

Repliez la partie supérieure.

Passez la main dans l’espace inférieur situé 
au centre du panneau frontal.

Tirez sur le bouton de libération.

Ouvrir le banc.

Parois en acrylique

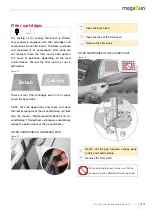
UVRIR LA PLAQUE DU BANC

Figure 13

Saisir  la  plaque  du  banc  par  le  milieu  de 

l’arête antérieure et la soulever.

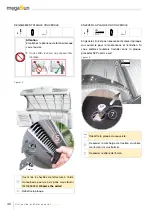
Soutenez  le  panneau  du  banc 

à  l’aide  des 

deux positionneurs latéraux.

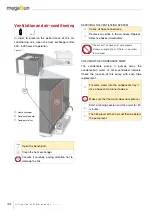
INCLINAISON DU PANNEAU INTERMÉDIAIRE 

Uniquement  pour  les  appareils  équipés 
de la climatisation.

Figure 14

Soulevez le panneau intermédiair

e d’un côté 

afi n de fi xer la ventouse au centre de la partie 

inférieure.

La ventouse est attachée à la liaison du posi-

tionneur latéral de gauche. 

Содержание megaSun Optima

Страница 1: ...Utilisation et Maintenance ...

Страница 2: ......

Страница 3: ...uelles et à l exclusion de toute responsabilité L équipement technique et la réalisation des appareils sont conformes aux prescriptions légales du pays de l exploitant concerné L exportation ou l exploitation des appareils mentionnés dans ce mode d emploi sont interdites respectivement aux États Unis et au Canada Dans un tel cas la société KBL AG n assume aucune responsabilité du fabricant Nous at...

Страница 4: ...age 14 Indications pour l utilisateur 14 Temps d exposition 15 Mode bronzage 16 Début de la séance de bronzage 16 Commande pendant la séance de bronzage 16 Élément de commande modulaire 17 Fonctions subalternes 17 Fonctions de base 17 Présentation des fonctions 18 Standby mode service mode 20 Layout of the display numbers 20 Switching the decorative lighting on and off 20 Collagen boosters in stan...

Страница 5: ...ar exemple avec un chariot à roulettes jusqu au lieu prévu pour l installation En fonction de leur poids les éléments doivent être transportés par plusieurs personnes Mise au rebut de l ancien équipement Cet appareil contient des composants qui ne peuvent pas être jetés avec les ordures ménagères Mettez au rebut votre ancien équipement de manière écologique à la fin de sa vie utile Les métaux et l...

Страница 6: ...us avec un diamètre supérieur ou égal à 2 millimètres En cas de doute il est impératif de consulter un médecin Personnes ayant souffert dans leur enfance de plusieurs coups de soleil graves Personnes ayant les cheveux naturellement roux Personnes ne bronzant pas du tout ou ne pouvant pas bronzer sans avoir un coup de soleil Personnes prédisposées aux coups de soleil En outre l appareil n a pas été...

Страница 7: ...vêtements ou des vitres en acrylic glass démontés L appareil doit être commandé par un minuteur qui soit conforme aux normes en vigueur Respectez absolument tous les intervalles de maintenance indiqués dans le programme de maintenance Dans le cas des appareils pour position allongée respectez la limite de capacité de charge de la vitre de couchage Temps d exposition Les temps d exposition doivent ...

Страница 8: ...gène max 90 et le panneau de commandes La base contenant 16 tubes et l unité électro nique Selon le modèle d autres composants disponibles en option peuvent également être présents 1 Partie supérieure 2 Barre de verrouillage avec les verrous pour le panneau supérieur 3 Panneau de commandes 4 Booster de collagèn 5 Console audio avec système de sonorisa tion équipement en option 6 Banc dalle 7 Tube ...

Страница 9: ...type Typ ABB F 204 A 40 0 03 AP R Should the operation of the tanning unit cause any interference in the power supply network e g with ripple control systems TRA consult your power supply company to have corresponding blocking elements audio frequency suppressors installed Figure 2 Connecting an external audio source When connecting an external audio source studio music pay attention to the correc...

Страница 10: ... of the audio signal This connection must be made by trained service staff EXTERNAL PLAYERS HEAD EARPHONES A line connection has been integrated into the au dio module so that the sunbed user can connect his or her own player such as an MP3 player an iPod etc Take hold of the jack plug and pull the ca ble out of the opening Then connect the jack plug to the earphone jack of your player Then select...

Страница 11: ...ns supplied with the timer The following diagram shows the wiring requirements with regard to the timer The door contact is required if you have opted for the booth scenting feature Figure 9 aquaCool and Aroma connections AQUACOOL The aquaCool box is equipped with a liquid level sensor as well as with a connection to the aquaCool canister Furthermore the box houses the compressor ensuring the comp...

Страница 12: ...n t e n a n c e 12 AROMA The Aroma box is attached within the aquaCool box and equipped with three hose connections one for the compressed air supply and two leading to the Aroma nozzles Figure 11 5 Aroma box inlet 6 Aroma box outlets ...

Страница 13: ...contraire aucun effet ne peut être obtenu Rangez le manuel de manière à ce qu il reste toujours accessible Modes opératoires Nous présenterons ci après trois modes opératoires différents MODE VEILLE STAND BY L objet est au repos il est branché mais n est pas utilisé Les tubes sont éteints Le mode bronzage ainsi que le mode maintenance sont activés depuis le mode veille MODE BRONZAGE Les tubes sont...

Страница 14: ... évité Les rayons UV émanant du soleil ou d appareils de bronzage peuvent endommager irréversiblement la peau et les yeux Ces effets biologiques dépendent de la qualité et de la quantité des rayons reçus ainsi que de la sensibilité de la peau de chaque personne Si vous êtes particulièrement sensible ou présen tez des réaction allergiques aux UV il est impératif de consulter un médecin avant de com...

Страница 15: ... des intervalles de temps conformes à ceux indiqués dans le chapitre Maintenance Équipement de tubes voir tableau Données techniques PLAN DE BRONZAGE UE correspondant au Type III d UV et à 0 3W m2 conformément à EN 60335 2 27 Types de peau I II III IV V VI 1 Séance 6 min 6 min 6 min 6 min 6 min 6 min 2 Séance 6 min 7 min 7 min 8 min 10 min 11 min 3 Séance 7 min 7 min 9 min 10 min 14 min 17 min 4 S...

Страница 16: ...ie est défectueuse Respecter les durées préconisées dans le plan de bronzage Les fonctions présentées ci dessous se réfèrent aux solariums entièrement équipés Début de la séance de bronzage La séance de bronzage démarre automatiquement une fois la durée de mise en route paramétrée dans la minuterie écoulée Pendant cette mise en route le bronzage peut être immédiatement déclenché en mode manuel en ...

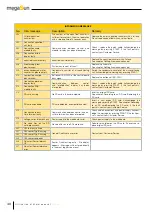
Страница 17: ...éférence à un lit de bronzage entièrement équipé Si vous avez choisi un équipement plus simple les fonctions des éléments de fonc tionnement variables prennent auto matiquement la place de la fonction de base manquante Élément de commande modulaire Fonctions subalternes Fonctions de base Prémisse Il faut toutefois que les fonctions soient disponibles et activées dans le menu Service Au cours de la...

Страница 18: ...tion aquaCool est automatiquement activée marche arrêt Climatisation Après l arrêt un blocage empêchant la mise en marche est actif pendant 3 minutes pour des raisons de sécurité Si pendant ce temps la climatisation est activée la demande est enregistrée La mise en marche est alors automatique mais différée une fois la durée du blocage écoulée Si le réservoir à eau de condensation est plein le sym...

Страница 19: ...oit supérieur à 1 MP3 externe AUX Le module audio du lit de bronzage est équipé d un câble doté d une prise jack de 3 5 mm permettant d utiliser des lecteurs externes tels que des lecteurs MP3 iPods etc Ce câble vous permet de connecter la prise écouteur de votre propre lecteur au solarium Le choix des titres se fait ici via les éléments de commande du lecteur externe Canal Canal SCHÉMA ACTIVATION...

Страница 20: ...ns Simply enter the corresponding sequence of numbers on the display 1 2 3 4 5 0 9 8 7 6 Switching the decorative lighting on and off 5 0 5 NOTE The connection times of the decorative lighting can be set in the service menu individually for each day of the week There are two independent connection periods A and B available for each day of the week Collagen boosters in standby mode In standby mode ...

Страница 21: ...ons on and off and to modify values Press 3 STORE to save all modifications made in all menu items Press 8 EXIT to go back to the previous menu level or to exit the service menu ON STORE UP EXIT ENTER DOWN OFF RESET R E S E T SERVICE MENU BASIC OPERATION The service menu is divided into the main menu and subordinate groups of functions If you choose a menu item e g AUDIO you will get access to all...

Страница 22: ... over the changes you made See also chapter Service Menu Timeout By pressing the STORE button you save all changes you have made in all menu items 3 By pressing 8 EXIT you go back to the previous menu level or you exit the service menu 8 SERVICE MENU TIMEOUT After performing your last operating action you have 2 minutes left to save the changes you have made Then a prompt appears and all changes a...

Страница 23: ...Volume adaption Studio Line In Treble studio line In High bass studio line in Low bass studio line In 5 AQUA aquaCool aquaCool spray time Cycle time aquaCool start test cycle aquaCool endurance test aquaCool start initialization 6 AROMA Aroma Aroma status reset Cycle time Aroma cabin automatic Aroma cycles per hour TIMER AROMA Aroma start test cycle 7 AIR CONDITIONING Air condition Start level bod...

Страница 24: ... update deactivates the Personal PIN Personal PIN secured menu items may be identified by the personal PIN logo as given in the service menu Service menu options In order to avoid operating errors read through the basics at the begin ning of the Service Menu section Always remember to save your settings by pressing STORE All menu items that comprise further submenus are displayed in CAPITAL LETTER...

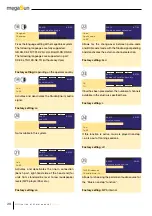
Страница 25: ...e Exit Select time or date The menu item Timer decorative lighting offers you two switching cycles A and B for each day of the week Switching cycles A B Monday A ON B ON A OFF B OFF Tuesday A ON B ON A OFF B OFF Wednesday A ON B ON A OFF B OFF Thursday A ON B ON A OFF B OFF Friday A ON B ON A OFF B OFF Saturday A ON B ON A OFF B OFF Sunday A ON B ON A OFF B OFF Switching cycle A Switching cycle B ...

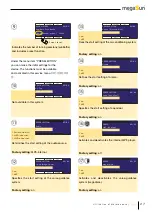
Страница 26: ...N Monday AON ENVIRONMENT TIMER0 Monday AON ENVIRONMENT TIMER0 Monday AON Save settings by pressing STORE Set the time SUBMENU TIMER DECORATIVE LIGHTING Sets the maximum tanning time for all timers In the easyCare operating mode the setting has been fixed to 30 minutes Factory setting 44 minutes 5min 30min ENVIRONMENT 05 05 Maximum tanning time Displays the total operating hours HOUR METERS 01 04 O...

Страница 27: ...dio Line In MP3 internal MP3 external PRESELECTION 02 06 Audio Specifies the start setting of the voice guidance system Factory setting on on off PRESELECTION 03 06 Voice megaVoice Fixes the start setting of the air conditioning system Factory setting on on off PRESELECTION 04 06 Aircon Aircondition Defines the start setting of Aroma Factory setting on on off PRESELECTION 05 06 Aroma Specifies the...

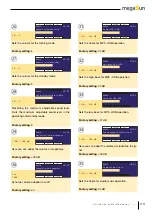
Страница 28: ...ead end for units from standard line level to low loudspeaker levels MP3 player iPod etc Factory setting on on off AUDIO 06 22 MP3 Line In Allows for the change over between pulse code and BCD code mode with the Studio signal pending and deactivates the external channel selection Factory setting bcd bcd puls code off AUDIO 07 22 Studio channel selection If bcd has been preselected the number of ch...

Страница 29: ...ing 00 dB 09 09 dB AUDIO 14 22 megaVoice volume adaption Dynamic volume adaption on off Factory setting on on off AUDIO 15 22 Dynamic volume adaption Sets the treble for MP3 USB operation Factory setting 00 dB 14 14 dB AUDIO 16 22 Treble MP3 USB Sets the high bass for MP3 USB operation Factory setting 00 dB 14 14 dB AUDIO 17 22 High bass MP3 USB Sets the low bass for MP3 USB operation Factory sett...

Страница 30: ...aCool start testcycle 04 06 aquaCool start testcycle AQUA 04 06 aquaCool st AQUA 04 06 aquaCool st Starts the aquaCool endurance test After having selected and stored the on setting you must leave the service menu and start a tanning session Attention aquaCool will continue to spray permanently during a whole tanning session Factory setting off on off AQUA 05 06 aquaCool endurance test Startstheaq...

Страница 31: ...ct Intervall off AROMA 04 07 Aroma cabin automatic For interval operation of the cabinet scent released the number of scent releases per hour can be set here Factory setting 3 1 6 AROMA 05 07 Aroma cycles per hour The menu item TIMER AROMA offers you a switching cycle for each day of the week Switching cycle Monday ON OFF Tuesday ON OFF Wednesday ON OFF Thursday ON OFF Friday ON OFF Saturday ON OF...

Страница 32: ...F AROMA TIMER AROMA Monday OFF Save settings by pressing STORE Set the time SUBMENU TIMER AROMA Starts the Aroma test 1 cycle AROMA 07 07 Aroma start testcycle Start press for 2s Aroma start testcycle Aroma start testcycle AROMA 07 07 Aroma start testcycle AROMA 07 07 Aroma start testcycle Switches the air conditioning unit on and off Factory setting on on off AIR CONDITIONING 01 02 Aircon air con...

Страница 33: ...country on US on off EASYCARE SETTINGS 01 07 easyCare mode only eonly If this function is active the tanning time can be entered at the easyCare unit The tanning power will be adapted automatically Factory setting off on off EASYCARE SETTINGS 02 07 man time config TDispl Allows for preselecting the tanning time The tanning power will be adapted automatically Factory setting 20 min 8min 20min EASYC...

Страница 34: ... 00000 Sets the volume of the easyCare voice guidance system Factory setting 4 0 9 EASYCARE 03 03 Volume UV LEVEL 01 01 SET UV LEVEL These settings must only be made by trained service personnel Loads the factory default settings SERVICE 01 10 Load factory defaults Reset press for 2s SERVICE 02 10 PERSONAL PIN press ENTER Submenu call with START ENTER PERSONAL PIN activate deactivate Enter your pe...

Страница 35: ...START ENTER SUBMENU SERVICE MODE Service mode without tanning Service mode with tanning Troubleshooting mode The service mode is switched on for 30 minutes The mains voltage is connected Error notifications are ignored but tanning cannot be started SERVICE 01 02 Service mode without tanning Start press ENTER for 2s Troubleshooting mode The service mode is switched on for 10 minutes The mains volta...

Страница 36: ...s for 2s Attention All unsaved changes will be discarded Lists the latest 99 events error codes info messages Detailed information is available by pressing the Start button Example no time date code tanning time 001 16 44 05 01 09 0011 03 23 002 15 22 05 01 09 0002 07 22 003 10 07 22 12 08 004 17 16 005 099 EVENTLOG 01 01 ...

Страница 37: ...ut risque de rayure des surfaces Veiller à ce qu aucun détergent ne puisse s infiltrer dans l appareil TUBES Afin de préserver la fonction de bronzage nous vous recommandons de nettoyer eau chaude et peau de chamois les tubes et les lampes UV après env 200 h de fonctionnement PAROIS EN ACRYLIQUE BARRES ET POIGNÉES Utiliser si possible pour les parois en acrylique le nettoyant désinfectant spécial ...

Страница 38: ...600 h nettoyer l échangeur ther mique et contrô ler la pompe de relevage des condensats En cas de besoin Outillage et accessoires 4 4 Tournevis pour vis à six pans creux span 4 60 mm Art N 3410055263 PH2 Tournevis cruciforme standard PH2 Valideretterminerl opérationenappuyant sur la touche Start écran interne Nombre de personnes nécessaires Les opérations de travail correspondant aux travaux de ma...

Страница 39: ...e UVRIR LA PLAQUE DU BANC Figure 13 Saisir la plaque du banc par le milieu de l arête antérieure et la soulever Soutenez le panneau du banc à l aide des deux positionneurs latéraux INCLINAISON DU PANNEAU INTERMÉDIAIRE Uniquement pour les appareils équipés de la climatisation Figure 14 Soulevez le panneau intermédiaire d un côté afin de fixer la ventouse au centre de la partie inférieure La ventous...

Страница 40: ...du tournevis pour vis à six pans creux fourni 3410055263 Observe the order Rabattre la plaque ENLEVER LA PLAQUE DU COUVERCLE 4 4 PH2 En général il n est pas nécessaire d enlever la plaque du couvercle pour la maintenance et l entretien Si vous préférez toutefois travailler sans la plaque procédez SVP comme suit Figure 16 PH2 Page 40 Rabattre la plaque du couvercle Desserrer la décharge de traction...

Страница 41: ...t positionné Figure 18 Lorsque vous fermez le panneau de la partie supérieure assurez vous que le guide de profil est correctement positionné Tubes 4 Lors de l installation des tubes vérifier que le marquage est parfaitement lisible Dans le cas contraire la fonction bronzage n est pas opérationnelle Après l installation de nouveaux tubes il faut remettre à zéro le compteur d heures des tubes dans ...

Страница 42: ...centrale Boosters de collagene En cas de défaillance le remplacement de ces éléments doit être assuré par un technicien qualifié Contactez votre partenaire d entretien Interior unit lighting The lighting from the tanning unit is effected by high performance LEDs In the case of a defect replacement can only be made by qualified technical personnel Contact your service partner in this case FLUORESCE...

Страница 43: ...ur filter cartridges each in the canopy and in the bench part NOTE Take the opportunity and check and clean the heat exchangers of the air conditioning unit See also the chapter Maintenance Ventilation and air conditioning Soiled heat exchangers substantially reduce the performance of the air conditioner FILTER CARTRIDGES IN THE BENCH PART Figure 25 Page 39 Open the bench part Open the lock of the...

Страница 44: ...ILATION SYSTEM Check all hose connections Remove any kinks in the air hoses Replace defective hoses immediately The exhaust air hose must not exceed a maximum length of 6 m if there is no auxiliary fan installed CHECKING THE CONDENSATE PUMP The condensate pump pumps away the condensation water at timer controlled intervals Check the function of this pump with each tube replacement Fill some water ...

Страница 45: ...ins the storage medium with the MP3 data from the internal MP3 player is located at the control box in the bench part of the sunbed Figure 29 Please refer to the chapter Technical data for information regarding supported card sizes as well as file system and MP3 formats The card contains two directories Pop and Voice Within the Pop directory you can add or delete audio files as you desire These au...

Страница 46: ...ROMA TIN When the Aroma tin is empty a corresponding message is displayed Attention Do not use any agents other than aquaCool and Aroma gel supplied by KBL Risk of infections Function of nozzles impaired Figure 31 Page 39 Open the bench part Unlock the retaining bracket Replace the tin Reset the Aroma counter in the service menu to 0 Reset Then the message on the display will disappear Replacing t...

Страница 47: ... write cycle flash memory reached Maximum write cycle flash memory rea ched Contact your Customer Service 14 Error SD card read error CRC fault Update via SD card failed CRC fault SD card check replace 15 Error no access to the SD card Update via SD card failed access error SD card check replace 17 Parameter storage not found please connect and restart Parameter storage not found please con nect a...

Страница 48: ...preSelection display has been interrupted Check replace the patch cable Acknowledge the message by pressing START If the fault persists contact your Customer Service 212 Connection RGB module faulty 213 SD card missing No SD card in the audio module Insert an original SD card See chapter Recording to an SD card Removing the SD card 214 SD card unreadable SD card defective incompatible content Inse...

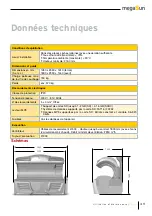
Страница 49: ... env 570 kg Raccordements électriques Classe de protection IP20 Tension de réseau 400V 3N 50Hz Ø des raccordements 5 x 4 mm2 Ölflex Lecteur MP3 Support de cartes SD jusqu à 1 2 GB SD 4 16 GB SDHC Système de données supporté par la carte SD FAT16 FAT32 Données MP3 supportées par la carte SD Bitrate constant et variable 96 320 Kbit s Fusibles Voir les données de l appareil Evacuation Ventilateur Câb...

Страница 50: ...érieure Lit 22x ultimate 2100 R 180W 4x ultimate 1863 O 80W 16x ultimate 1919 R 120W 3230076118 3230074882 3230076110 160 R 15 20 1 4 1 8 80 O 15 20 7 4 10 0 120 R 19 25 2 1 2 9 Booster de collagène Booster de collagène facial 70x Booster de collagène des jambes 20x en option Puiss nominale Avec climatiseur 8300W Sans climatiseur 6900W Fusibles Fusibles automatiques tripolaires 3 x 16A avec RCD ...

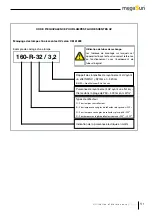
Страница 51: ...onnement avec l équipement de tubes d origine 160 R 32 3 2 Rapport des intensités de rayonnement UV ayant un effet NMSC 320nm et 320nm NMSC Non Melanom Skin Cancer Puissance de rayonnement UV ayant un effet éry thème dans la plage de 250 400nm en mW m2 Types de réflecteur O Pour lampes sans réflecteur B Pour lampes avec angles de réflecteur plus grands 2300 N Pour lampes avec angles de réflecteur ...

Страница 52: ...U t i l i s a t i o n e t M a i n t e n a n c e 52 Remarques ...

Страница 53: ...U t i l i s a t i o n e t M a i n t e n a n c e Optima 53 Remarques ...

Страница 54: ...U t i l i s a t i o n e t M a i n t e n a n c e 54 Remarques ...

Страница 55: ......

Страница 56: ...KBL AG Ringstraße 24 26 56307 Dernbach Allemagne Téléphone 49 0 26 89 94 26 0 Télécopie 49 0 26 89 94 26 66 E Mail megaSun kbl de www megaSun de ...

Отзывы: