background image

26

Basic Operation

Re

verb

Reverb

The Reverb setting adds reverberation to the sound.


Turning Reverb on/off

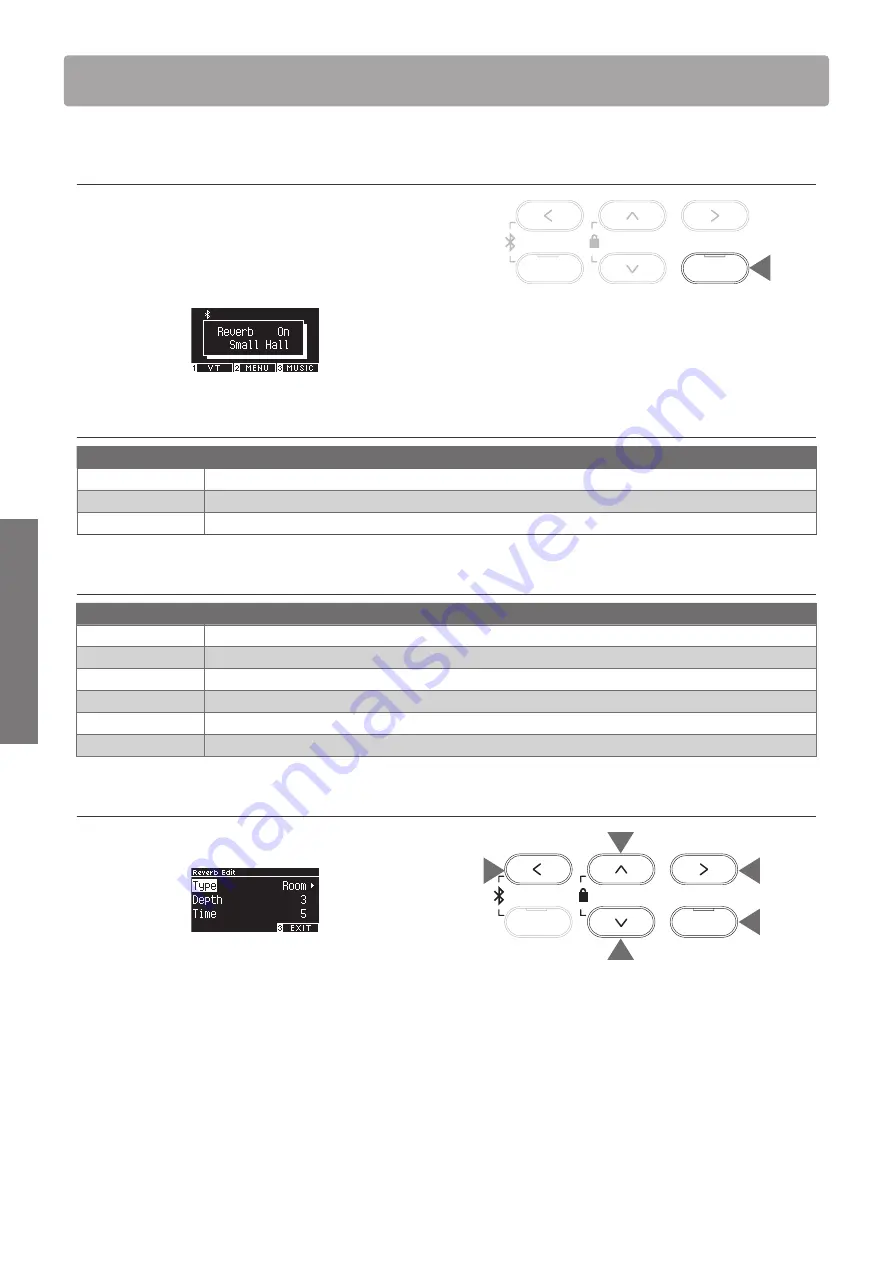
•  Press the [REVERB] button.

The LED indicator for the [REVERB] button will turn on and the 
reverberation effect is applied.

•  The reverberation effect is removed and the LED indicator 

for the [REVERB] button is turned off if the [REVERB] button is 
pressed again.


List of reverb settings

Reverb setting

Description

Type

Sets one of the six available reverb types.

Depth

Sets the reverb depth in the range from 1 to 10.

Time

Sets the reverb time in the range from 1 to 10.


List of reverb types

Type

Description

Room

Simulates the reverberation of a performance in a small rehearsal room.

Lounge

Simulates the reverberation of a performance in a piano lounge.

Small Hall

Simulates the reverberation of a performance in a small hall.

Concert Hall

Simulates the reverberation of a performance in a large concert hall for classical music.

Live Hall

Simulates the reverberation of a performance in a large hall for live music performance.

Cathedral

Simulates the reverberation of a performance in a large cathedral.


Reverb settings

1.  Press and hold the [REVERB] button to enter the Reverb Edit 

screen.

2.  Press the [UP]/[DOWN] button to select the settings menu.
3.  Press the [LEFT]/[RIGHT] button to set the value or type.

•  Pressing the [LEFT]/[RIGHT] buttons simultaneously will re-

store the default setting.

•  Pressing the [3] button will return to the Home screen.

EFFECTS

REVERB

2

2

3

3

EFFECTS

REVERB

hold

1

Содержание CN301

Страница 1: ...Important Information Preparation Appendix Adjustments Settings Basic Operation DIGITAL PIANO CN301 Owner s Manual...

Страница 2: ...it de la prise de courant et de positionner le c ble d alimentation secteur de sorte qu il puisse tre d branch rapidement en cas d urgence le courant lectrique tant toujours pr sent tant que la prise...

Страница 3: ...instructions 2 Keep these instructions 3 Heed all warnings 4 Follow all instructions 5 Do not use this apparatus near water 6 Clean only with dry cloth 7 Do not block any ventilation openings Install...

Страница 4: ...rt the plug into the outlet contact an electrician to replace your obsolete outlet Do not defeat the safety purpose of the plug When disconnecting the AC power cord s plug always hold the plug and pul...

Страница 5: ...could result in injury or damage to the product or other property if the product is handled incorrectly Using the product in such areas may result in product breakdown Use the product only in moderate...

Страница 6: ...either terminal of the power cord to the the ground od AC outlet on the wall Canadian Radio Interference Regulations This instrument complies with the limits for a class B digital apparatus pursuant t...

Страница 7: ...terial of the cloth used wiping the prod uct repeatedly may result in discoloration or deformation If the surface of the pedals become dirty clean the pedals us ing a dry dish washing sponge Wiping th...

Страница 8: ...ic song 40 Listening to a Concert Magic song 40 Concert Magic song settings 41 Registration Memories 42 Panel Lock 45 Adjustments Settings Settings Menu 46 Basic Settings 46 1 Key Transpose 47 2 Song...

Страница 9: ...supplementary PDF manual from the Kawai Global website https www kawai global com support manual Appendix Troubleshooting 79 Internal Songs List 81 Drum Rhythm List 83 Connecting to Other Devices 84 A...

Страница 10: ...10 Preparation Part Names and Functions In market locations where Bluetooth functionality is not available the Bluetooth mark will not be printed Part Names and Functions...

Страница 11: ...d in Lesson REC button This button is used to record the performance METRONOME button This button is used to turn the metronome function on off and adjust its tempo time signature and volume settings...

Страница 12: ...er and the main body Closing the key cover Slowly pull the key cover with both hands then gently lower it downward Music Rest 1 Lift the music rest 2 Set the metal prop on the rear side of the music r...

Страница 13: ...f the power until the startup process is completed Do not unplug the power cord until the display has turned off Thefirstscreenthatappearswhentheinstrumenthasstartedupafterpower oniscalledtheHomescree...

Страница 14: ...riking the keys Using headphones Plug the headphones into the PHONES jack located on the un derside of the main body When the headphones are connected the speakers on the main body no longer produce s...

Страница 15: ...l while playing the piano will sustain the sound even after one s hands have been lifted from the key board The length of reverberation can be controlled by the level of pedal depression Half pedal su...

Страница 16: ...ting is available from the following 1 4 2 4 3 4 4 4 5 4 3 8 6 8 7 8 9 8 12 8 When the setting 1 4 is selected it produces only the click sounds without an accent beat The default setting is 4 4 100 r...

Страница 17: ...ps Rough guide for the total recording capacity For example if the total recording capacity is 5 000 notes Beethoven s F r Elise can be recorded three to four times or recording of 10 to 15 minutes is...

Страница 18: ...d the PLAY STOP button will turn on 5 Press the PLAY STOP button to finish recording When the recording ends the LED indicators for the PLAY STOP button and the REC button will turn off A symbol will...

Страница 19: ...Recorder Edit screen 2 Press the UP DOWN button to select the settings menu 3 Press the LEFT RIGHT button to set the value Pressing the LEFT RIGHT buttons simultaneously will re store the default set...

Страница 20: ...LEFT RIGHT button to select the song and part 4 Press the 2 button 5 Press the LEFT RIGHT button to select the target format Select MP3 or WAV format 6 Press the PLAY STOP button to start conversion...

Страница 21: ...the Gain Adjustment screen GainAdjustmentscreen The level meter is displayed on the Gain Adjustment screen When the digital piano is played recording levels are dis played separately for the L channe...

Страница 22: ...s the UP DOWN button to change characters 4 Press the 2 button after entering the song name to save the recording 5 In the case where a file with the same name already exists press the 1 button to ove...

Страница 23: ...the upper folder Displays the Internal Recorder screen Returns to the Home screen indicates a song LCD display and buttons while playing back an SMF KSO MP3 or WAV file MP3 or WAV file Song name Play...

Страница 24: ...e Transpose the pitch of the recorded song to be played back This setting is displayed only when an SMF or KSO file is selected Song Part Set play or mute on each part Set Play for the part to be play...

Страница 25: ...C button to enter the USB Recorder screen The LED indicator for the REC button will start to flash once the USB Recorder screen opens 4 Press the UP DOWN button to select a Mode 5 Press the LEFT RIGHT...

Страница 26: ...f a performance in a small rehearsal room Lounge Simulates the reverberation of a performance in a piano lounge Small Hall Simulates the reverberation of a performance in a small hall Concert Hall Sim...

Страница 27: ...brato to tremolo Tremolo Amp This effect reproduces the change in sound caused by the amplifier and combines it with tremolo Auto Pan This effect periodically changes the position where the sound can...

Страница 28: ...t level The degree of applying effect will be deeper Speed The speed of fluctuations and undulations will be faster Rotary 6 types Accel Speed The speed when changing between slow and faster will be f...

Страница 29: ...INGS buttons simultaneously as shown in Figure 1 They will appear on the display as shown in Figure 2 The display may show shortened sound names 3 E PIANO 4 ORGAN 6 STRINGS 7 PAD 5 HARPSI 8 BASS 1 PIA...

Страница 30: ...mic sensitivity of Part 2 in Dual between 1 and 10 The smaller the number the lower the dynamic sensitivity For example lowering the dynamic sensitivity of String Ensemble in a perfor mance of SK EX C...

Страница 31: ...s sound Pressing the 3 button will return to the Home screen Changing the split point Press and hold the 1 button then press the desired split key on the keyboard The pressed split key will become the...

Страница 32: ...unction on or off for the lower section in Split The pedal function is always on for the upper section Split Point C4 Set the split point in the range from A0 to C 8 Split settings 1 On the Split scre...

Страница 33: ...tions will both be set to the SK EX Concert Grand Piano Concert sound Pressing the 3 button will return to the Home screen Changing the Four Hands split point Press and hold the 1 button then press th...

Страница 34: ...ift 2 Adjust the sound range of the left section between 0 and 3 octaves Split Point F4 Set the split point in the range from A0 to C 8 Four Hands settings 1 On the Four Hands screen press the 2 butto...

Страница 35: ...c songs The Concert Magic function allows players to experience a real piano performance by simply tapping any key with their finger Concert Magic songs can also be played back as demo songs For a com...

Страница 36: ...iano Course Lesson 1B Czerny 30 Etudes de M canisme Opus 849 Alfred s Basic Piano Library Lesson Book Level 1A Czerny 100 Hundert bungsst cke Opus 139 Alfred s Basic Piano Library Lesson Book Level 1B...

Страница 37: ...e bar Pressing the LEFT button move the playback position a beat backward and pressing the RIGHT button move the playback position a beat forward Practicing the right hand left hand parts while playin...

Страница 38: ...ator of the 1 but ton starts flashing 2 Upon reaching the desired position press the 1 button to specify the end point B of the repeat The end point B is set and the LED indicator of the 1 button turn...

Страница 39: ...rpeggios chords and cadences Evaluation on evenness etc is shown on the LCD display to help with reviewing one s own performance It is also possible to listen to model performances of each Finger Exer...

Страница 40: ...termined by the tapping speed The volume of the song is determined by the tapping force Black circles on the display change to plus symbols as the song progresses Use them as a guide for tapping The s...

Страница 41: ...rhythm of the melody on any key of the keyboard Twinkle Twinkle Little Star Skillful SK Tap out the rhythm of both the melody and the accompaniment notes on any key of the key board Waltz of the Flow...

Страница 42: ...Octave Shift Layer Dynamics Split settings P42 Balance Lower Octave Shift Lower Pedal on off Split Point Four Hands settings P34 Balance Right Octave Shift Left Octave Shift Split Point Basic Settings...

Страница 43: ...mory 1 Press and hold the REGISTRATION button LED indicators for the eight registration memory SOUND but tons starts flashing Press the 1 or 2 button to select the Bank in which to store the registrat...

Страница 44: ...settings This allows checking and editing of settings such as the sound and reverb Saving the selected registration in a USB memory device 1 On the Registration Edit screen press the UP DOWN but ton...

Страница 45: ...he LED indicator for the 2 button starts flashing and panel lock will be activated Panel lock can be activated only in the Home screen where the sound name is displayed Panel lock cannot be activated...

Страница 46: ...ttps www kawai global com support manual USB Menus USB memory device settings P63 Bluetooth Settings Bluetooth Audio and Bluetooth MIDI settings P77 Entering the Settings Menu On the Home screen press...

Страница 47: ...ard in semi tone steps Key Transpose setting The value can be specified in the range from 12 to 12 in semi tone steps Checking the Key Transpose status The transpose icon appears on the Home screen if...

Страница 48: ...ies to retain the instrument s sound character even at low volume levels Bright Emphasises high range frequencies creating a brighter sound Mellow Reduces high range frequencies creating a softer soun...

Страница 49: ...alue will enhance the sound of pianissimo touches while the volume is reduced 6 Tuning The Tuning function allows players to adjust the pitch of the instrument Adjusting the pitch The pitch can be adj...

Страница 50: ...ettings screen 11 Factory Reset Factory Reset is a function that restores the instrument back to its factory default configuration Executing the Factory Reset With Factory Reset selected press the REC...

Страница 51: ...educe damper pedal resonance and string resonance Soft Setting to produce a softer tone by softening the hammers and increasing the touch weight of the keyboard which is suitable for slow quiet pieces...

Страница 52: ...5 Piano sound only P55 6 Undamped Str Res 5 Piano sound only P56 7 Cabinet Resonance 1 Piano sound only P56 8 Key off Effect 5 Piano sound Tine Electric Piano Reed Electric Piano Tine Electric Piano...

Страница 53: ...the relationship between the volume and the strength of keystrokes The display shows Touch Touch Curve types Touch Curve Description Heavy 4 Produces a more softer sound consistently Heavy 3 Produces...

Страница 54: ...w 2 Setting to produce an even softer tone by further softening the hammers than Mellow 1 Dynamic Setting to produce a dynamic tone from soft to bright according to the touch of keys Bright 1 Setting...

Страница 55: ...allest and 10 is the greatest When set to Off Damper Noise will not be produced 5 String Resonance String Resonance simulates the resonance effects of the piano strings What is string resonance To exp...

Страница 56: ...s Adjusting the Cabinet Resonance volume The value can be specified in the range from 1 to 10 or can be set to Off 1 is the lightest and 10 is the deepest When set to Off Cabinet Resonance will not be...

Страница 57: ...delay and 10 is the greatest hammer delay When set to Off Hammer Delay will not be produced 12 Topboard Simulation Topboard Simulation simulates the difference in the sound produced by the opening of...

Страница 58: ...produces no sound for an extremely soft touch 16 Stretch Tuning User Tuning The Stretch Tuning function allows a piano specific tuning which makes lower octaves slightly flatter and upper octaves sli...

Страница 59: ...however other intervals may sound impure Use this system by specifying the tonic of the piece to be played Pythagorean Temperament Pythagorean The tuning system that eliminated impurity from most of...

Страница 60: ...be specified in the range from C to B The temperament does not change if the equal temperament is specified even when the tonic is set 19 Key Volume The Key Volume function allows players to adjust th...

Страница 61: ...d Adjusting the Half Pedal Adjust value Value Description 1 This setting allows Half Pedal to take effect at a shallow point 7 This setting allows Half Pedal to take effect at a deep point 8 This sett...

Страница 62: ...l of the head phones output to be increased Normal Entering the Phones Settings screen 1 On the Settings Menu screen press the UP DOWN button to select Phones Settings 2 Press the 2 button to enter th...

Страница 63: ...nforms to USB2 0 Hi Speed standards Older USB devices can still be used however data transfer speed will be limited to the maximum transfer speed of the device Connecting a USB memory device allows sa...

Страница 64: ...recorded in the instrument s internal memory to a USB memory device in KSO file format P70 6 Save SMF Song Save the song recorded in the instrument s internal memory to a USB memory device in SMF fil...

Страница 65: ...memory Song 1 Song 6 Song 10 Song 9 Song 8 Song 7 Song 2 Song 3 Song 4 USB memory device Song 5 SMF file KSO file Load Save Registration and Startup Settings to a USB memory device Save Load from USB...

Страница 66: ...the internal song memory for the song to be loaded into Songs are loaded into the memory that is used for recording up to 10 songs 2 Press the 2 button 3 Press the UP DOWN button to select the song to...

Страница 67: ...press the 2 button 2 Press the UP DOWN button to select a registration file type All KM3 to be loaded 3 Press the 2 button 4 Press the 1 button to load or press the 3 button to cancel The extension of...

Страница 68: ...egistration memory for the registration to be loaded into 2 Press the 2 button 3 Press the UP DOWN button to select the registration file type Single KM6 to be loaded 4 Press the 2 button 5 Press the...

Страница 69: ...select the startup settings file KM1 to be loaded 3 Press the 2 button 4 Press the 1 button to load or press the 3 button to cancel The extension of the startup settings file is KM1 The file is not co...

Страница 70: ...s the 1 button to save or press the 3 button to cancel In the case where a file with the same name already exists specify whether to overwrite it Press the 1 button to overwrite or press the 3 button...

Страница 71: ...e file name 5 Press the 1 button to save or press the 3 button to cancel In the case where a file with the same name already exists specify whether to overwrite it Press the 1 button to overwrite or p...

Страница 72: ...he UP DOWN button to change characters Up to 12 characters can be specified for the file name 3 Press the 2 button after entering the file name 4 Press the 1 button to save or press the 3 button to ca...

Страница 73: ...ge characters Up to 12 characters can be specified for the file name 4 Press the 2 button after entering the file name 5 Press the 1 button to save or press the 3 button to cancel In the case where a...

Страница 74: ...le name 3 Press the 2 button after entering the file name 4 Press the 1 button to save or press the 3 button to cancel In the case where a file with the same name already exists specify whether to ove...

Страница 75: ...ct the file to be re named 3 Press the 2 button 4 Enter the new name Press the LEFT RIGHT button to move the cursor and press the UP DOWN button to change characters Up to 12 characters can be specifi...

Страница 76: ...Press the UP DOWN button to select the file to be deleted 3 Press the 2 button 4 Press the 1 button to delete or press the 3 button to can cel 12 Format USB Formatting 1 With Format selected press the...

Страница 77: ...CN301 Audio does not appear press and hold the LEFT and EFFECTS buttons on the instru ment s control panel while the Home screen is shown in the display After pairing successfully the instrument will...

Страница 78: ...ear the instrument 2 Bluetooth Audio Volume This function allows players to adjust the volume of music stored in smart devices which is output from the instrument s speakers After adjusting the volume...

Страница 79: ...ately as possible Since the pianos produce a rich variety of reso nance the way the sound is perceived changes depending on the location or environ ment The way the sound is perceived also changes whe...

Страница 80: ...I Bluetooth Audio Press and hold the LEFT button and EFFECTS button on the Home screen to cancel pairing P77 Unable to send recorded per formance of built in songs Recorded performances of built in so...

Страница 81: ...ic Alpengl hen Oesten EX Concert Grand Piano Pop Original Kawai SK 5 Grand Piano Pop Upright Piano Boogie EX Concert Grand Piano Modern Original Kawai Upright Piano Honky Tonk E PIANO Electric Piano S...

Страница 82: ...ra Vivaldi PAD Vocal Pad Sound Name Song Title Composer Choir Londonderry Air Irish folk song Choir 2 Original Kawai New Age Pad Original Kawai Atmosphere Original Kawai BASS Bass Guitar Sound Name So...

Страница 83: ...Funk 2 43 Funk 3 44 Funk Shuffle 1 45 Funk Shuffle 2 46 Buzz Beat 47 Disco 1 48 Disco 2 49 Hip Hop 1 50 Hip Hop 2 No Rhythm Name 51 Hip Hop 3 52 Hip Hop 4 53 Techno 1 54 Techno 2 55 Techno 3 56 Heavy...

Страница 84: ...ry keyboard to the instrument s amplifier and speaker system The illustration below provides a visual overview of the connectors and their typical applications USB to HOST PEDAL DC IN 15V Computer Com...

Страница 85: ...uetooth MIDI device and a USB cable are connected at the same time When connecting the digital piano to a computer with a USB cable insert the USB cable first and then turn on the digital piano After...

Страница 86: ...re included Please also prepare a Phillips head screwdriver B B A A C C D D E E Main body Pedal board including adjustor bolt Screw set Headphone hook set AC adaptor Power cord Back board Side panels...

Страница 87: ...ew 2 Attaching D Allow the E assembled with B and C to stand upright as shown in the figure below Ensure that the adjustor is attached and the floor is clear from parts or musical scores etc Align the...

Страница 88: ...ds or fingers caught between A and the stand C A A B 4 Fastening A to the stand Temporarily fasten A and the stand with four screws a with flat washer and spring washer First loosely fasten the screws...

Страница 89: ...damage the plugs Keep the correct angle Do not bend Do not pull the cable 6 Attaching the headphone hook Attach the headphone hook to the hole shown in the figure using the two tapping screws 4 x 14 m...

Страница 90: ...rer s trademark KAWAI KAWAI KAWAI KAWAI Model identifier PS 129 PS 154 PS 241 PS 242 Input voltage 230 V 230 V 230 V 230 V Input AC frequency 50 Hz 50 Hz 50 Hz 50 Hz Output voltage 12 0 V 15 0 V 24 0...

Страница 91: ...ASTINTA ES ATITIKTIES DEKLARACIJA A Kawai Europa GmbH patvirtinu kad radijo rengini tipas CN301 atitinka Direktyv 2014 53 ES Visas ES atitikties deklaracijos tekstas prieinamas iuo interneto adresu IT...

Страница 92: ...Temperament Key Key Volume Half Pedal Adjust Soft Pedal Depth Phones Settings Spatial Headphone Sound SHS Phones Type Phones Volume Bluetooth MIDI Bluetooth Ver 5 0 GATT compatible Bluetooth Low Energ...

Страница 93: ......

Страница 94: ......

Страница 95: ......

Страница 96: ...Copyright 2021 Kawai Musical Instruments Mfg Co Ltd All Rights Reserved SP00001417...

Отзывы: