background image

Page

5

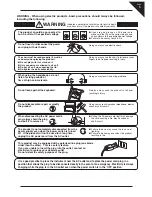
WARNING

The product should be connected to 
an AC outlet of the specified voltage.

● 

If you are going to use an AC power cord, 

  make sure that it has the correct plug shape 
  and conforms to the specified power voltage.

● 

Failure to do so may result in fire.

120V

240V

230V

Indicates a potential hazard that could result in death 
or serious injury if the product is handled incorrectly.

WARNING - When using electric products, basic precautions should always be followed,
including the following.

The product is not completely disconnected from the 
power supply even when the power switch is turned 
off.  If the product will not be used for a long time, 
unplug the AC power cord from the AC outlet.

● 

Failure to do so may cause fire in case of

 lightning.

● 

Failure to do so may over-heat the product,

  resulting in fire.

This product may be equipped with a polarised line plug (one blade 
wider than the other).  This is a safety feature. 
If you are unable to insert the plug into the outlet, contact an 
electrician to replace your obsolete outlet.
Do not defeat the safety purpose of the plug.

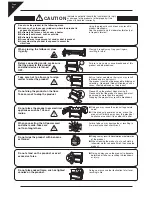
When disconnecting the AC power cord’s 
plug, always hold the plug 
and pull it to remove it.

● 

Pulling the AC power cord itself may damage 

  the cord, causing a fire, electric shock or 
 short-circuit.

Doing so may cause the product to fall over, 
resulting in injury.

Do not lean against the keyboard.

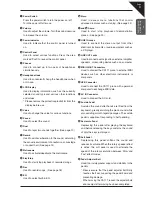
When using the headphones, do not 
listen for long periods of 
time at high volume levels.

Doing so may result in hearing problems.

It is a good practice to place the instrument near the AC outlet and to place the power cord plug in a 
position that allows the plug to be disconnected easily in the event of an emergency. Electricity is always 
charging while the plug is in the AC outlet even when the power switch is in the ‘OFF’ position.

The chair must be used properly (it must be 
used only when playing the product).

● 

Do not play with it or stand on it.

● 

Only one person is allowed to sit on it.

● 

Do not sit on it when opening the lid.

● 

Re-tighten the bolts occasionally.

Doing so may cause the chair to fall over or your 
fingers to be trapped, resulting in injury.

Do not insert or disconnect the power
cord plug with wet hands.

Doing so may cause electric shock.

Do not disassemble, repair or modify 
the product.

Doing so may result in product breakdown, electric 
shock or short-circuit.

CA111̲EN.indd   5

2008/04/12   0:58:25

Содержание CA 111

Страница 1: ...1 PART NAMES FUNCTIONS 2 BASIC OPERATION 3 INTERNAL SOUNDS 4 METRONOME 5 RECORDER 6 DEMO MODE 7 MENU FUNCTIONS 8 USB USAGE 9 APPENDIX Owner s Manual...

Страница 2: ......

Страница 3: ...e are also available allowing the playback and connection of other electronic instruments and personal computers This owner s manual contains valuable information that will help you to make full use o...

Страница 4: ...e instructions 3 Heed all warnings 4 Follow all instructions 5 Do not use this apparatus near water 6 Clean only with dry cloth 7 Do not block any ventilation openings Install in accordance with the m...

Страница 5: ...plug When disconnecting the AC power cord s plug always hold the plug and pull it to remove it Pulling the AC power cord itself may damage the cord causing a fire electric shock or short circuit Doing...

Страница 6: ...of sand or dust is present Areas where the product is exposed to excessive vibrations Entry of water needles or hair pins may result in breakdown or short circuit The product should not be exposed to...

Страница 7: ...ct the equipment into an outlet on a different electrical circuit from the receiver Consult the dealer or an experienced radio TV technician for help Canadian Radio Interference Regulations This instr...

Страница 8: ...rol panel and connectors CONTROL BOX z Control panel visible z Front view Control box Please do not place any objects on the control panel z Control Panel z Rear view MIDI USB LINE IN OUT connectors f...

Страница 9: ...age 24 o and p Demo Used to start stop playback of demonstration pieces See page 23 q LINE IN Jacks Used to connect the stereo output from other electronic instruments or audio equipment such as a CD...

Страница 10: ...control panel Volume knob will light up to indicate that the CA111 piano is turned on Step 4 Use the Volume knob to set the volume to a comfortable listening level The volume knob controls the volume...

Страница 11: ...r of headphones to one of the Phones jacks located on the underside of the control box Two pairs of headphones can be connected simultaneously allowing two people to listen to the CA111 piano at the s...

Страница 12: ...Baroque period plucked string instrument Harpsichord Oct Vibraphone The sound of a percussive tuned instrument played using mallets Church Organ The sound a pipe organ suitable for Church music etc Di...

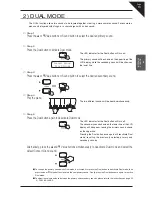
Страница 13: ...usly Step 5 Press the Dual button again to deactivate Dual mode The LED indicator for the Dual button will turn off The secondary sound shown on the lower line of the LCD display will disappear leavin...

Страница 14: ...button will turn on indicating that the reverb simulation has been activated Step 2 Press and hold the Reverb button then press the S or T Value buttons to select the desired reverb type The currentl...

Страница 15: ...id range frequencies providing a clearer sound in certain conditions Step 1 Press the EQ button to activate the EQ mode The LED indicator for the EQ button will turn on indicating that EQ has been act...

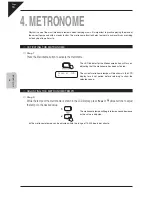
Страница 16: ...The LED indicator for the Metronome button will turn on indicating that the metronome has been activated The current metronome tempo will be shown in the LCD display for a brief period before returnin...

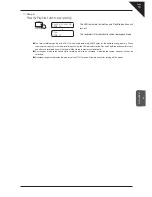
Страница 17: ...ronome button is released ADJUSTING THE METRONOME VOLUME To adjust the volume of the metronome please refer to the instructions on page 42 13 METRONOME VOLUME for more information DEACTIVATING THE MET...

Страница 18: ...d back 1 RECORDING A SONG Step 1 Select the desired sound for the performance Step 2 Press the Rec button to activate the recorder The LED indicator for the Rec button will start to ash indicating tha...

Страница 19: ...ire ten song memory When the maximum capacity is reached recording will stop the LED indicators for the Rec and Play Stop buttons will turn off and all music recorded up until that point will be store...

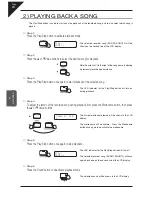
Страница 20: ...f the selected song The LED indicator for the Play Stop button will turn on during playback Step 4 To adjust the tempo of the recorded song during playback rst press the Metronome button then press th...

Страница 21: ...e again to con rm deleting of the selected song Completed will be shown in the LCD display before returning to the song playback mode Repeat the steps above in order to delete recorded songs individua...

Страница 22: ...L Boccherini i Thema und Variationen Sonate f r Klavier No 11 K 331 300i j T rkischer Marsch Sonate f r Klavier No 11 K 331 300i k Menuett W A Mozart l Sonate f r Klavier No 14 Mondschein m Sonate f r...

Страница 23: ...Value buttons to select the desired demonstration piece Step 3 Press either the EQ Menu or Play Stop buttons to stop the demonstration performance The LED indicator for the EQ and Menu button will tu...

Страница 24: ...Technician An experienced piano technician is essential to fully realise the potential of an acoustic piano As well as meticulously tuning each note the technician performs regulation and voicing adj...

Страница 25: ...volume balance The sum of the primary and secondary sound volume balances will always total 10 e g 1 9 5 5 9 1 etc with larger values producing greater volume Step 4 Press the Sound button to exit the...

Страница 26: ...amic range Mellow 2 is softer than Mellow 1 Dynamic The sound character will change dramatically from mellow to bright depending on how soft or hard the piano is played Bright 1 2 A brighter sound cha...

Страница 27: ...subtle effect while the maximum level of 10 creates a stronger more pronounced resonance Setting the damper resonance to Off will disable the function entirely Step 3 Play the piano while using the da...

Страница 28: ...he level of resonance will be shown on the second line of the LCD display Step 2 Press the S or T Value buttons to select the desired string resonance level A string resonance level of 1 produces a ve...

Страница 29: ...ossible to clearly hear the String Resonance simulation The String Resonance function will only be applied to the Concert Grand Concert Grand 2 Studio Grand Studio Grand 2 Mellow Grand Mellow Grand 2...

Страница 30: ...nounced key off sound Setting the key off effect to Off will disable the function entirely Step 3 Play the piano The strength of the key off effect will vary depending on the value speci ed in Step 2...

Страница 31: ...nd hold the Menu button then press the S or TValue buttons until the Touch function is selected The LED indicator for the Menu button will turn on The Touch menu function will be shown in the LCD disp...

Страница 32: ...limited for use with chords but it produces very characteristic melodic lines Meantone Temperament Meantone This temperament which uses a mean between a major and minor whole tone to eliminate disson...

Страница 33: ...sound will be shown in the LCD display Alternatively press the Menu button again to select other menu functions The Temperament function will return to the default setting of Equal Temperament piano...

Страница 34: ...be shown on the second line of the LCD display Step 2 Press the S or T Value buttons to select the desired key of temperament setting The key of temperament can be set between the range of C to B Step...

Страница 35: ...z The pitch will be changed by 0 5 Hz increments each time one of the Value buttons is pressed Step 3 Play the piano The tuning value set in Step 2 will be utilised for the sound Step 4 Press the Soun...

Страница 36: ...select the desired stretch tuning type The stretch tuning function can be set to either Normal or Wide which as the name would suggest creates a more pronounced tuning adjustment for the lower and hig...

Страница 37: ...he C key in the centre of the piano keyboard corresponds to the value 0 The piano pitch can be transposed by up to 12 halftones higher or 12 halftones lower Step 3 Play the piano The transpose value s...

Страница 38: ...her data MIDI uses channels to exchange data back and forth between MIDI devices There are receive MIDI IN and transmit MIDI OUT channels Most musical instruments or devices with MIDI functions are eq...

Страница 39: ...iano sound to be combined with that of a String sound from a separate synthesizer MIDI Functions The CA111 piano is capable of the following MIDI functions Sending Receiving keyboard note information...

Страница 40: ...n the second line of the LCD display Step 2 Press the S or T Value buttons to select the desired MIDI channel The MIDI Channel can be set to 1 or can be set to a speci c channel within the range of 1...

Страница 41: ...the LCD display The local control setting will be shown on the second line of the LCD display Step 2 Press the S or T Value buttons to enable or disable the local control setting Step 3 Press the Sou...

Страница 42: ...e metronome volume level can be set within the range of 1 to 10 Step 3 Press the Sound button to exit the Metronome Volume function menu The LED indicator for the Menu button will turn off The selecte...

Страница 43: ...e buttons until the User Memory function is selected The LED indicator for the Menu button will turn on The User Memory menu function will be shown in the LCD display Step 2 Press the Rec button to co...

Страница 44: ...ory preset values Step 1 Press the Menu button repeatedly or press and hold the Menu button then press the S or TValue buttons until the Factory Reset function is selected The LED indicator for the Me...

Страница 45: ...CA111 piano ensure that the MIDI device is de ned as USB audio device within the MIDI application Windows Vista 2000 98SE users Additional USB MIDI driver software will be required Please download th...

Страница 46: ...the USB driver while starting up the computer while MIDI applications are performing tasks while the CA111 piano is communicating with the computer while the computer is in energy saver mode y If the...

Страница 47: ...BPM Recorder 10 songs total memory capacity approximately 90 000 notes Demonstration 29 songs Virtual Technician Voicing 6 types Damper Resonance String Resonance Key Off Effect Touch Curve 6 types Te...

Страница 48: ...ode 1 3 Set to OMNI ON in the initial setting Set to OMNI OFF by MIDI channel Note Number True voice 21 108 0 127 0 127 9 120 including transpose Velocity Note ON Note OFF 9nH v 1 127 9nH v 0 After To...

Страница 49: ......

Страница 50: ...CA111 Owner s Manual KPSZ 0234 816238 OM1015E S0804 Version 1 Printed in Japan Copyright 2008 KAWAI Musical Instruments Mfg Co Ltd All Rights Reserved...

Отзывы: