6 Panoramic and 3D calibrations and adjustments
69
6.5.4
3D Beam size verification (optional)
This program can be used to verify that the size of the 3D
X-ray beam does not exceed limits defined in IEC 60601-1-
3 and DIN 6868-161, if required by local regulations. The
result of the program only gives information and does not
affect the calibration of the unit. Perform the 3D Col
calibration before using this program (redo the 3D Col if not
done recently, or if it was done with a different driver
version).
The panoramic sensor is used to measure the X-ray beam
dimensions. To have the whole beam visible on the sensor
you may have to adjust the panoramic sensor downwards
(and possibly 3D collimator upwards if the sensor
adjustment is not enough). Should this be the case, re-do
collimator calibrations after beam size verification has been
carried out.
1. Attach the panoramic sensor.
2. Select the
3D Beam Size
program.
3. Press
Patient Positioning
.
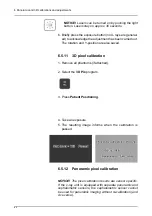
4. Take an exposure.
5. The beam dimensions and calibration result are present-
ed in the result image.
Содержание ORTHOPANTOMOGRAPH OP 3D Pro
Страница 1: ...ORTHOPANTOMOGRAPH OP 3D Pro 3D Dental X Ray System Installation Manual ENGLISH 216363 rev 1 0 805 5080...
Страница 2: ......
Страница 4: ......
Страница 8: ...iv rev...
Страница 18: ...1 Introduction 10...
Страница 22: ...2 Unit description 14 Panoramic lights 1 Midsagittal light 2 FH light 1 Image layer 2 TMJ light...
Страница 27: ...2 Unit description 19 2 6 Unit movements Panoramic unit movements R C J D...
Страница 29: ...2 Unit description 21...
Страница 30: ...2 Unit description 22...
Страница 38: ...4 PC requirements 30...
Страница 54: ...5 Installing the unit 46 4 Fasten the covers...
Страница 67: ...5 Installing the unit 59 C C D D Top cover of the column E E...
Страница 104: ...7 Cephalometric calibration and alignment 96...
Страница 111: ...7 Cephalometric calibration and alignment 103 3 Tighten the locking nut...
Страница 117: ...7 Cephalometric calibration and alignment 109...
Страница 128: ...8 Special procedures 120 6 Remove the arm from the column 4 nuts 7 Disassemble the arm...
Страница 132: ...8 Special procedures 124 right handed assembly Prism assembly for the left handed cephalostat...
Страница 158: ...8 Special procedures 150...
Страница 165: ...9 OP 3D Pro Pre sales check list 157 9 11 Notes comments...
Страница 166: ...9 OP 3D Pro Pre sales check list 158 9 12 Dimensions 463...
Страница 167: ...9 OP 3D Pro Pre sales check list 159 9 13 Dimensions with cephalostat...
Страница 168: ...9 OP 3D Pro Pre sales check list 160...


