background image

Operating Manual


Original Operating Manual 

21 


As necessary 


Version 1

: Replace worn sliders (13) by removing nut (25) see chapter 6.3.2 - from 

each cylinder (26). Pull the slides (34) to the side to remove 

– see chapter 6.3.2 -. 

Remove the greasing nipples (14) and screw (26). Replace the sliders (13). When 
installing the new sliders, make sure that the axial stops (27) are correctly seated. 
Remount the screw (26) and the greasing nipple (14). Push the slides (34) 

– see 

chapter 6.3.2 - into clamp body (28) and reinstall nuts (25) of cylinders (26). 


Version 2

: Replace worn sliders (13), by removing screws (1), safety metal sheet (3), 

screws (2), safety metal sheet (4) and nut (25) 

– see chapter 6.3.2 – from each 

cylinder (26). Pull the slides (34) to the side to remove 

– see chapter 6.3.2 -. Replace 

the sliders (13). Push the slides (34) 

– see chapter 6.3.2 - into clamp body and 

remount the safety metal sheet (4) with screw (2), safety metal sheet (3) with screws 
(1) and nut (25) of cylinders (26). 


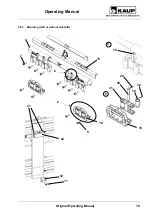
Replace worn sliders (15), by removing hooks (10). Lift the attachment off the fork 
carriage of the lift truck. Replace the sliders (10). When installing the new sliders (15), 
make sure that the sliders (15) are correctly seated in the sideshifter housings (8). 
Place the attachment on the fork carriage and remount the hooks (10) with screws 
(9). 


Replace defective supporting rollers (18) in the hooks (10) by removing the screws 
(9). Using suitable lifting equipment, tilt the complete equipment forwards off the fork 
carriage of the lift truck and secure this position. Using suitable means remove the 
fixing pin (29), bolt (30), holder (31) and fixing pin (32). Replace the supporting roller 
(18). Mount the fixing pin (32), holder (31), bolt (30), fixing pin (29) and hooks (10) 
using screws (9). 


Renew the faulty cylinder (26) by removing the hydraulic lines from the cylinder (26) 
with the hydraulic system depressurized. Remove the nut (25) 

– see chapter 6.3.2 - 

and nut (33). Replace the cylinder (26). Reinstall the nuts (33, 25) and the hydraulic 
lines. 


After installing or removing a cylinder (26), always check the clearance between the 
cylinder mount and nuts (25, 33) of the cylinder (26). Cylinders are installed with axial 
clearance of 1.5 to 2 mm. 


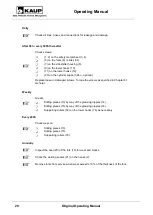
Bent forks are not safe to operate and their continued use should be prevented. 


Straightening of forks may only be performed by the manufacturer of the fork or by 
one of his authorised workshops. 


You can increase the service life of forks by using forks especially protected 
against wear. 


Содержание T 401 BZ

Страница 1: ...A Fork Positioner T 411 B T 401 BZ T 411 B T 401 BZ T 411 B BA Clamp with welded on bolt on forks with sideshift T 401 B BA Clamp with welded on bolt on forks without sideshift T 411 BZ BZA Fork Positioner with welded on forks bolt on with valveblock sideshift T 401 BZ BZA Fork Positioner with welded on forks bolt on without sideshift ...

Страница 2: ...aspects 6 3 Design 7 3 1 Clamp Fork Positioner with mounting 7 3 2 Forks 8 3 3 Efficient equipment settings on electric vehicles 8 3 4 Proper use of the equipment 9 3 5 Improper use 9 4 Installation and checking out 9 4 1 Installation 9 4 1 1 Clamp Fork Positioner 10 4 1 2 Installation Uninstallation screw on forks 11 4 2 Checking out 11 4 2 1 Bleeding the hydraulic system 12 4 2 2 Adjustment afte...

Страница 3: ...25 12 EC Declaration of Conformity Summary 25 Our service department in Aschaffenburg will be happy to answer your technical questions and to provide additional support Technical Support 0049 0 6021 865 395 0049 0 6021 865 284 0049 0 6021 865 352 Orders for spare parts Domestic 0049 0 6021 865205 0049 0 6021 865251 Orders for spare parts Export 0049 0 6021 865344 0049 0 6021 865348 Outside of norm...

Страница 4: ... following symbols are used in this operating manual to highlight details of special importance Identifies details relating to do s and don ts for the purpose of avoiding injury and property damage Specific details relating to the efficient use of the attachment and other advice Lists are denoted by a shadowed box Steps to be performed by the operator are denoted by a black dot 1 In illustrations ...

Страница 5: ...onents Inappropriate installation maintenance inspection and servicing Assignment of unqualified or non authorised personnel Claims raised by third parties 1 7 Limits of applicable use KAUP attachments are intended for use under the following climatic conditions Average ambient temperature for continuous operation 25 C Allowable maximum ambient temperature short term up to 1h 40 C Allowable minimu...

Страница 6: ...a safe distance away from moving reciprocating or rotating parts of the attachment to avoid danger of crushing pinching or entanglement Notify the responsible department person immediately of changes and faults in operation of the attachment that affect safety The attachment shall be shut down Use aids to vision e g mirrors camera etc where goods being transported obstruct vision Only allow work o...

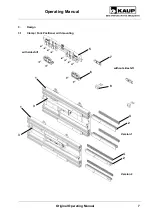
Страница 7: ...Operating Manual Original Operating Manual 7 3 Design 3 1 Clamp Fork Positioner with mounting with sideshift without sideshift Version 1 Version 2 5 6 7 8 4 2 4 2 1 1 3 3 ...

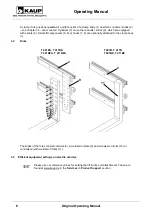
Страница 8: ... or hooks 7 8 are optionally attached to the clamp body 1 3 2 Forks The slides of the forks consist conduits 2 a welded on plate 9 and screwed on forks 10 or conduits 2 with welded on forks 11 3 3 Efficient equipment settings on electric vehicles Please use our reference values for setting the lift trucks and attachments These are found at www kaup de in the Services Product Support section 2 T 40...

Страница 9: ...maintenance instructions 3 5 Improper use Exceeding the allowable load capacity and load centre Dragging or pushing loads with the attachment Transporting persons with the load or load handling devices Mounting auxiliary equipment on the attachment such that the original mode of usage is changed e g fork extensions must be authorised by the manufacturer 4 Installation and checking out 4 1 Installa...

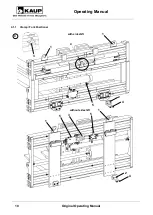
Страница 10: ...Operating Manual 10 Original Operating Manual 4 1 1 Clamp Fork Positioner with sideshift without sideshift 1 1 X X 3 2 4 4 2 1 1 3 5 5 5 ...

Страница 11: ... the operating elements operating lever joystick etc Mount the residual carrying capacity notice and identification of the operating elements if not already present of the combination of lift truck attached equipment on the lift truck 4 1 2 Installation Uninstallation screw on forks When installating or uninstalling the screw on forks torque the scews as specified in Chapter 6 1 General 4 2 Checki...

Страница 12: ...he system in accordance with the operating instructions of the lift truck manufacturer In the case of injuries caused by high pressure oil inform the works physician and seek out a specialist immediately Synchronising the arms The synchronization of arms is adjusted ex factory This can alter for different friction conditions wear temperatures and volumes conveyed Perform a readjustment The recomme...

Страница 13: ...g shift the machine and equipment must be inspected for visible damage and defects Repeat faults to your superior and have them rectified without delay Be aware of persons present in the area where you are working or driving and ensure that they are not endangered Do not transport any load exceeding that specified on the residual load plate for the particular combination of lift truck and attachme...

Страница 14: ... comes into contact with the ground Ensure that multiple items stacked on top of one another are securely fastened 6 Maintenance and servicing 6 1 General Regular maintenance is essential to ensure reliable operation and long service life of the KAUP attachment Ensure that maintenance and servicing are performed by qualified and authorised personnel only Lubrication and cleaning work on the attach...

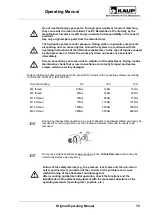
Страница 15: ...re visibly damaged Note the following tightening torques which are valid for screws with connecting surfaces according to ISO 4762 ISO 4014 ISO 4032 etc Screw bolt rating 8 8 10 9 12 9 M6 thread 9 3Nm 14Nm 16Nm M8 thread 23Nm 33Nm 39Nm M10 thread 45Nm 66Nm 77Nm Μ12 thread 77Nm 115Nm 135Nm Μ16 thread 190Nm 280Nm 330Nm Μ20 thread 385Nm 550Nm 640Nm During any disassembly operations be sure that parts...

Страница 16: ...icants approved and recommended by KAUP Greases Note Lithium soap grease NLGI Class 2 e g Avialith 2 Designation DIN51825 K 2 K 30 Complex soap grease NLGI Class 2 e g Turmogrease Gel M 5 Foundry quality Teflon spray e g Wieds or Rivolta Only for plastic sections The specified maintenance schedules can change as a result of the operating conditions such as extreme cold heat and dust or poor ground...

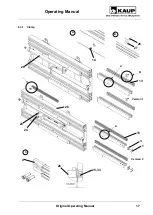
Страница 17: ...Operating Manual Original Operating Manual 17 6 3 1 Clamp A B A B C A Version 1 Version 2 14 26 27 13 13 3 1 25 33 26 4 23 24 28 26 ...

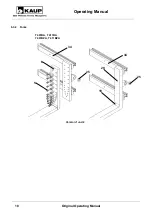
Страница 18: ...Operating Manual 18 Original Operating Manual 6 3 2 Forks 34 T 401BA T 411BA T 401BZA T 411BZA 5 20 Version 1 und 2 34 6 25 25 19 ...

Страница 19: ...Operating Manual Original Operating Manual 19 6 3 3 Mounting with or without sideshift D E E D 7 8 15 16 29 30 31 32 18 10 10 9 22 21 12 11 ...

Страница 20: ...tional Replace loose or damaged screws Torque the screws as specified in Chapter 6 1 General Weekly Grease Sliding pieces 13 by way of the greasing nipples 14 Sliding pieces 15 by way of the greasing nipples 16 Supporting rollers 18 on the lower hooks 16 as necessary Every 200h Check wear on Sliding pieces 13 Sliding pieces 15 Supporting rollers 18 Annually Inspect the heel 20 of the fork 19 for w...

Страница 21: ...that the sliders 15 are correctly seated in the sideshifter housings 8 Place the attachment on the fork carriage and remount the hooks 10 with screws 9 Replace defective supporting rollers 18 in the hooks 10 by removing the screws 9 Using suitable lifting equipment tilt the complete equipment forwards off the fork carriage of the lift truck and secure this position Using suitable means remove the ...

Страница 22: ...UP order number 1 Identification plate only by Quality department 2 Before putting into operation carefully read and take note of the operating and security instructions 0100016401 3 Never reach into the unit as long as parts could still be moving due to the danger of squashing or shearing 0100016601 4 4 2 1 3 5 ...

Страница 23: ...lics Increase flow rate of truck s hydraulics Load not holding Pressure too low Increase the pressure from the lift truck Pressure too low on pressure relief valve Increase pressure on the pressure relief valve Cylinders have internal leaks Replace sealing kits Clearance Carriage has too much clearance Slider is worn Replace sliders Carriage tilts at outer limit Slider is worn Replace sliders Carr...

Страница 24: ...on defective Replace piston rod Oil leakage Leaking Screw fitting is leaking Tighten seal screw fitting Sealing kit defective Replace sealing kit Piston rod scored Replace piston rod and sealing kit Solenoid valve Not functioning Solenoid coil defective Replace solenoid coil No power to the magnet Inspect power cable and connections Legend FFZ lift truck DBV Pressure relief valve WE Drossel elbow ...

Страница 25: ...l hydraulic connectors must be sealed against contamination and damage Store the attachment in a clean dry environment 11 Spare parts list not part of the Operating Manual 12 EC Declaration of Conformity Summary KAUP GMBH Co KG Braunstraße 17 D 63741 Aschaffenburg we hereby declare that the machinery Model Clamp Fork Positioner Type T 401B BA T T11B BA T 401BZ BZA T 411 BZ BZA conforms to the late...

Отзывы: