w
w
w
.
k
a
u
b
e
r
.
e
u
-4-
SCREEN ASSEMBLY
1.
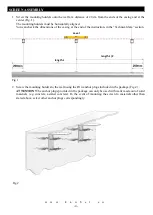
Screw the mounting holders onto the wall at a distance of 20 cm from the ends of the casing and at the
center (Fig. 1).
The mounting holders must be horizontally aligned.
You can check the dimensions of the casing at the end of the instruction, in the “Technical data” section.
Fig.1
2.
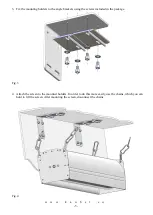
Screw the mounting holders to the wall using the Ø14 anchor plugs included in the package (Fig.2)
ATTENTION!
The anchor plugs provided in the package can only be used with walls made out of solid
materials (e.g. concrete, aerated concrete). In the event of mounting the screen to materials other than
stated above, select other anchor plugs correspondingly.
Fig.2
Level
length L
length L/2
Содержание MIDI
Страница 1: ...w w w k a u b e r e u 1 PROJECTION SCREEN ASSEMBLY INSTRUCTIONS MIDI ...
Страница 2: ...w w w k a u b e r e u 2 ...
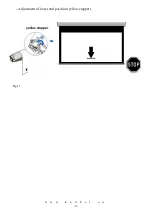
Страница 9: ...w w w k a u b e r e u 9 Adjustment of lower end position yellow stopper Fig 11 yellow stopper ...
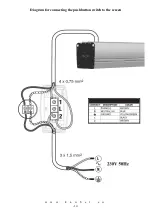
Страница 12: ...w w w k a u b e r e u 12 Diagram for connecting the pushbutton switch to the screen ...
Страница 14: ...w w w k a u b e r e u 14 ...
Страница 15: ...w w w k a u b e r e u 15 ...


