background image

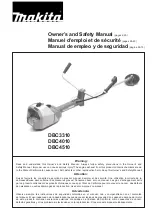
Crease Matic 150 mechanical adjustment and maintenance: 

Knife Driver 

1) Knife Depth 
Adjustment Blocks 

2) Screws for Adjustment 
of RHS Lay 

3) Bolts for Adjustment 
of LHS Lay

RHS Lay 

LHS Lay 

Crease Block 

LHS Lay Support Bar 

Turn the Power off. 

1) Knife depth adjustment: Using a 13mm spanner loosen the lock nuts on both adjusters. 
With the crease block set with the narrow tool up, turn the knife driver to bottom dead centre, driving 
the knife down. Set the adjustment blocks so that the creasing block has very little room to move, 
i.e. It does not rattle when moved but can be slid back out of the machine. Re-tighten the two lock nuts. 

Do not

 adjust these two blocks so that the knife driver can no longer be rotated freely. After setting, 

rotate the knife driver by hand and ensure there is no ‘sticking’ point as the knife driver goes through 
the bottom of its arc. 

2) Right hand side lay adjustment: Using a flat head screwdriver, loosen the two countersunk screws 
in the side lay. The angle of the lay to the crease knife may now be adjusted. Re-tighten the two screws. 

3) Left hand side lay adjustment: Using a 10mm spanner loosen the two bolts in the vertical panel 
beneath the right hand side lay. The left hand side lay support bar may now be move towards or away 
from the feed table to adjust the angle of the left hand side lay to the knife. Re-tighten the two bolts. 

4) Periodically check to ensure that the two areas of the knife driver that contact with the knife 
adjustment blocks are lubricated. 

5) Periodically clean the feed rolls to ensure an accurate crease position. A dry cloth should only be used. 

http://www.monomachines.com


http://www.monomachines.com

Содержание crease matic 150

Страница 1: ...KAS http www monomachines com http www monomachines com ...

Страница 2: ...es A5 to SRA3 and 6 page A4 There is a memory function which holds up to 5 jobs and a resetable sheet counter The creasing rule and matrix system prevents ink or toner cracking when folding digitally printed card A slide out reversible creasing matrix allows card up to 350gsm to be creased The Crease Matic 150 is quiet in operation and the drive motor shuts down if not used for a period of time Th...

Страница 3: ... job first press to enter the setup mode then press to choose the program number it will be saved as then press the key Any existing settings in this job will be lost The feed motor will run Feed a sheet into the creaser its leading edge will be fed to the crease head and then the feed motor will stop By pressing the and keys the sheet may be fed to the position of the first crease The position of...

Страница 4: ... to be made to the existing program Creases may not be added or deleted in this mode Feed a sheet into the creaser it will be fed to the first crease position and then the feed motor will stop By pressing the and keys the crease position may be adjusted The position of the potential crease is displayed in millimetres from the leading edge or last crease When the crease position is reached press th...

Страница 5: ...tting rotate the knife driver by hand and ensure there is no sticking point as the knife driver goes through the bottom of its arc 2 Right hand side lay adjustment Using a flat head screwdriver loosen the two countersunk screws in the side lay The angle of the lay to the crease knife may now be adjusted Re tighten the two screws 3 Left hand side lay adjustment Using a 10mm spanner loosen the two b...

Страница 6: ...l distance from edge 4 Press forward again until distance from is reached 99 00mm Press creaser button 1st crease is reached 198 00mm Press creaser button 5 Press forward again until sheet is out onto the 6 Press forward again until sheet is out onto collection tray the next sheet will now go in and the the collection tray the next sheet will now go in and the same creases will be repeated same cr...

Страница 7: ...ob Display job Setup Last D P on screen Exit to run Forward Crease and save setting Back slow Run mode Green LED Start Stop if motor running Reset counter Stop if motor running Edit job Stop if motor running Exit to setup Stop if motor running Edit Second D P on screen Exit to run Forward dead slow Crease Back dead slow D P Decimal point Distances in millimetres http www monomachines com http www ...

Страница 8: ...een Exit to run Forward Crease and save setting Back slow Run mode Green LED Start Stop if motor running Reset counter Stop if motor running Edit job Stop if motor running Exit to setup Stop if motor running Edit Second D P on screen Exit to run Forward dead slow Crease Back dead slow D P Decimal point Distances in millimetres http www monomachines com http www monomachines com ...

Страница 9: ... not adjust this screw Upper shaft Control wheel Control wheel Lower shaft Lower perforating wheel 1 8 3 17mm 1 4 6 35mm Position of Perforating wheels when in open position Position of perforating wheels when in closed position Perforator Set up http www monomachines com http www monomachines com ...

Страница 10: ...t flat Telescopic end piece Upper perforating wheel Collar Top shaft Control wheels Control wheels Lower perforating wheel Smoother guides Rule Bottom shaft Perforator unit http www monomachines com http www monomachines com ...

Отзывы: