


457462_a
53
GB
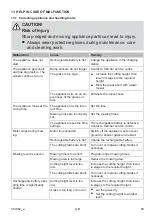
8.
or
Set entry point 1
if no
entry point has been specified during the
teaching-in movement. If no entry point has
been specified here, the entry points are au-
tomatically specified.
9.
or
Entry point x: XXm
if the
last entry point has been reached.
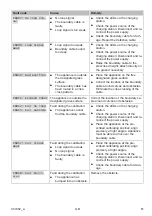
Manually specifying entry points (01)
The first entry point (01/X0) is preset and is 1 m
to right of the charging station. Up to 3 other en-
try points (X1 to X3) can be programmed behind
this point. When specifying the entry points, heed
the following:
■
Do not set entry points too far from the
charging station or too close to one anoth-
er (02/f).
■
Only use as many entry points as necessary.
1.
or
* Entry Point
2.
or
* Point X1 at [020m]
Select one digit in sequence with
or
and respectively accept with
.
3.
or
* Point X2 at [075m]
Select one digit in sequence with
or
and respectively accept with
.
4. If necessary, specify further entry points.
5. Return to the main menu with
.
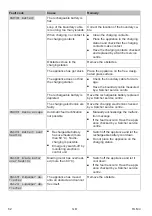
7.5.3
Setting the mowing times
NOTE
There must be at least 30 min. between
programming the mowing times and the
mowing start. If not, the appliance only
starts at the next programmed mowing
time.
In the
Weekly Program
menu item, the days of
the week and time periods when the appliance
should mow are set. Adapt these settings to the
size of your garden if necessary. If unmown ar-
eas are still visible after approx. one week, in-
crease the mowing periods.
1.
or
* Weekly Program
■
or
* All Days [X]
: The appli-
ance mows every day at the set times. If
All Days [ ]
is shown, the appliance
only mows on the set days of the week.
■
or
* Monday [X]
...
* Sunday
[X]
: The appliance mows for the set
time periods on the set day of the week.
If
Monday [ ]
is shown, for example,
the appliance does not mow on the re-
spective day.
■
or
Change
: Activate
[X]
or
deactivate
[ ]
the respective day and
set the time periods, type of mowing and
the entry points.
2.
Make the settings for every day or the re-
spective day:
■
e.g.
*[M] 07:00-10:00 [?]
: Normal
mowing
[M]
from 7 am – 10 am with au-
tomatically changing entry point 0 – 3
[?]
.
■
e.g.
*[R] 16:00-18:00 [1]
: The ap-
pliance starts with edge mowing
[R]
at 4
pm and moves along the entire boundary
cable. The area mowing then begins at
entry point 1
[1]
. At 6 pm or as soon as
the rechargeable battery is discharged,
the appliance moves back to the
charging station.
■
or
Change
: Change the se-
lected setting.
■
or
Continue
: Confirm the
changes setting and continue to the next
setting.
3.
or
Save
: Save all changed set-
tings of the menu item.
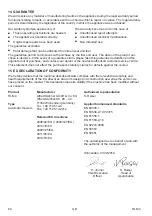
7.6
Edge mowing with a manual start
For a manual start, the setting can be made here
that the appliance begins with edge mowing.
Carrying out the edge mowing at the pro-
grammed mowing time periods: see
chapter 7.5.3
"Setting the mowing times", page 53
.
1.
or
* Margin mowing
2.
or
* at manual start
Содержание RLM 4
Страница 427: ...457462_a 427 RU 1 1 1...
Страница 432: ...432 RLM 4 RU 2 7 5 3 3 1 2 7 4 6 5 8 1 2 3 4 5 6 7 8 8 2 8 100 45 C K rcher K rcher 3 30 11 2 449 K rcher...
Страница 433: ...457462_a 433 RU 2 9 0 3 3 1 CE 500 2 45 24 45 24 0 45 C 0 55 C 3 2...
Страница 434: ...434 RLM 4 RU 3 3 3 3 1 PIN PUK PIN PIN PIN 3 PUK 24 PIN PUK PIN PUK 3 3 2...
Страница 435: ...457462_a 435 RU 24 45 EGMF 3 4 3 4 1 16 3 4 2...
Страница 436: ...436 RLM 4 RU 3 4 3 3 4 4...
Страница 437: ...457462_a 437 RU 3 4 5 4 4 1 1 2 K rcher 3 2 1 428 4 2 01 01 1 01 01 h n 01 01 HF 01 NF 01 X0 01 X3 4 3 1 2...
Страница 447: ...457462_a 447 RU 9 1 1 ON OFF 2 3 4 9 3 448 1 2 9 2 1 2 K rcher K rcher 1 2 K rcher 1 1 2 K rcher...
Страница 448: ...448 RLM 4 RU 9 3 K rcher 1 ON OFF 2 3 4 5 180 6 180 K rcher 10 1 START STOP 2 ON OFF 3...
Страница 449: ...457462_a 449 RU 11 11 1 30 1 5 1 08 441 2 9 1 447 3 11 2 1 2 3 4 1 2 3 4 08 4 5 11 3 1 12...
Страница 450: ...450 RLM 4 RU 2012 19 EC Hg Cd Pb Hg 0 0005 Cd 0 002 Pb 0 004 2006 66 EC 1 2 3 1 1 2 2 3 3 4...
Страница 451: ...457462_a 451 RU 13 13 1 K rcher K rcher...
Страница 452: ...452 RLM 4 RU K rcher K rcher K rcher K rcher 13 2 CN001 Tilt sensor CN002 Lift sensor...
Страница 459: ...457462_a 459 UA 1 1 1...
Страница 464: ...464 RLM 4 UA 2 7 5 3 3 1 2 7 4 6 5 8 1 2 3 4 5 6 7 8 8 2 8 100 45 C K rcher K rcher 3 30 p 11 2 480 K rcher 2 9...
Страница 465: ...457462_a 465 UA 0 3 3 1 CE 500 2 45 24 45 24 0 45 C 0 55 C 3 2 3 3 3 3 1 PIN PUK PIN PIN PIN 3 PUK...
Страница 466: ...466 RLM 4 UA 24 PIN PUK PIN PUK 3 3 2 24 45 EGMF...
Страница 467: ...457462_a 467 UA 3 4 3 4 1 16 3 4 2 3 4 3 3 4 4...
Страница 468: ...468 RLM 4 UA 3 4 5 4 4 1 1 2 K rcher 3 p 2 1 460 4 2 01 01 1 01 01 h n 01 01 HF 01 NF...
Страница 478: ...478 RLM 4 UA 9 1 1 ON OFF 2 3 4 p 9 3 479 1 2 9 2 1 2 K rcher K rcher 1 2 K rcher 1 1 2 K rcher...
Страница 480: ...480 RLM 4 UA 11 2 1 2 3 4 1 2 3 4 08 4 5 11 3 1 12 ElektroG 2012 19 C...
Страница 481: ...457462_a 481 UA BattG Hg Cd Pb Hg 0 0005 Cd 0 002 Pb 0 004 2006 66 C 1 2 3 1 1 2 2 3 3 4...
Страница 482: ...482 RLM 4 UA 13 13 1 K rcher K rcher...
Страница 483: ...457462_a 483 UA K rcher K rcher K rcher K rcher 13 2 CN001 Tilt sensor CN002 Lift sensor CN005 Bumper deflected...
Страница 488: ...https www kaercher com dealersearch...


